General
General remarks
The examples illustrated in this document (particularly cabling variants and circuit diagrams) are suggestions only. These examples have been carefully developed and tested, and may therefore be used as the basis for an installation. Anyone following or using these examples does so at their own risk.
NOTE!
You must observe and apply any relevant national laws, standards and provisions, as well as any specifications from the respective grid operator.
We strongly recommend discussing the specific examples implemented and the specific installation with the grid operator and obtaining their express approval. This obligation applies in particular to those parties responsible for constructing the system (e.g. the installer).
The examples suggested here show the emergency power supply with and without an external protection device. Please consult the respective grid operator to ascertain whether an external protection device is mandatory or not.
NOTE!
Read the Installation Instructions and Operating Instructions carefully before use.
Contact your salesperson immediately if anything is unclear.
WARNING!
Any incorrect installation, commissioning, operation or usage can cause serious injury and/or material damage.
The system may only be installed and commissioned by specially trained personnel in accordance with the technical regulations.
Cabling variants including emergency power circuits and 3-pin separation e.g. Austria or Australia
Circuit diagram
The circuit diagram for the cabling variant „Appendix: 3-pin separation Austria with Solar Battery“ can be found in the appendix to this document on page (→).
The circuit diagram for the cabling variant „Appendix: 3-pin separation Australia with Solar Battery“ can be found in the appendix to this document on page (→).
The circuit diagram for the cabling variant „Appendix: 3-pin separation Austria with BYD“ can be found in the appendix to this document on page
</fct:ExternalLink>
</ExternalLink>
The circuit diagram for the cabling variant „Appendix: 3-pin separation Australia with BYD“ can be found in the appendix to this document on page
</fct:ExternalLink>
</ExternalLink>
Functions
- Measuring and transferring the required parameters for energy management and Solar.web by the Fronius Smart Meter
- Disconnecting from the public grid to enable operation in emergency power mode if the grid parameters are outside the country-specific standards.
- Reconnecting to the public grid when the grid parameters are within the limits specified by the country-specific standards.
- Option of having a separate emergency power circuit or several emergency power circuits that are supplied even during failure of the public grid. The total load of the emergency power circuits must not exceed the nominal output of the inverter. Furthermore, the performance of the attached battery must also be considered. The other circuits are not supplied in the event of a power failure.
Cabling for emergency power circuit and non-emergency power circuits
The use of contactor K2 is optional in Australia.
If not all the consumers in the home need to be supplied in an emergency power situation, the circuits need to be divided into emergency power circuits and non-emergency power circuits.
The total load of the emergency power circuits must not exceed the nominal output of the inverter.
The emergency power circuits and non-emergency power circuits must be fused separately according to the required safety measures (residual-current circuit breaker, automatic circuit breaker, etc.).
In emergency power mode, only the emergency power circuits are disconnected from the grid by contactors K1 and K2 3-pin. The rest of the home network is not supplied with power in this case
- The main contacts of contactors K1 and K2 must be installed between the Fronius Smart Meter and the residual-current circuit breaker of the inverter or the residual-current circuit breaker of the emergency power circuits.
- The supply voltage for contactors K1 and K2 is provided by the public grid and must be connected to phase 1 (L1) after the Fronius Smart Meter and fused accordingly.
- An NC contact for relay K3 interrupts the supply voltage to contactors K1 and K2. This prevents the emergency power network of the inverter from being switched to the public grid.
- The NO contact of relay K3 gives feedback to the inverter on whether the locking was successfully performed by relay K3.
- Additional inverters or other AC sources can be installed in the emergency power circuit after the main contacts of K1 and K2. The sources are not synchronised to the network of the Fronius Symo Hybrid because this emergency power network has a frequency of 53 Hz.
Transition from feeding energy into the grid to emergency power mode
- The public grid is monitored by the inverter's internal grid and system protection unit and by the Fronius Smart Meter connected to it.
- Failure of the public grid
- The inverter carries out the necessary measures according to the country standard and then switches off.
Contactors K1 and K2 drop out. This disconnects the emergency power circuits and the inverter from the rest of the home network and from the public grid, as the main contacts of the contactors K1 and K2 3-pin open.The NC auxiliary contacts of contactors K1 and K2 send feedback to the inverter that the contactors are open (a condition for starting the emergency power mode). - The inverter activates relay K3, which interrupts the supply to contactors K1 and K2. This prevents unintentional activation of contactors K1 and K2 and thus a grid connection when voltage is restored in the grid.
- The NO contact of relay K3 gives optional feedback to the inverter on whether the locking was successfully performed by relay K3.
- Based on the feedback from the contactors and the measurements at the inverter terminals and at the Smart Meter, the inverter decides that emergency power mode can be started.
- The inverter starts emergency power mode after a defined checking period
- All loads in the emergency power circuits are supplied with power. The remaining loads are not supplied with power and are safely isolated.
Transition from emergency power mode to feeding energy into the grid
- The inverter is operating in emergency power mode. The contactors K1 and K2 to the public grid are open.
- Public grid available again
- The Fronius Smart Meter monitors the grid parameters on the public grid and passes this information to the inverter.
- After a defined measuring period, the restored public grid is deemed to be stable.
- The inverter ends emergency power mode and disconnects the outputs.
- The inverter deactivates K3. The contactors K1 and K2 are reactivated.
- All circuits are reconnected to the public grid and are supplied by the grid. The inverter, therefore, does not feed anything into the grid.
- The inverter can start feeding energy into the grid again after performing the grid checks required by the country standard.
Cabling variants including emergency power circuits with grid and system protection and 3-pin separation e.g. Austria
Circuit diagram
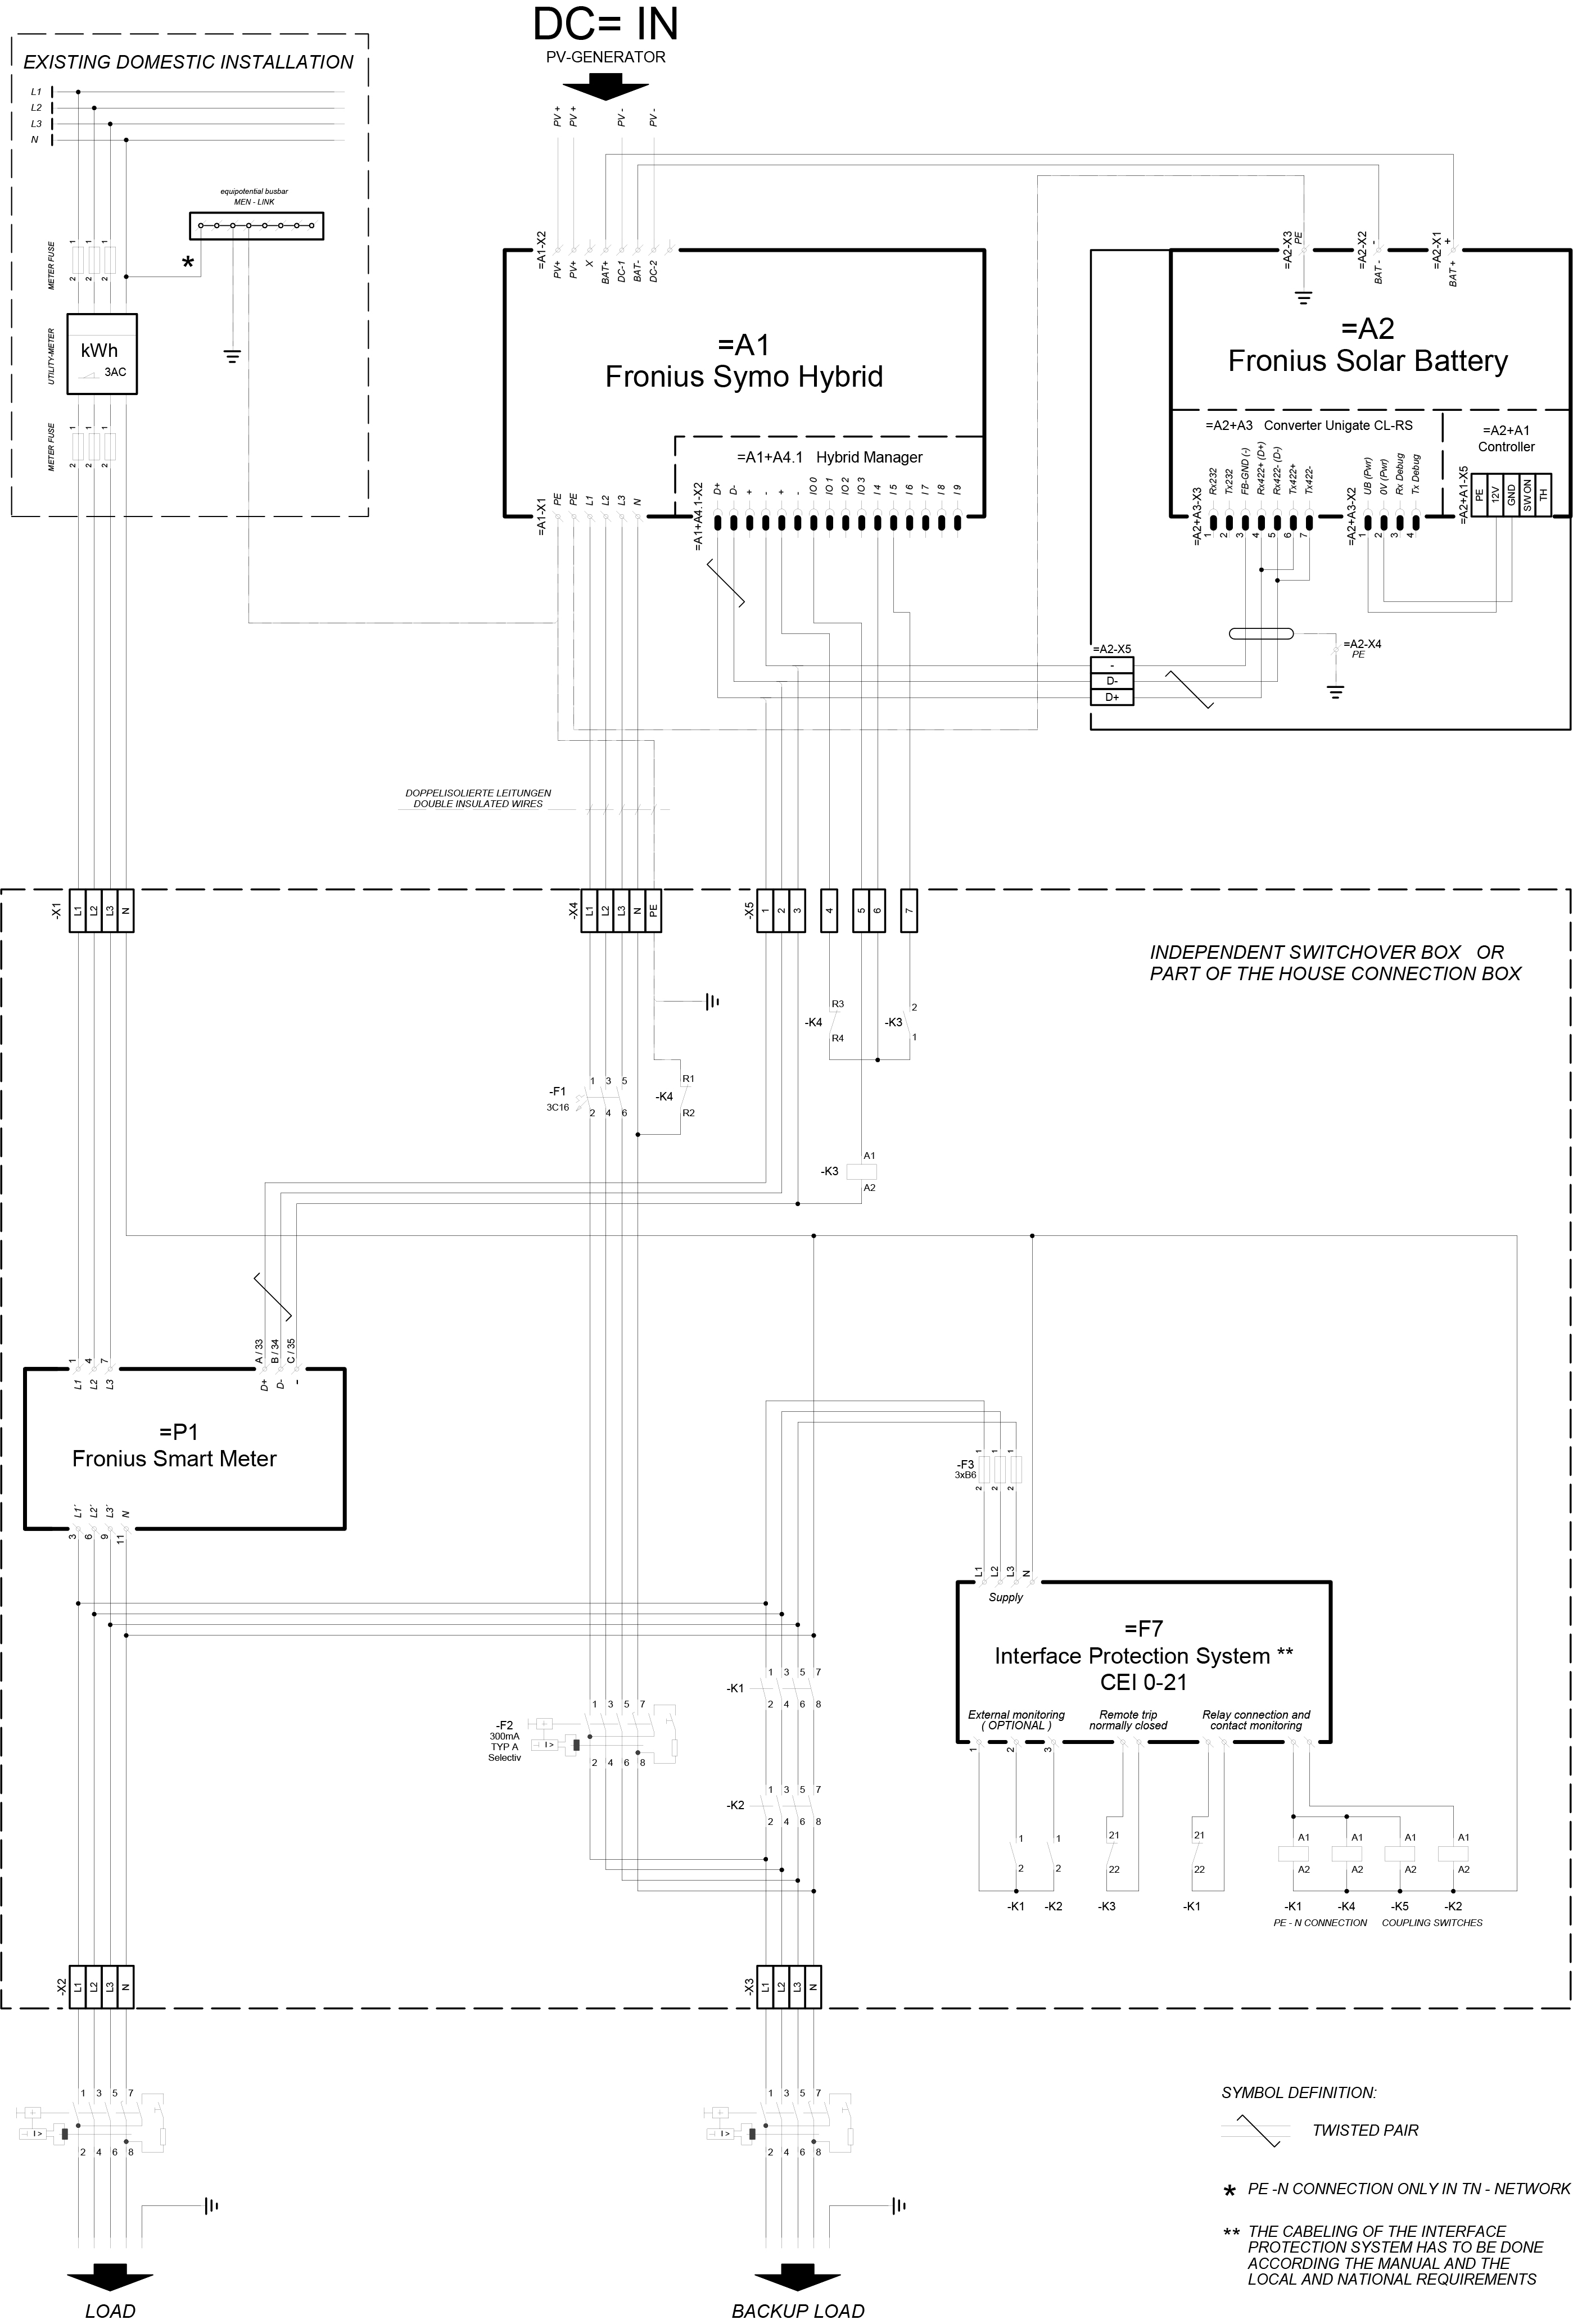
The circuit diagram "Appendix: 3-pin separation with grid and system protection Austria with Solar Battery" can be found in the appendix to this document on page (→).
Circuit diagram
The circuit diagram "Appendix: 3-pin separation with grid and system protection Austria with Solar Battery" can be found in the appendix to this document on page (→).
Functions
- Measuring and transferring the required parameters for energy management and Solar.web by the Fronius Smart Meter.
- Monitoring of the voltage and frequency grid parameters by the grid and system protection unit.
- Disconnecting from the public grid to enable operation in emergency power mode if the grid parameters are outside the country-specific standards.
- Reconnecting to the public grid when the grid parameters are within the limits specified by the country-specific standards.
- Option of having a separate emergency power circuit or several emergency power circuits that are supplied even during failure of the public grid. The total load of the emergency power circuits must not exceed the nominal output of the inverter. Furthermore, the performance of the attached battery must also be considered. The other circuits are not supplied in the event of a power failure.
Cabling for emergency power circuits and non-emergency power circuits
If not all the consumers in the home need to be supplied in an emergency power situation, the circuits need to be divided into emergency power circuits and non-emergency power circuits.
The total load of the emergency power circuits must not exceed the nominal output of the inverter.
The emergency power circuits and non-emergency power circuits must be fused separately according to the required safety measures (residual-current circuit breaker, automatic circuit breaker, etc.).
In emergency power mode, only the emergency power circuits are disconnected from the grid by contactors K1 and K2 3-pin (L1, L2 and L3). The rest of the home network is not supplied with power in this case.
- The main contacts of contactors K1 and K2 must be installed between the Fronius Smart Meter and the residual-current circuit breaker of the inverter or the residual-current circuit breaker of the emergency power circuits.
- The supply voltage for contactors K1 and K2 is provided by the public grid and must be connected to phase 1 (L1) after the Fronius Smart Meter and fused accordingly.
- Actuation of contactors K1 and K2 is carried out by the external grid and system protection unit.
- The external grid and system protection unit must be installed after the Fronius Smart Meter. Precise installation and cabling notes for the external grid and system protection unit can be found in its separate Operating Instructions.
- The remote trip input of the external grid and system protection unit must be set to NC according to the manufacturer's Operating Instructions.
- An NC contact for relay K3, which activates the remote input of the external grid and system protection unit, interrupts the supply voltage to contactors K1 and K2. This prevents the emergency power network of the inverter from being switched to the public grid.
- The NO contact of relay K3 gives feedback to the inverter on whether the locking was successfully performed by relay K3.
- Additional inverters or other AC sources can be installed in the emergency power circuit after the main contacts of K1 and K2. The sources are not synchronised to the network of the Fronius Symo Hybrid because this emergency power network has a frequency of 53 Hz.
Transition from feeding energy into the grid to emergency power mode
- The public grid is monitored by the inverter's internal grid and system protection unit and by an external grid and system protection unit.
- Failure of the public grid
- The inverter carries out the measures necessary according to the country standard and then switches off.
- The external grid and system protection unit opens contactors K1 and K2 for grid monitoring. This disconnects the emergency power circuits and the inverter from the rest of the home network and from the public grid, as the main contacts of the contactors K1 and K2 3-pin open. To ensure that the public grid has definitely been disconnected, the NC auxiliary contacts of contactors K1 and K2 give feedback to the external grid and system protection unit.
- The NC main contact of contactor K4 gives feedback to the inverter that the grid was disconnected by the external ENS.
- The inverter activates relay K3, which activates the remote input of the external grid and system protection unit via an NC contact. This prevents a connection to the public grid when power returns.
- The NO contact of relay K3 gives optional feedback to the inverter on whether the locking was successfully performed by relay K3.
- The inverter decides based on the contactor's feedback as well as the measurement on the inverter terminals and the Smart Meter that the emergency power mode can be activated.
- The inverter starts emergency power mode after a defined checking period.
- All loads in the emergency power circuits are supplied with power. The remaining loads are not supplied with power and are safely isolated.
Transition from emergency power mode to feeding energy into the grid
- The inverter is operating in emergency power mode. The contactors K1 and K2 to the public grid are open.
- Public grid available again
- The Fronius Smart Meter monitors the grid parameters on the public grid and passes this information to the inverter.
- After a defined measuring period, the restored public grid is deemed to be stable.
- On the basis of adjustments that have been carried out, the inverter ends emergency power mode and disconnects the outputs.
- The inverter deactivates K3. The external grid and system protection unit switches the contactors K1 and K2 after performing the grid checks required by the applicable standards.
- All circuits are reconnected to the public grid and are supplied by the grid.
- The inverter can start feeding energy into the grid again after performing the grid checks required by the country standard.
Cabling variants including emergency power circuits and 4-pin separation e.g. Germany
Circuit diagram
The circuit diagram for the cabling variant "Appendix: 4-pin separation Germany with Solar Battery" can be found in the appendix to this document on page (→).
The circuit diagram for the cabling variant "Appendix: 4-pin separation Germany with BYD" can be found in the appendix to this document on page (→).
Functions
- Measuring and transferring the required parameters for energy management and Solar.web by the Fronius Smart Meter.
- Disconnecting from the public grid to enable operation in emergency power mode if the grid parameters are outside the country-specific standards.
- Reconnecting to the public grid when the grid parameters are within the limits specified by the country-specific standards.
- Establishing a proper ground connection for emergency power mode to ensure the protection devices function correctly.
- Option of having a separate emergency power circuit or several emergency power circuits that are supplied even during failure of the public grid. The total load of the emergency power circuits must not exceed the nominal output of the inverter. Furthermore, the performance of the attached battery must also be considered. The other circuits are not supplied in the event of a power failure.
Cabling for emergency power circuits and non-emergency power circuits
If not all the consumers in the home need to be supplied in an emergency power situation, the circuits need to be divided into emergency power circuits and non-emergency power circuits.
The total load of the emergency power circuits must not exceed the nominal output of the inverter.
The emergency power circuits and non-emergency power circuits must be fused separately according to the required safety measures (residual-current circuit breaker, automatic circuit breaker, etc.).
In emergency power mode, only the emergency power circuits are disconnected at all pins from the grid by contactors K1 and K2; a ground connection is only established for these circuits. The rest of the home network is not supplied with power in this case.
- The main contacts of contactors K1 and K2 must be installed between the Fronius Smart Meter and the residual-current circuit breaker of the inverter or the residual-current circuit breaker of the emergency power circuits.
- The supply voltage for contactors K1 and K2 is provided by the public grid and must be connected to phase 1 (L1) after the Fronius Smart Meter and fused accordingly.
- To ensure residual-current circuit breakers function in emergency power mode, the connection between the neutral conductor and the ground conductor must be established as close as possible to the inverter, but in any case before the first residual-current circuit breaker. An NC contact is used for this purpose for each of the main contacts of contactors K4 and K5. This ensures that the ground connection is established as soon as the public grid connection is no longer available.
- As with contactor K1, the supply voltage for contactors K4 and K5 is provided via phase 1 (L1) of the public grid.
- An NC contact for the relay K3 interrupts the supply voltage to contactors K1, K2, K4 and K5. This prevents the ground connection from being immediately disconnected again when power returns to the public grid and the emergency power network of the inverter from being switched to the public grid.
- The NO contact of relay K3 gives feedback to the inverter on whether the locking was successfully performed by relay K3.
- Additional inverters or other AC sources can be installed in the emergency power circuit after the main contacts of K1 and K2. The sources are not synchronised to the network of the Fronius Symo Hybrid because this emergency power network has a frequency of 53 Hz.
Transition from feeding energy into the grid to emergency power mode
- The public grid is monitored by the inverter's internal grid and system protection unit and by the Fronius Smart Meter connected to it.
- Failure of the public grid
- The inverter carries out the necessary measures according to the country standard and then switches off.
Contactors K1 and K2, as well as K4 and K5, drop out. This disconnects the emergency power circuits and the inverter from the rest of the home network and from the public grid, as the main contacts of the contactors K1 and K2 open at all pins. The NC auxiliary contacts of contactors K1 and K2 send feedback to the inverter that the contactors are open (a condition for starting the emergency power mode). - The NC main contacts of contactors K4 and K5 are closed, establishing a connection between the neutral conductor and the ground conductor. The two other NC main contacts of contactors K4 and K5 give feedback to the inverter that the ground connection has been established correctly (a condition for starting the emergency power mode).
- The inverter activates relay K3, which interrupts the supply to contactors K1, K2, K4 and K5. This prevents unintentional activation of contactors K1, K2, K4 and K5 and thus a grid connection when voltage is restored in the grid.
- The NO contact of relay K3 gives additional feedback to the inverter on whether the locking was successfully performed by relay K3.
- The inverter decides based on the contactors' feedback as well as the measurements on the inverter terminals and the Smart Meter that the emergency power mode can be activated.
- The inverter starts emergency power mode after a defined checking period
- All loads in the emergency power circuits are supplied with power. The remaining loads are not supplied with power and are safely isolated.
Transition from emergency power mode to feeding energy into the grid
- The inverter is operating in emergency power mode. The contactors K1 and K2 to the public grid are open.
- Public grid available again
- The Fronius Smart Meter monitors the grid parameters on the public grid and passes this information to the inverter.
- After a defined measuring period, the restored public grid is deemed to be stable.
- The inverter ends emergency power mode and disconnects the outputs.
- The inverter deactivates K3. The contactors K1, K2, K4 and K5 are reactivated.
- All circuits are reconnected to the public grid and are supplied by the grid. The inverter, therefore, does not feed anything into the grid.
- The inverter can start feeding energy into the grid again after performing the grid checks required by the country standard.
Cabling variants including emergency power circuits with grid and system production and 4-pin separation e.g. Germany
Circuit diagram
The circuit diagram "Appendix: 4-pin separation with grid and system protection Germany with Solar Battery" can be found in the appendix to this document on page (→).
Circuit diagram
The circuit diagram "Appendix: 4-pin separation with grid and system protection Germany with Solar Battery" can be found in the appendix to this document on page (→).
Functions
- Measuring and transferring the required parameters for energy management and Solar.web by the Fronius Smart Meter.
- Monitoring of the voltage and frequency grid parameters by the grid and system protection unit.
- Disconnecting from the public grid to enable operation in emergency power mode if the grid parameters are outside the country-specific standards.
- Reconnecting to the public grid when the grid parameters are within the limits specified by the country-specific standards.
- Establishing a proper ground connection for emergency power mode to ensure the protection devices function correctly.
- Option of having a separate emergency power circuit or several emergency power circuits that are supplied even during failure of the public grid. The total load of the emergency power circuits must not exceed the nominal output of the inverter. Furthermore, the performance of the attached battery must also be considered. The other circuits are not supplied in the event of a power failure.
Cabling for emergency power circuits and non-emergency power circuits
If not all the consumers in the home need to be supplied in an emergency power situation, the circuits need to be divided into emergency power circuits and non-emergency power circuits.
The total load of the emergency power circuits must not exceed the nominal output of the inverter.
The emergency power circuits and non-emergency power circuits must be fused separately according to the required safety measures (residual-current circuit breaker, automatic circuit breaker, etc.).
In emergency power mode, only the emergency power circuits are disconnected from the grid by contactors K1 and K2; a ground connection is only established for these circuits. The rest of the home network is not supplied with power in this case.
- The main contacts of contactors K1 and K2 must be installed between the Fronius Smart Meter and the residual-current circuit breaker of the inverter or the residual-current circuit breaker of the emergency power circuits.
- The supply voltage for contactors K1 and K2 is provided by the public grid and must be connected to phase 1 (L1) after the Fronius Smart Meter and fused accordingly.
- Actuation of contactors K1 and K2 is carried out by the external grid and system protection unit.
- The external grid and system protection unit must be installed after the Fronius Smart Meter. Precise installation and cabling notes for the external grid and system protection unit can be found in its separate Operating Instructions
- The remote trip input of the external grid and system protection unit must be set to NC according to the manufacturer's Operating Instructions.
- To ensure residual-current circuit breakers function in emergency power mode, the connection between the neutral conductor and the ground conductor must be established as close as possible to the inverter, but in any case before the first residual-current circuit breaker. An NC contact is used for this purpose for each of the main contacts of contactors K4 and K5. This ensures that the ground connection is established as soon as the public grid connection is no longer available.
- As with contactor K1, the supply voltage for contactors K4 and K5 is provided via phase 1 (L1) of the public grid and is switched via the grid and system protection.
- An NC contact for relay K3, which activates the remote input of the external grid and system protection unit, interrupts the supply voltage to contactors K1, K2, K4 and K5. This prevents the ground connection from being immediately disconnected again when power returns to the public grid and the emergency power network of the inverter from being switched to the public grid.
- The NO contact of relay K3 gives feedback to the inverter on whether the locking was successfully performed by relay K3.
- Additional inverters or other AC sources can be installed in the emergency power circuit after the main contacts of K1 and K2. The sources are not synchronised to the network of the Fronius Symo Hybrid because this emergency power network has a frequency of 53 Hz.
Transition from feeding energy into the grid to emergency power mode
- The public grid is monitored by the inverter's internal grid and system protection unit and by an external grid and system protection unit.
- Failure of the public grid
- The inverter carries out the measures necessary according to the country standard and then switches off.
- The external grid and system protection unit opens contactors K1 and K2 for grid monitoring. This disconnects the emergency power circuits and the inverter from the rest of the home network and from the public grid, as the main contacts of the contactors K1 and K2 open at all pins. To ensure that the public grid has definitely been disconnected, the NC auxiliary contacts of contactors K1 and K2 give feedback to the external grid and system protection unit.
- The NC main contacts of contactors K4 and K5 are closed, establishing a connection between the neutral conductor and the ground conductor. The two other NC main contacts of contactors K4 and K5 give feedback to the inverter that the ground connection has been established correctly (a condition for starting the emergency power mode).
- The inverter activates relay K3, which activates the remote input of the external ENS via an NC contact. This prevents a connection to the public grid when power returns.
- The NO contact of relay K3 gives optional feedback to the inverter on whether the locking was successfully performed by relay K3.
- The inverter decides based on the contactor's feedback as well as the measurements on the inverter terminals and the Smart Meter that the emergency power mode can be activated.
- The inverter starts emergency power mode after a defined checking period.
- All loads in the emergency power circuits are supplied with power. The remaining loads are not supplied with power and are safely isolated.
Transition from emergency power mode to feeding energy into the grid
- The inverter is operating in emergency power mode. The contactors K1 and K2 to the public grid are open.
- Public grid available again
- The Fronius Smart Meter monitors the grid parameters on the public grid and passes this information to the inverter.
- After a defined measuring period, the restored public grid is deemed to be stable.
- On the basis of adjustments that have been carried out, the inverter ends emergency power mode and disconnects the outputs.
- The inverter deactivates K3. The external grid and system protection unit switches the contactors K1, K2, K4 and K5 after performing the grid checks required by the applicable standards.
- All circuits are reconnected to the public grid and are supplied by the grid.
- The inverter can start feeding energy into the grid again after performing the grid checks required by the country standard.
Cabling variants including emergency power circuits with grid and system protection and 4-pin separation, e.g. Italy
Circuit diagram
The circuit diagram "Appendix: 4-pin seperation with grid and system protection Italy with Solar Battery" can be found in the appendix to this document on page (→).
Circuit diagram
The circuit diagram "Appendix: 4-pin seperation with grid and system protection Italy with Solar Battery" can be found in the appendix to this document on page (→).
Functions
- Measuring and transferring the required parameters for energy management and Solar.web by the Fronius Smart Meter.
- Monitoring of the voltage and frequency grid parameters by the grid and system protection unit.
- Disconnecting from the public grid to enable operation in emergency power mode if the grid parameters are outside the country-specific standards.
- Reconnecting to the public grid when the grid parameters are within the limits specified by the country-specific standards.
- Establishing a proper ground connection for emergency power mode to ensure the protection devices function correctly.
- Option of having a separate emergency power circuit or several emergency power circuits that are supplied even during failure of the public grid. The total load of the emergency power circuits must not exceed the nominal output of the inverter. Furthermore, the performance of the attached battery must also be considered. The other circuits are not supplied in the event of a power failure.
Cabling for emergency power circuits and non-emergency power circuits
If not all the consumers in the home need to be supplied in an emergency power situation, the circuits need to be divided into emergency power circuits and non-emergency power circuits.
The total load of the emergency power circuits must not exceed the nominal output of the inverter.
The emergency power circuits and non-emergency power circuits must be fused separately according to the required safety measures (residual-current circuit breaker, automatic circuit breaker, etc.).
In emergency power mode, only the emergency power circuits are disconnected at all pins from the grid by contactors K1 and K2; a ground connection is only established for these circuits. The rest of the home network is not supplied with power in this case.
- The main contacts of contactors K1 and K2 must be installed between the Fronius Smart Meter and the residual-current circuit breaker of the inverter or the residual-current circuit breaker of the emergency power circuits.
- The supply voltage for contactors K1 and K2 is provided by the public grid and must be connected to phase 1 (L1) after the Fronius Smart Meter and fused accordingly.
- Actuation of contactors K1 and K2 is carried out by the external grid and system protection unit.
- The external grid and system protection unit must be installed after the Fronius Smart Meter. Precise installation and cabling notes for the external grid and system protection unit can be found in its separate Operating Instructions
- The remote trip input of the external grid and system protection unit must be set to NC according to the manufacturer's Operating Instructions.
- To ensure residual-current circuit breakers function in emergency power mode, the connection between the neutral conductor and the ground conductor must be established as close as possible to the inverter, but in any case before the first residual-current circuit breaker. An NC contact is used for this purpose for each of the main contacts of contactor K4. This ensures that the ground connection is established as soon as the public grid connection is no longer available.
- As with contactor K1, the supply voltage for contactor K4 is provided via phase 1 (L1) of the public grid and is switched via the external grid and system protection unit.
- An NC contact for relay K3, which activates the remote input of the external grid and system protection unit, interrupts the supply voltage to contactors K1, K2 and K4. This prevents the ground connection from being immediately disconnected again when power returns to the public grid and the emergency power network of the inverter from being switched to the public grid.
- The NO contact of relay K3 gives additional feedback to the inverter on whether the locking was successfully performed by relay K3.
- Additional inverters or other AC sources can be installed in the emergency power circuit after the main contacts of K1 and K2. The sources are not synchronised to the network of the Fronius Symo Hybrid because this emergency power network has a frequency of 53 Hz.
Transition from feeding energy into the grid to emergency power mode
- The public grid is monitored by the inverter's internal grid and system protection unit and by an external grid and system protection unit.
- Failure of the public grid
- The inverter carries out the measures necessary according to the country standard and then switches off.
- The external grid and system protection unit opens contactors K1 and K2 for grid monitoring. This disconnects the emergency power circuits and the inverter from the rest of the home network and from the public grid, as the main contacts of the contactors K1 and K2 open at all pins. To ensure that the public grid has definitely been disconnected, the NC auxiliary contacts of contactor K1 give feedback to the external grid and system protection unit.
- The NC main contact of contractor K4 is closed and this establishes a connection between the neutral conductor and ground conductor. The other NC main contact of contactor K4 gives feedback to the inverter that the ground connection has been established correctly.
- The inverter activates relay K3, which activates the remote input of the external grid and system protection unit via an NC contact. This prevents a connection to the public grid when voltage is restored in the grid.
- The NO contact of relay K3 gives additional feedback to the inverter on whether the locking was successfully performed by relay K3.
- The inverter decides based on the contactors' feedback as well as the measurement on the inverter terminals and the Smart Meter that the emergency power mode can be activated.
- The inverter starts emergency power mode after a defined checking period
- All loads in the emergency power circuits are supplied with power. The remaining loads are not supplied with power and are safely isolated.
Transition from emergency power mode to feeding energy into the grid
- The inverter is operating in emergency power mode. The contactors K1 and K2 to the public grid are open.
- Public grid available again
- The Fronius Smart Meter monitors the grid parameters on the public grid and passes this information to the inverter.
- After a defined measuring period, the restored public grid is deemed to be stable.
- On the basis of adjustments that have been carried out, the inverter ends emergency power mode and disconnects the outputs.
- The inverter deactivates K3. The external grid and system protection unit switches the contactors K1, K2, K4 and K5 after performing the grid checks required by the applicable standards.
- All circuits are reconnected to the public grid and are supplied by the grid.
- The inverter can start feeding energy into the grid again after performing the grid checks required by the country standard.
Description of components
Beschreibung der Komponenten für den Vollausbau
- Type: Fronius Smart Meter 63 A
- Fronius Artikelnummer: 43,0001,1473
- 230 (400) V - 240 (415) V
- 10 (63) A / 50 Hz - 60 Hz
- Modbus RTU Communication
oder
- Type: Fronius Smart Meter 50kA-3
- Fronius Artikelnummer: 43,0001,1478
- 230 (400) V - 240 (415) V
- 10 (63) A / 50 Hz - 60 Hz
- Modbus RTU Communication
Andere Hersteller und Typen sind zulässig, wenn diese technisch und funktional ident sind mit dem folgenden Typ, z.B.:
- Hersteller: Bendner
- Type: VMD460-NA-D-2
- 3-polig oder 1-polig
- 6 A
- 3-polig oder 4-polig (je nach Verkabelungsvariante)
- 25 A oder 63 A (je nach Hausanschluss)
- Spulenspannung 230 V AC
- Nennfrequenz 50/60 Hz
- Nennstrom Hilfskontakt min. 1 A
- Kurzschlusstrom = min. 3 kA (Arbeitskontakte)
- Hilfskontakt
- 1 Öffner
- Schaltspannung 12 - 230 V @ 50/60 Hz
- Kurschlussstrom min. 1 kA
- 2 Wechsler
- Spulenspannung: 12 V DC
- 2 Öffner 20 A
- Spulenspannung 230 V AC (2P)
- Nennfrequenz 50/60 Hz
- Kurzschlusstrom = min. 3 kA (Arbeitskontakte)
Die Schütze K1, K2, K4 und K5 müssen eine Zertifizierung nach IEC 60947-4-1 aufweisen. Beispiele für Schütze / Relais, welche diese Anforderungen erfüllen sind, z.B.:
- K1 und K2:
- Iskra IK63-40 Stand 2018
- Schrack BZ326461 Stand 2018
- K4 und K5:
- Iskra IK20-02 Stand 2018
- Schrack BZ626439 Stand 2018
- K3:
- Finder 22.23.9.012.4000
- Schrack Relais RT424012 (Haltebügel RT17017, Relaissockel RT78725)
Emergency power configuration
Requirements
- Correct wiring of the emergency power system in the electrical installation (according to this document) - Check wiring
- Attach the emergency power sticker supplied with the inverter to the electrical distributor.
- The meter (Fronius Smart Meter) must be installed at the feed-in point and configured
- Current system monitoring firmware on the inverter: V 1.3.2-3 or higher.
Update the firmware if necessary.
Emergency power configuration - overview
- Accessing the CONFIG menu
- Selecting alternative (emergency power) setup
- Configuring the digital I/Os on the Fronius Datamanager
- Configuring the system overview on the Fronius Datamanager
- Configuring the energy management on the Fronius Datamanager (option)
Accessing the CONFIG menu
 | 1.Press the "Menu" key | |
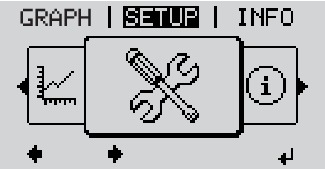 |
| The menu level appears. 1.Press the unassigned "Menu / Esc" key 5 times  |
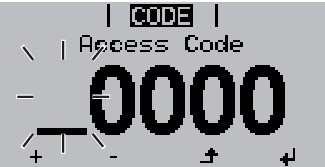 | 'Access Code' is displayed in the 'CODE' menu; the first digit starts flashing. | |
 | 1.Enter the access code for the CONFIG menu: Use the 'Up' and 'Down' keys to select a value for the first digit of the code | |
 | 1.Press the 'Enter' key |
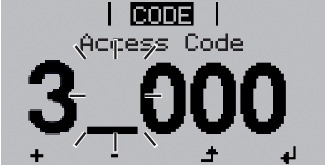 | The second digit flashes. | |
1.Repeat steps 3 and 4 for the second, third, fourth and fifth digits of the access code until... | ||
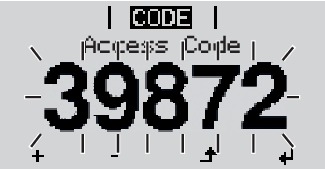 | the selected code starts flashing. | |
 | 1.Press the 'Enter' key | |
The first parameter of the CONFIG menu is displayed |
Selecting alternative (emergency power) setup
- EmergencyPower 50Hz: for all countries with a nominal frequency of 50 Hz
- EmergencyPower 60Hz: for all countries with a nominal frequency of 60 Hz
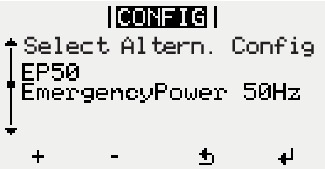 |  | 1.Use the 'Up' and 'Down' keys to select the Alternative (emergency power) setup |
 | 1.Press the 'Enter' key |
Configuring the digital I/Os on the Fronius Datamanager
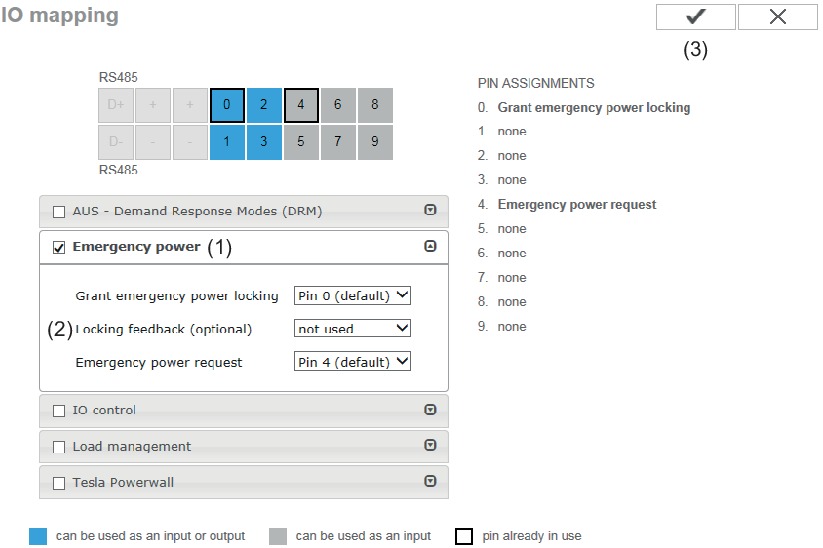
The default values for the pins correspond to the settings used in the document entitled "Fronius Energy Package - Examples of emergency power switchover".
Configuring the system overview on the Fronius Datamanager
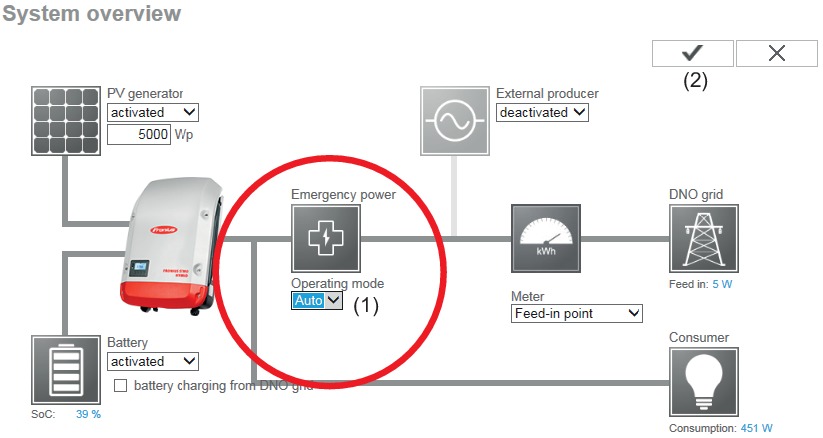
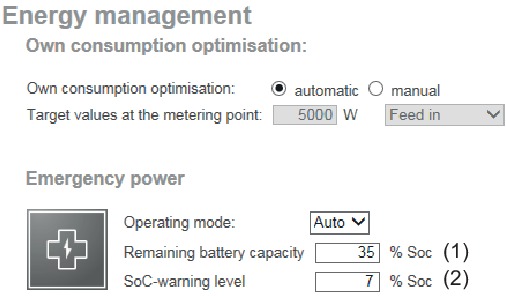
Configuring the energy management on the Fronius Datamanager (option)
Checklist
Checkliste Notstrom
Nach erfolgter Installation, Konfiguration und Inbetriebnahme muss diese Checklistedurchgegangen und somit die korrekte Funktion der Notstromumschaltung und des Notstrombetrieb bestätigt werden.
Tätigkeit / Prüfung | Auswirkung | Bestätigung |
|---|---|---|
Der Wechselrichter, die Batterie und alle anderen benötigten Komponenten wurden korrekt installiert und montiert? |
|
|
Die Notstrom-Umschaltung wurde wie in diesem Dokument beschrieben und unter Einhaltung der länderspezifischen Installationsrichtlinien installiert und in Betrieb genommen? |
|
|
Die Einstellungen in der Software wurden laut Kapitel „Emergency power configuration“ auf Seite „(→)“ durchgeführt? |
|
|
|
|
|
Folgende Tests wurden durchgeführt: |
|
|
Wechselrichter im Netzeinspeisebetrieb hochfahren lassen. | Verifizieren ob der Wechselrichter im Netzeinspeisebetrieb startet und ein Leistungsverschub stattfindet. (Testdauer 1 Minute) |
|
Die Anlage vom öffentlichen Netz trennen. Dies kann mittels einer im vorgelagerten AC-Pfad befindlichen Trenneinrichtung oder den Trenneinrichtungen (z.B.: NH-Sicherung) des Hausanschlusses erfolgen. Die Trennung muss vor dem Smart Meter (netzseitig) erfolgen. | Verifizieren ob der Wechselrichter im Inselbetrieb hochfährt. Die Umschaltung kann über eine Minute dauern. |
|
Spannung / Frequenz in der erzeugten Insel messen | Sollwert: 230 V / ± 10 % / 53 Hz |
|
Die Anlage wieder mit dem öffentlichen Netz verbinden | Die Zeit bis zum Ende des Inselbetriebs und darauffolgenden Zuschalten der Schütze in der Notstromumschaltung muss mindestens 10 Sekunden dauern. Die Umschaltung kann über eine Minute dauern Erst im Anschluss daran darf der Wechselrichter wieder den Netzeinspeisebetrieb starten. Dies muss über das Display des Wechselrichters verifiziert werden (Testdauer 1 Minute) |
|
Hiermit wird die korrekte Funktionsweise der Notstrom-Umschaltung und des Notstrombetriebs bestätigt. | ||
| ||
Ort, Datum | Unterschrift | |
Appendix
Appendix: 3-pin separation Austria with Solar Battery
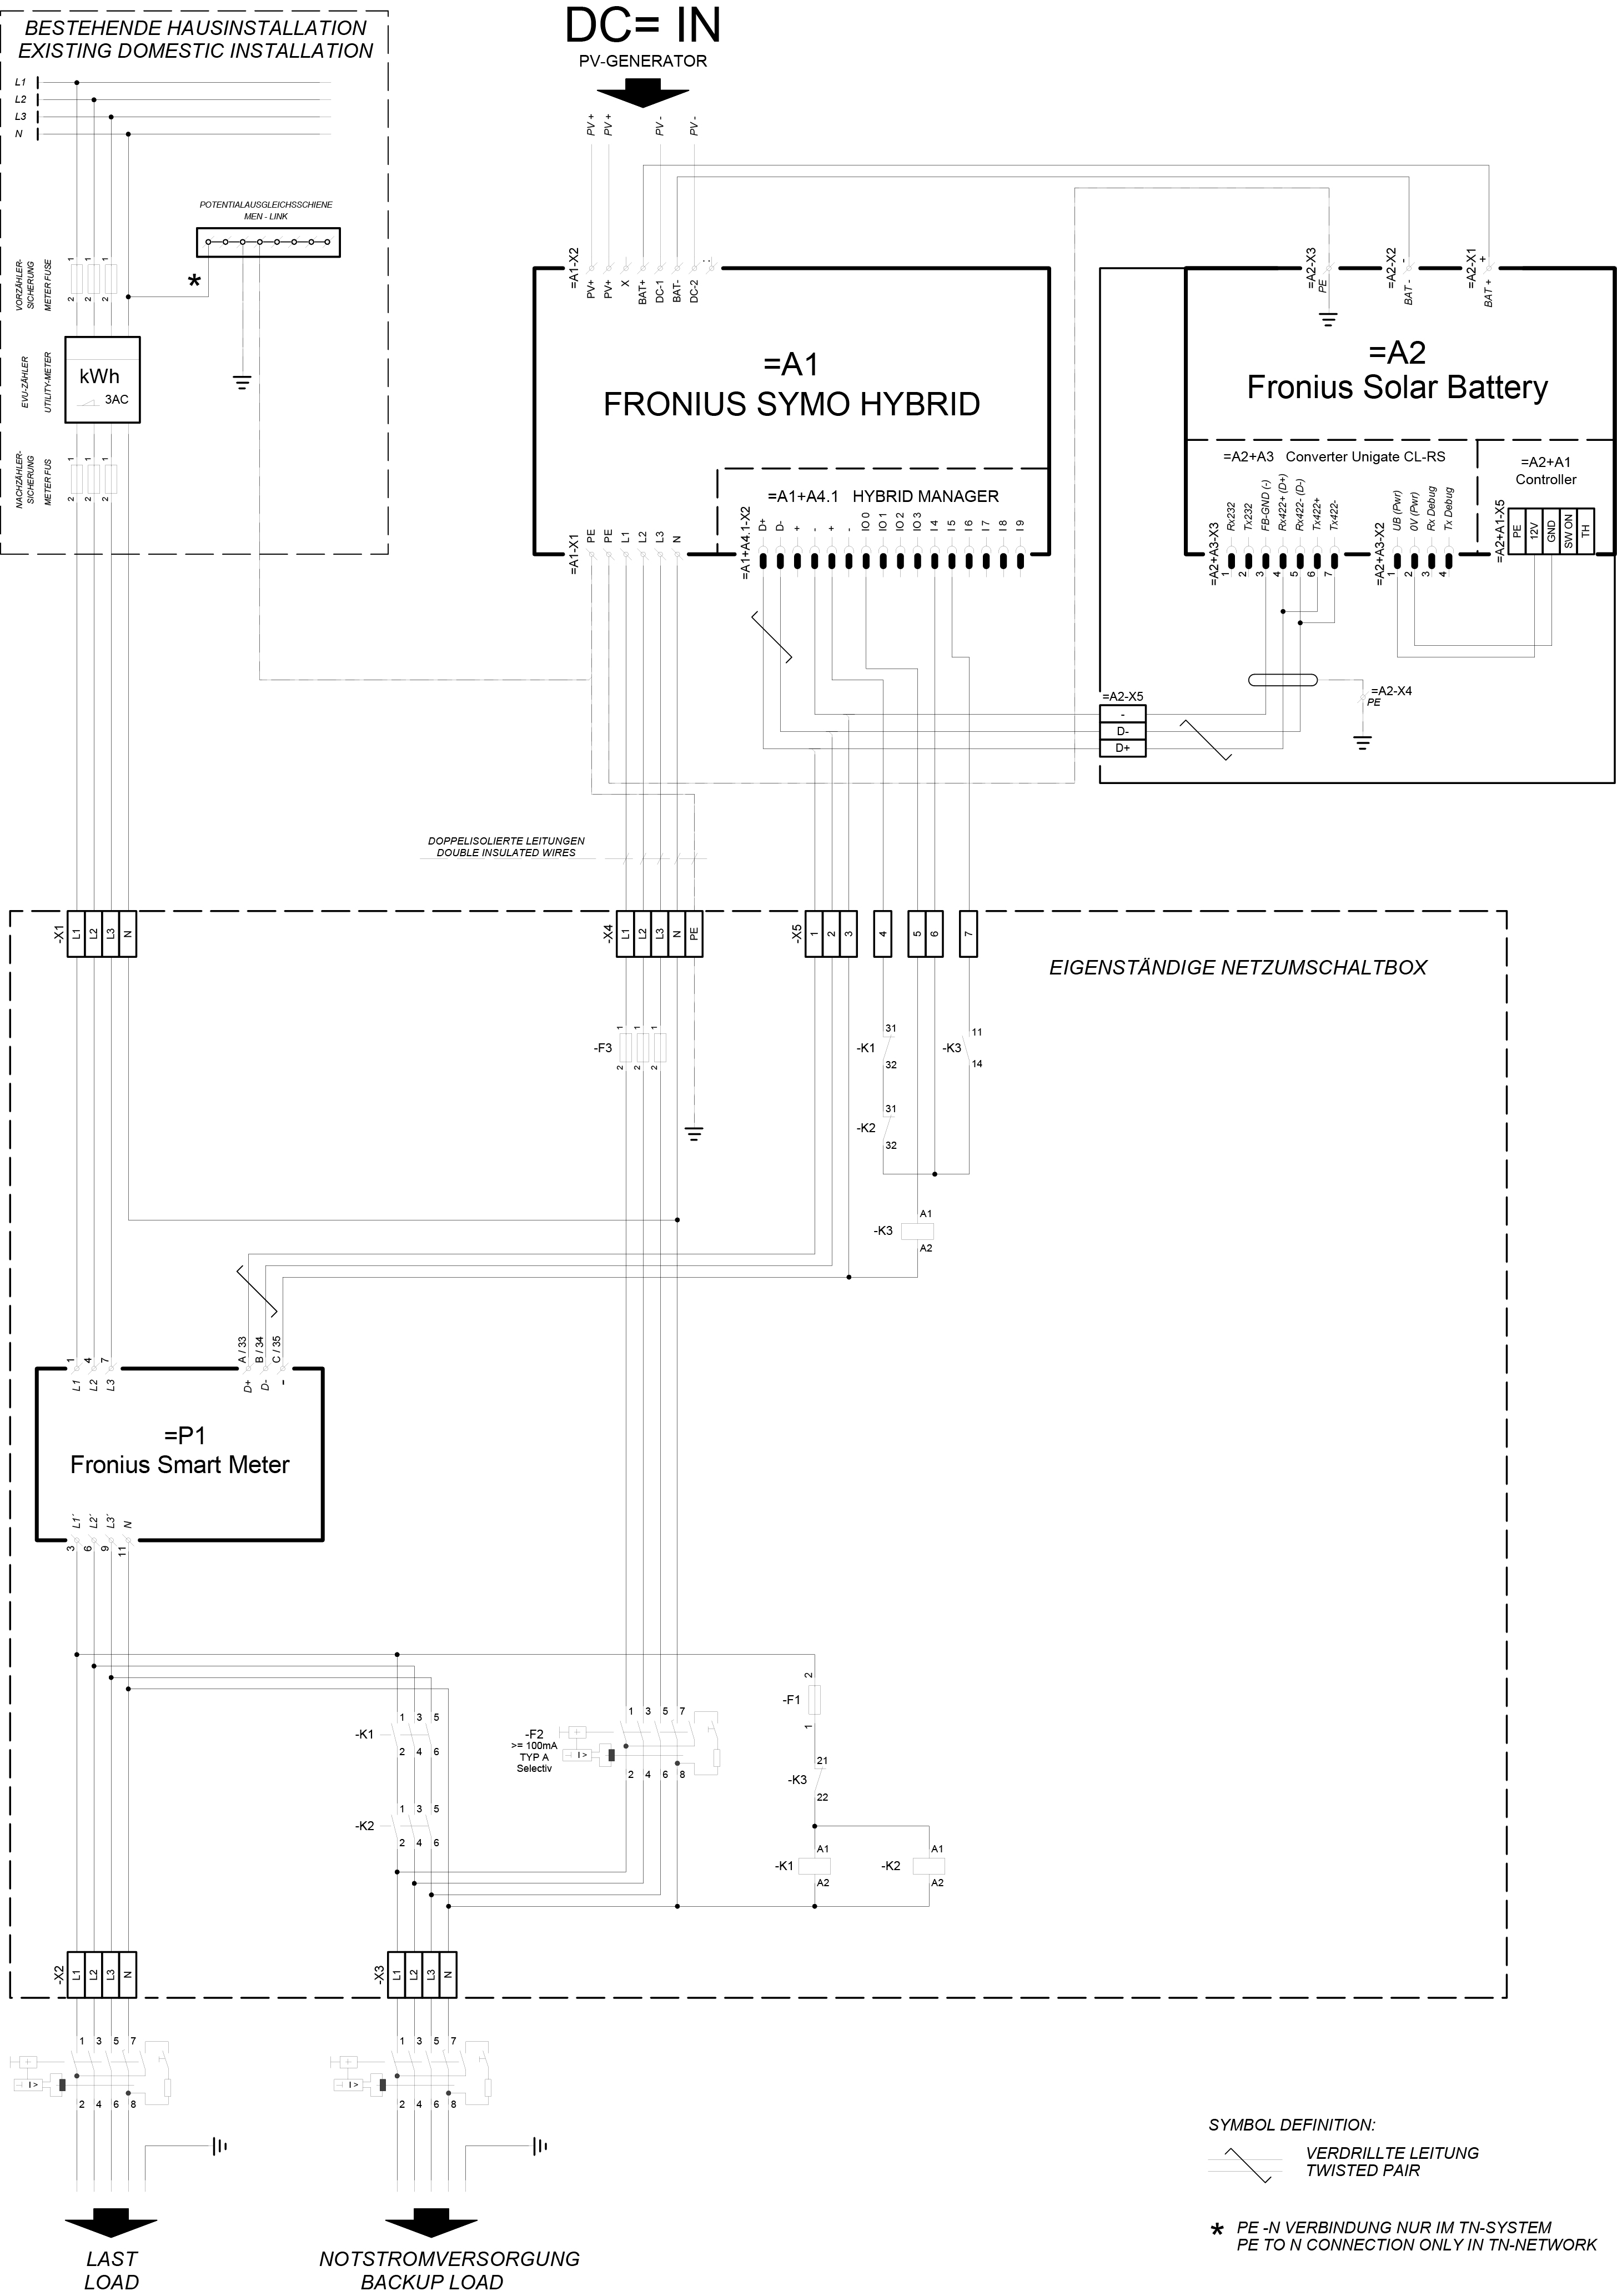
Appendix: 3-pin separation Austria with Solar Battery

Appendix: 3-pin separation Australia with Solar Battery
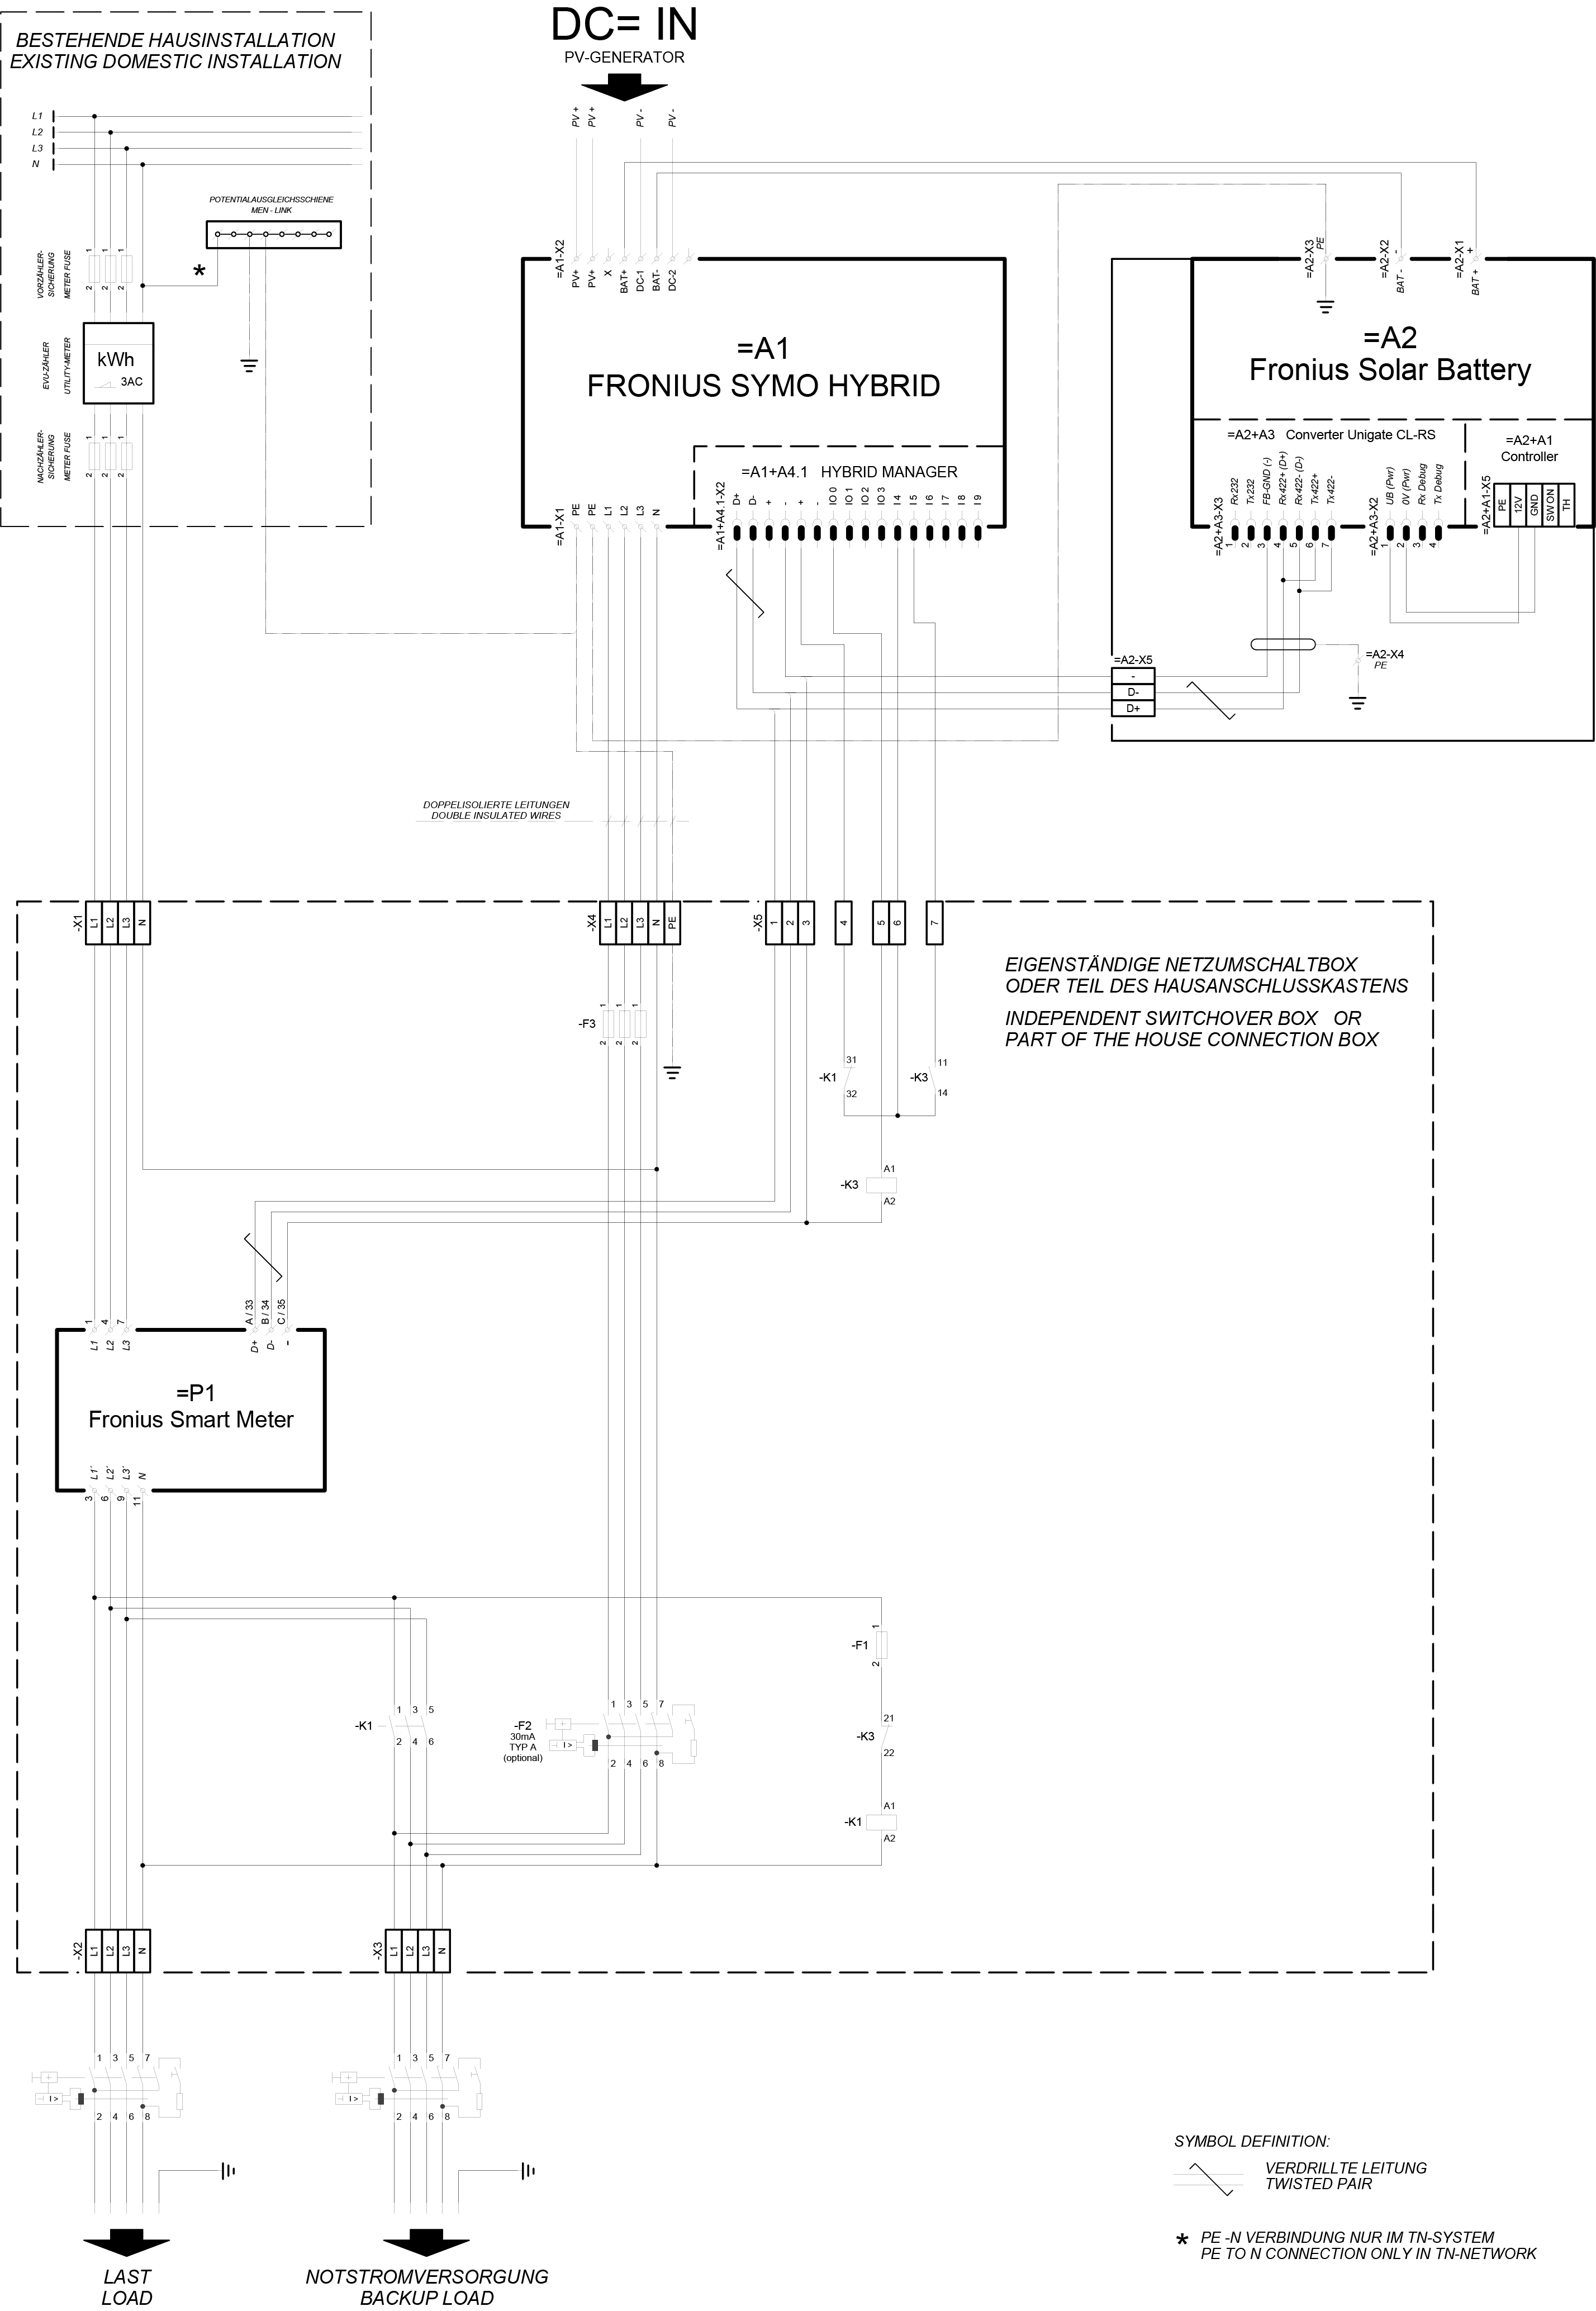
Appendix: 3-pin separation Austria with BYD
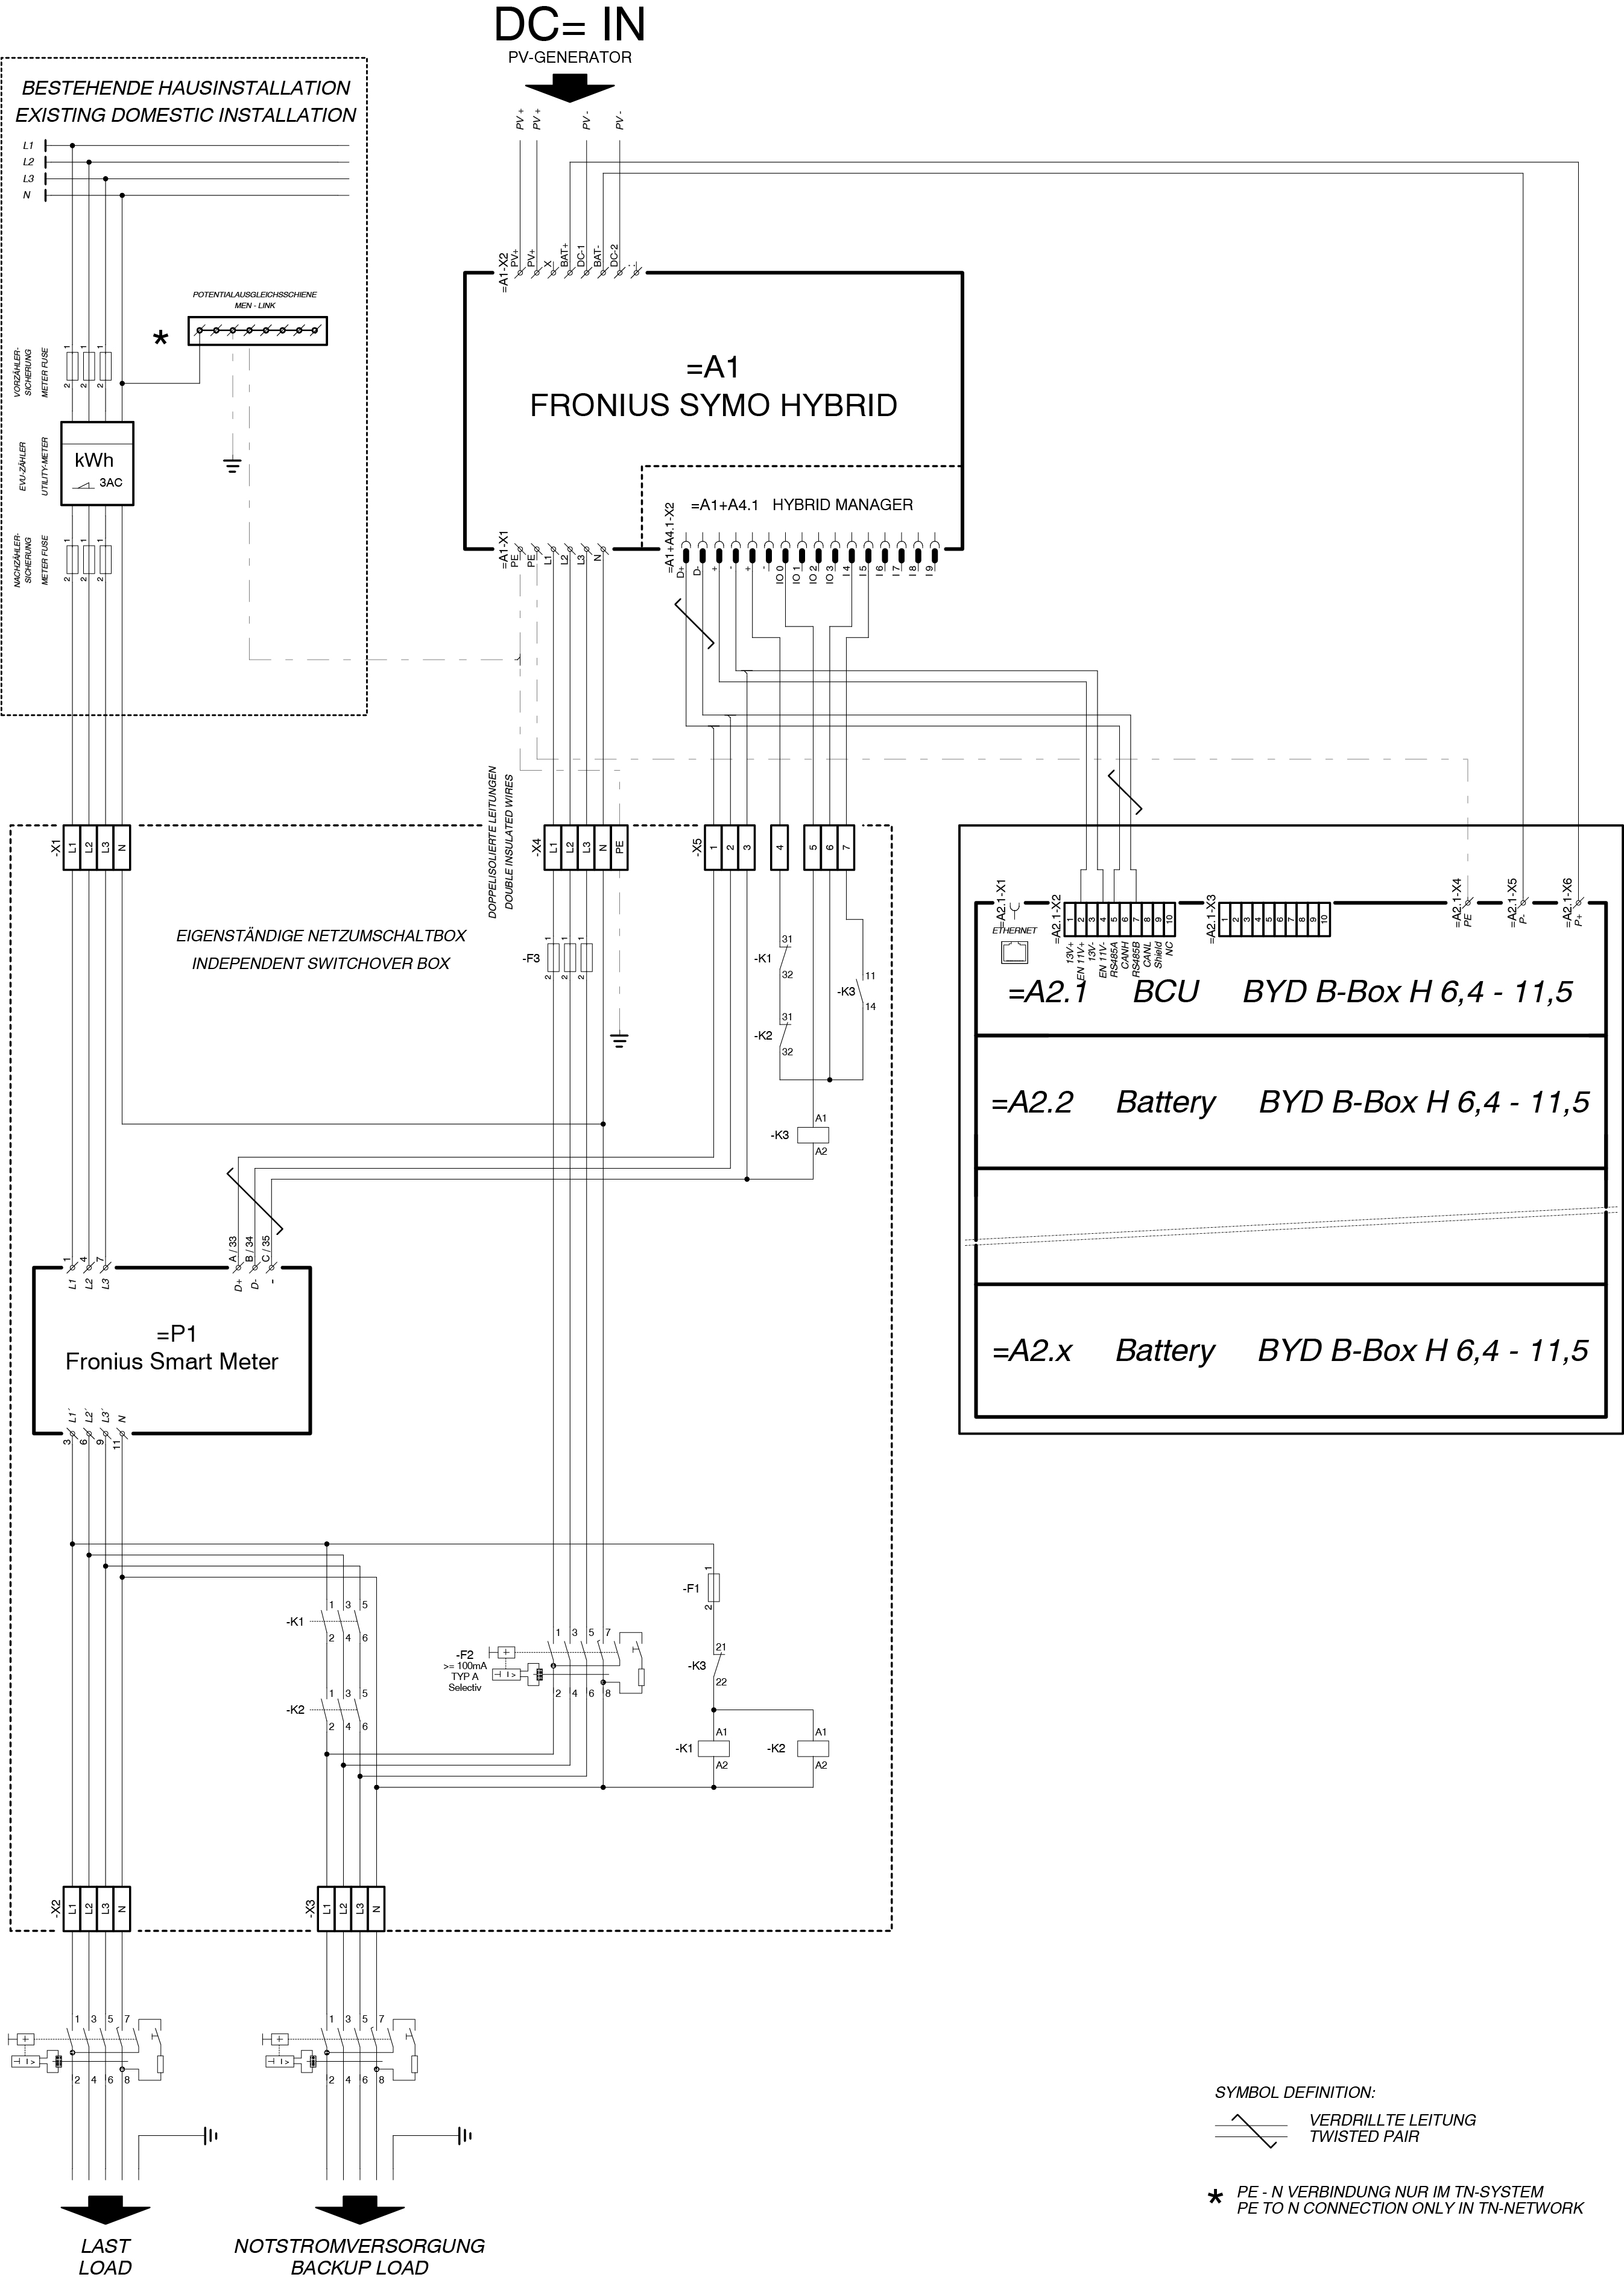
Appendix: 3-pin separation Australia with BYD
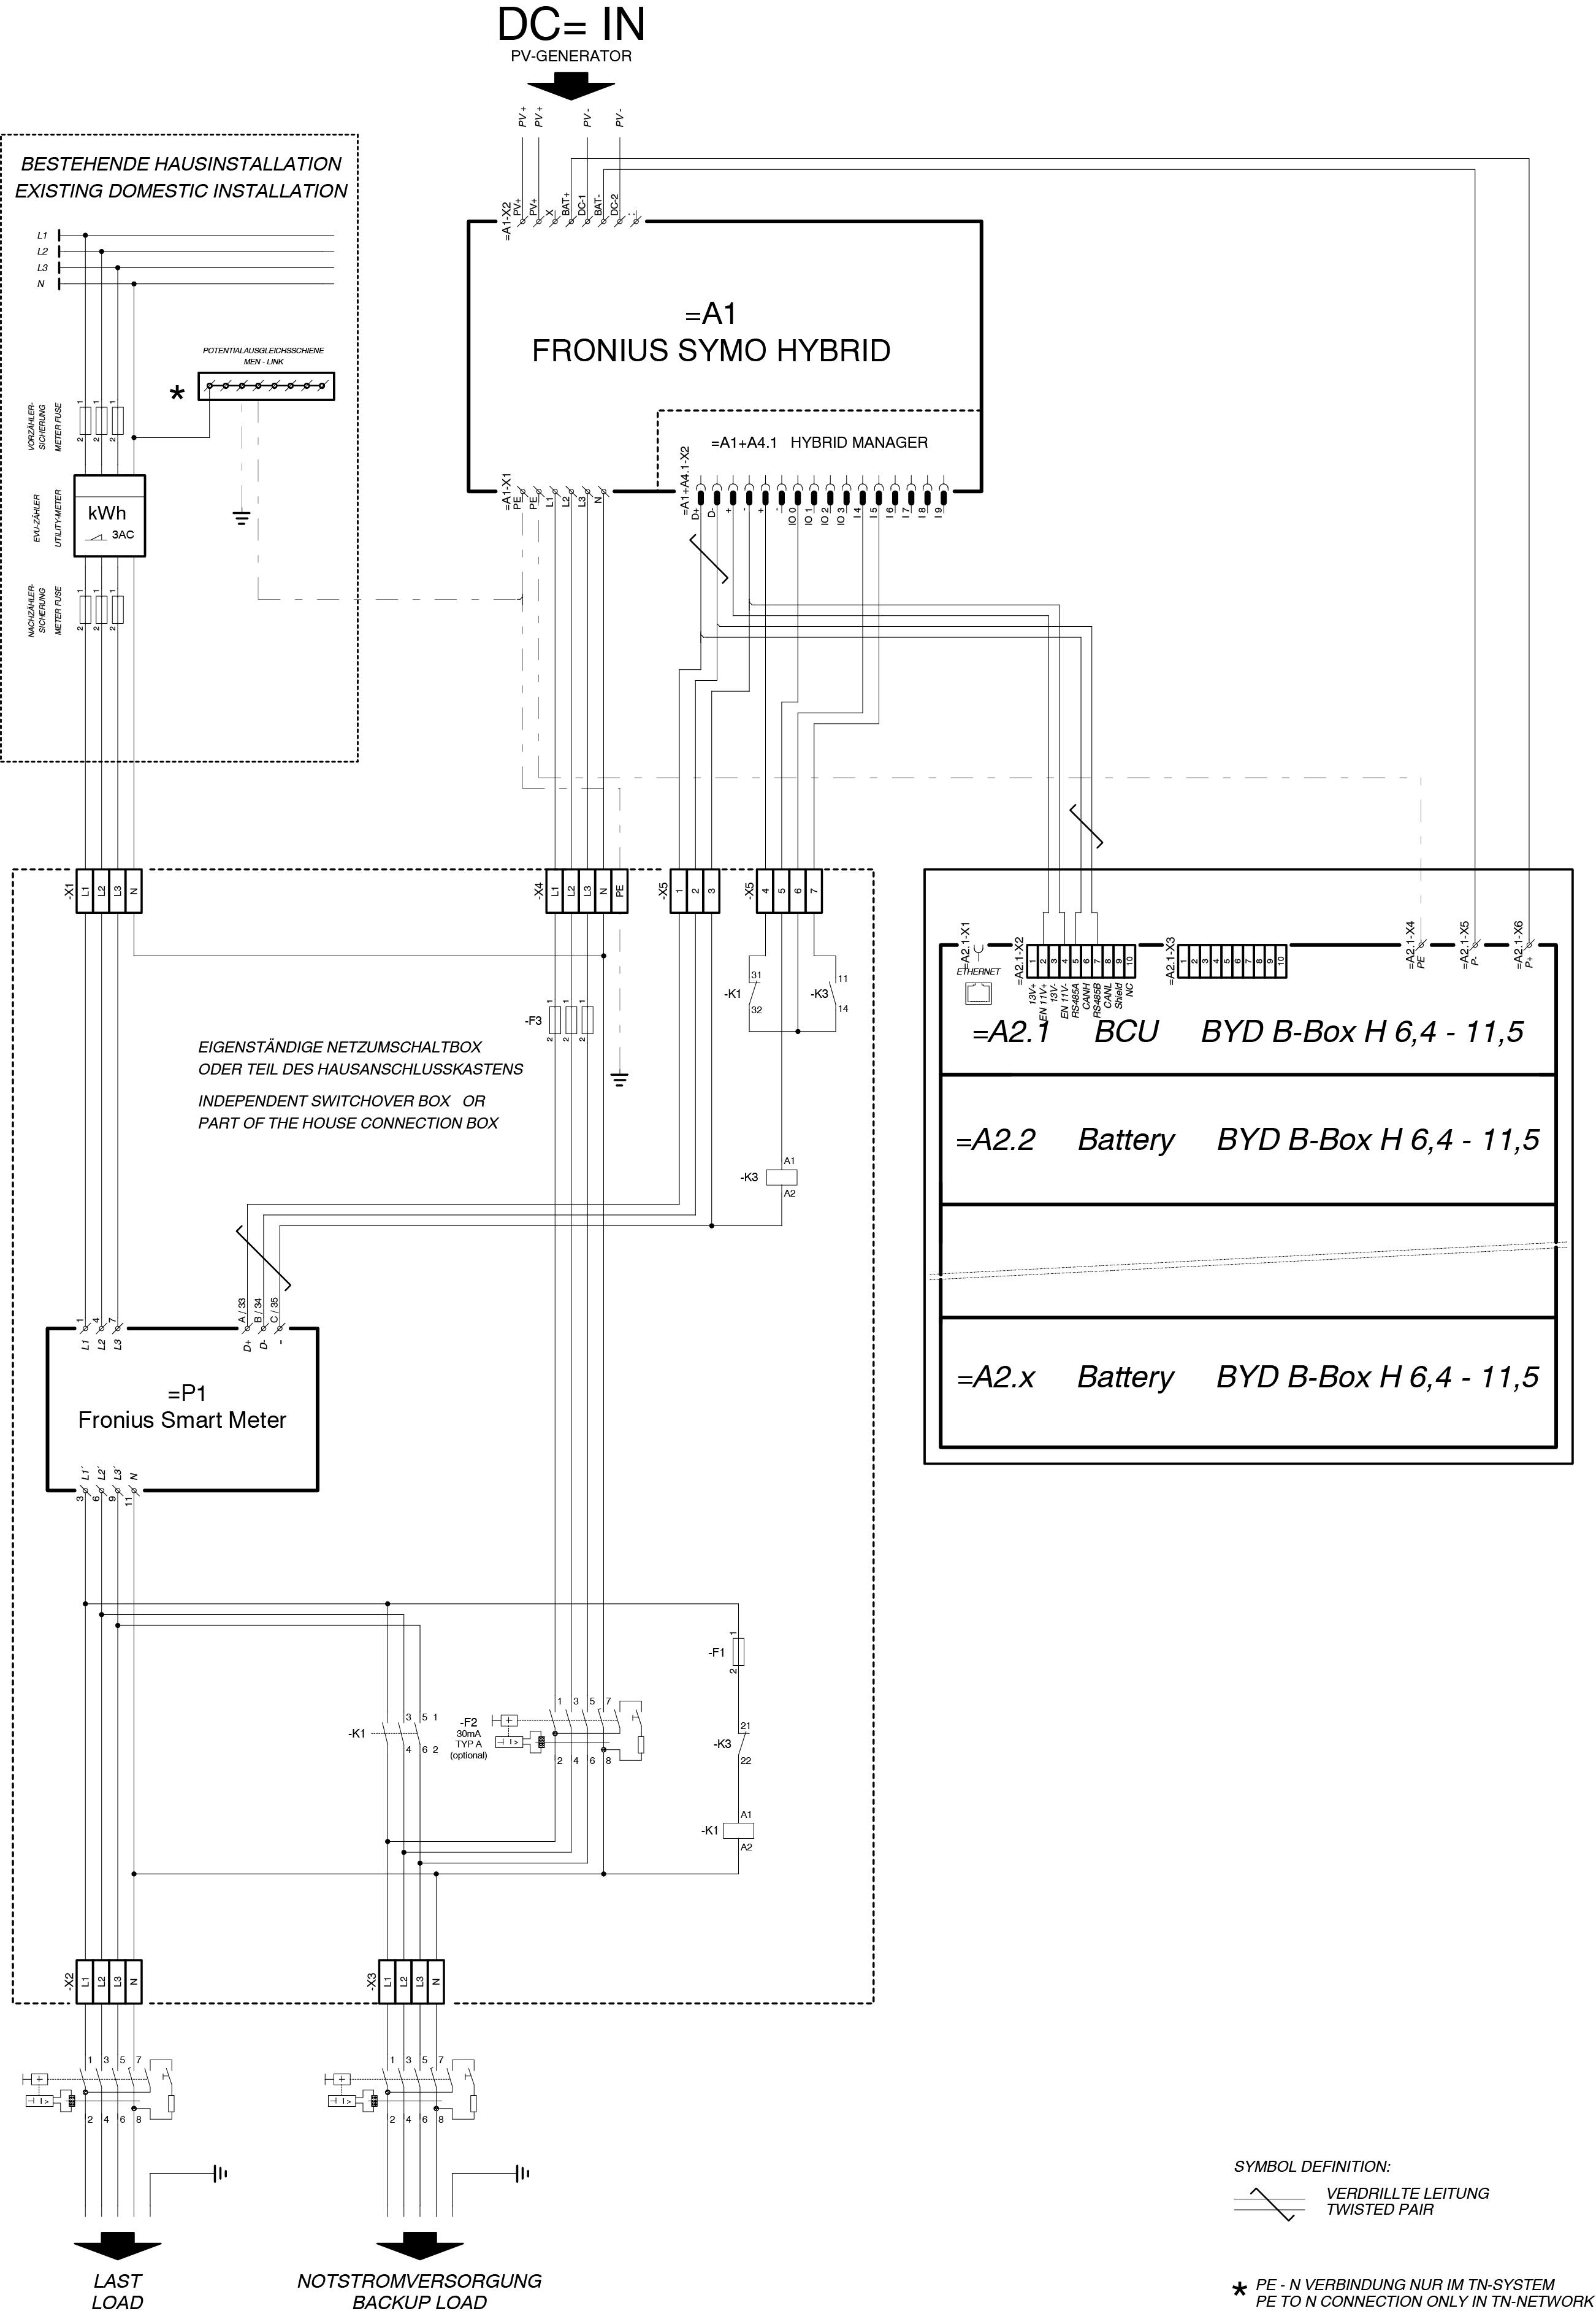
Appendix: 3-pin separation with grid and system protection Austria with Solar Battery
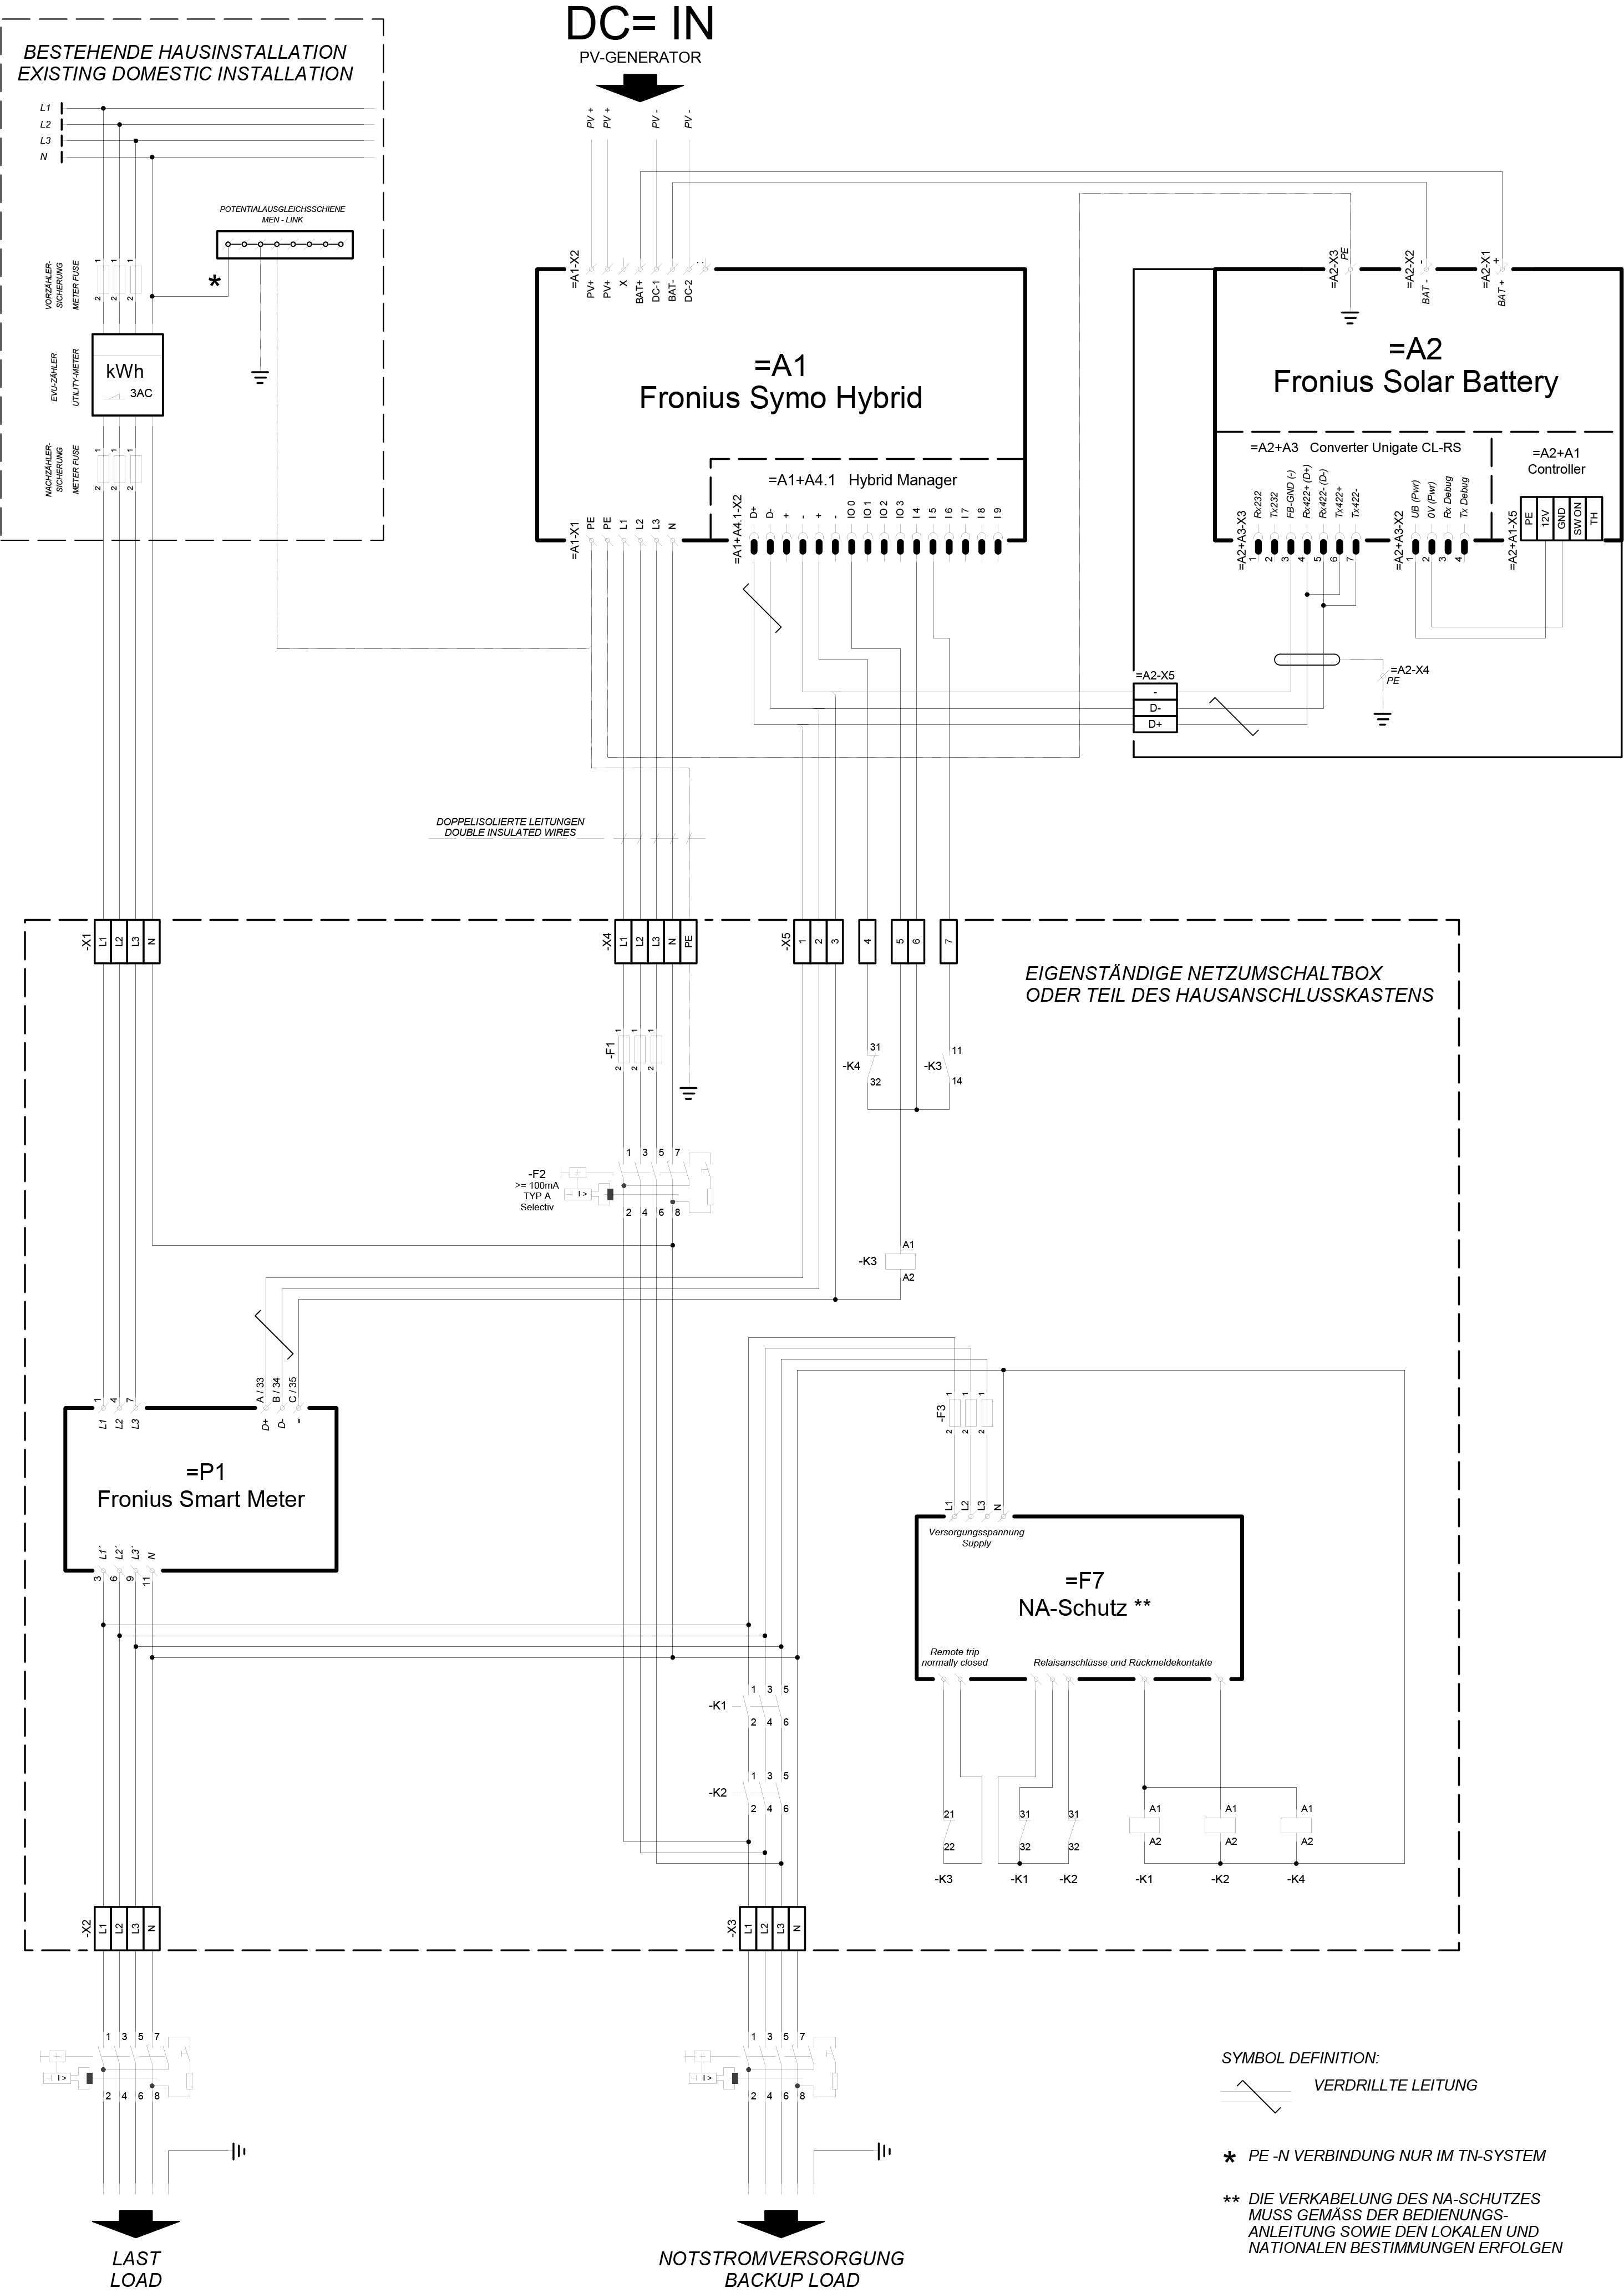
Appendix: 4-pin separation Germany with Solar Battery
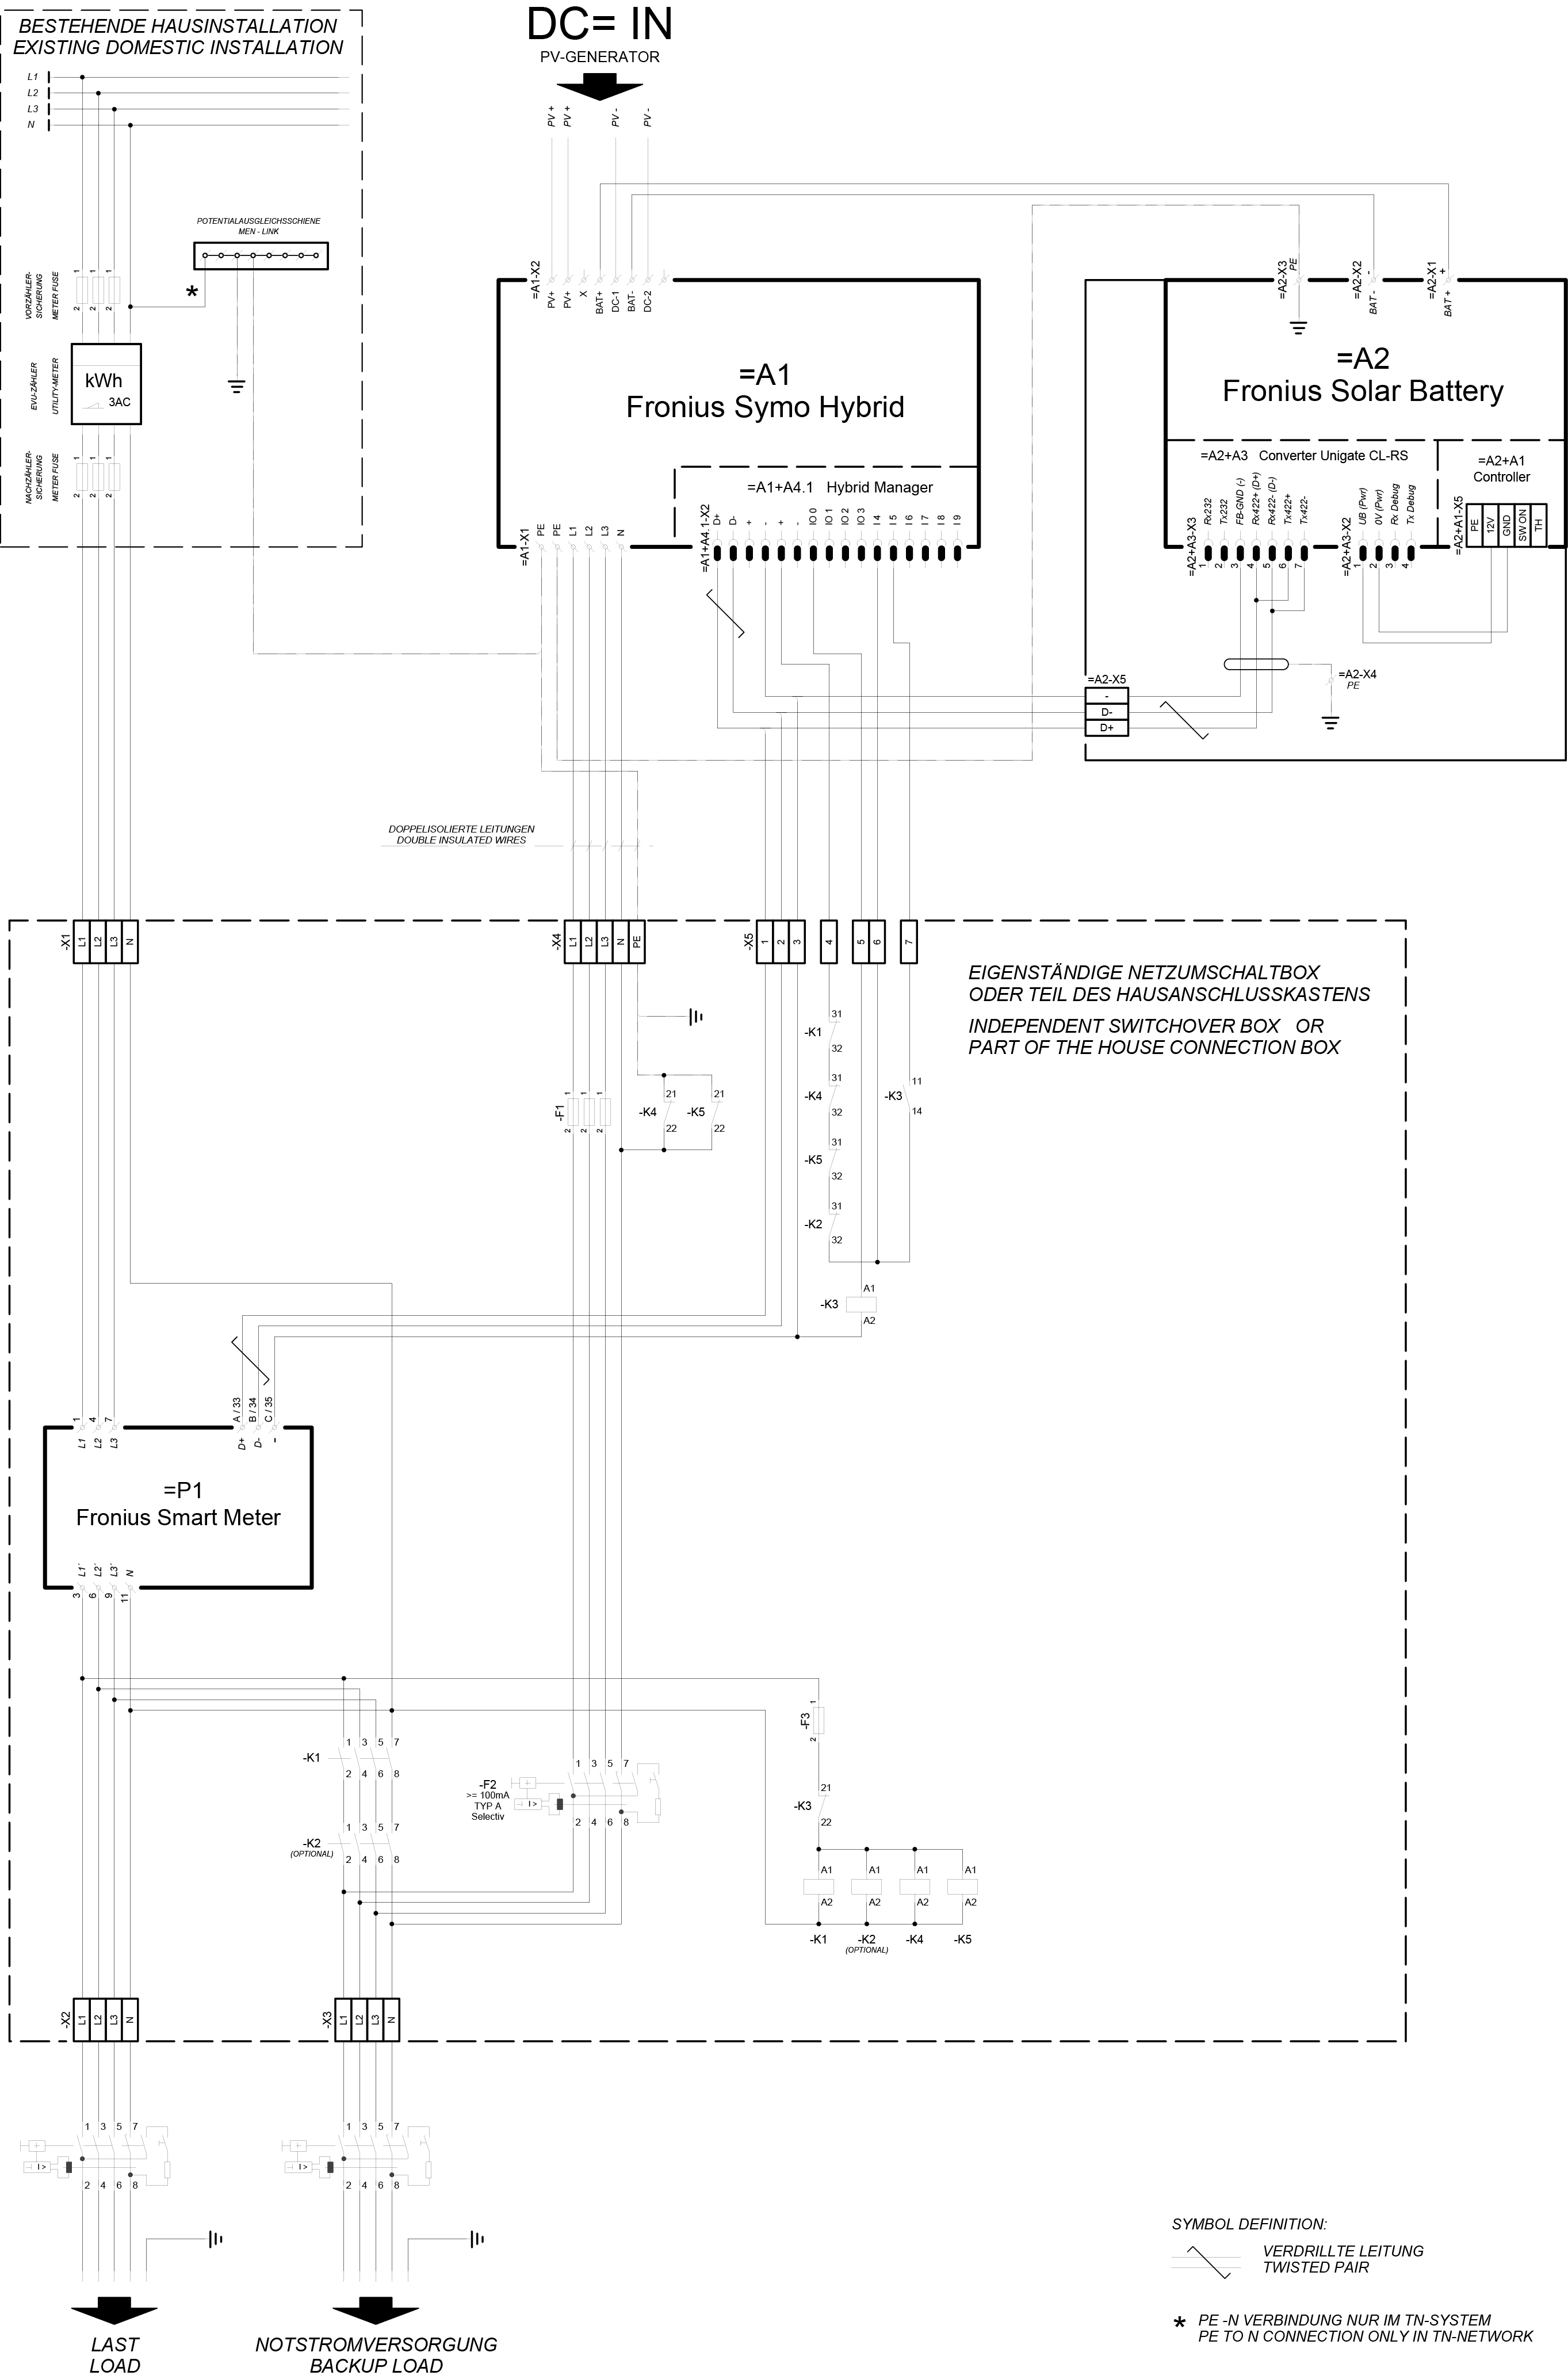
Appendix: 4-pin separation Germany with BYD
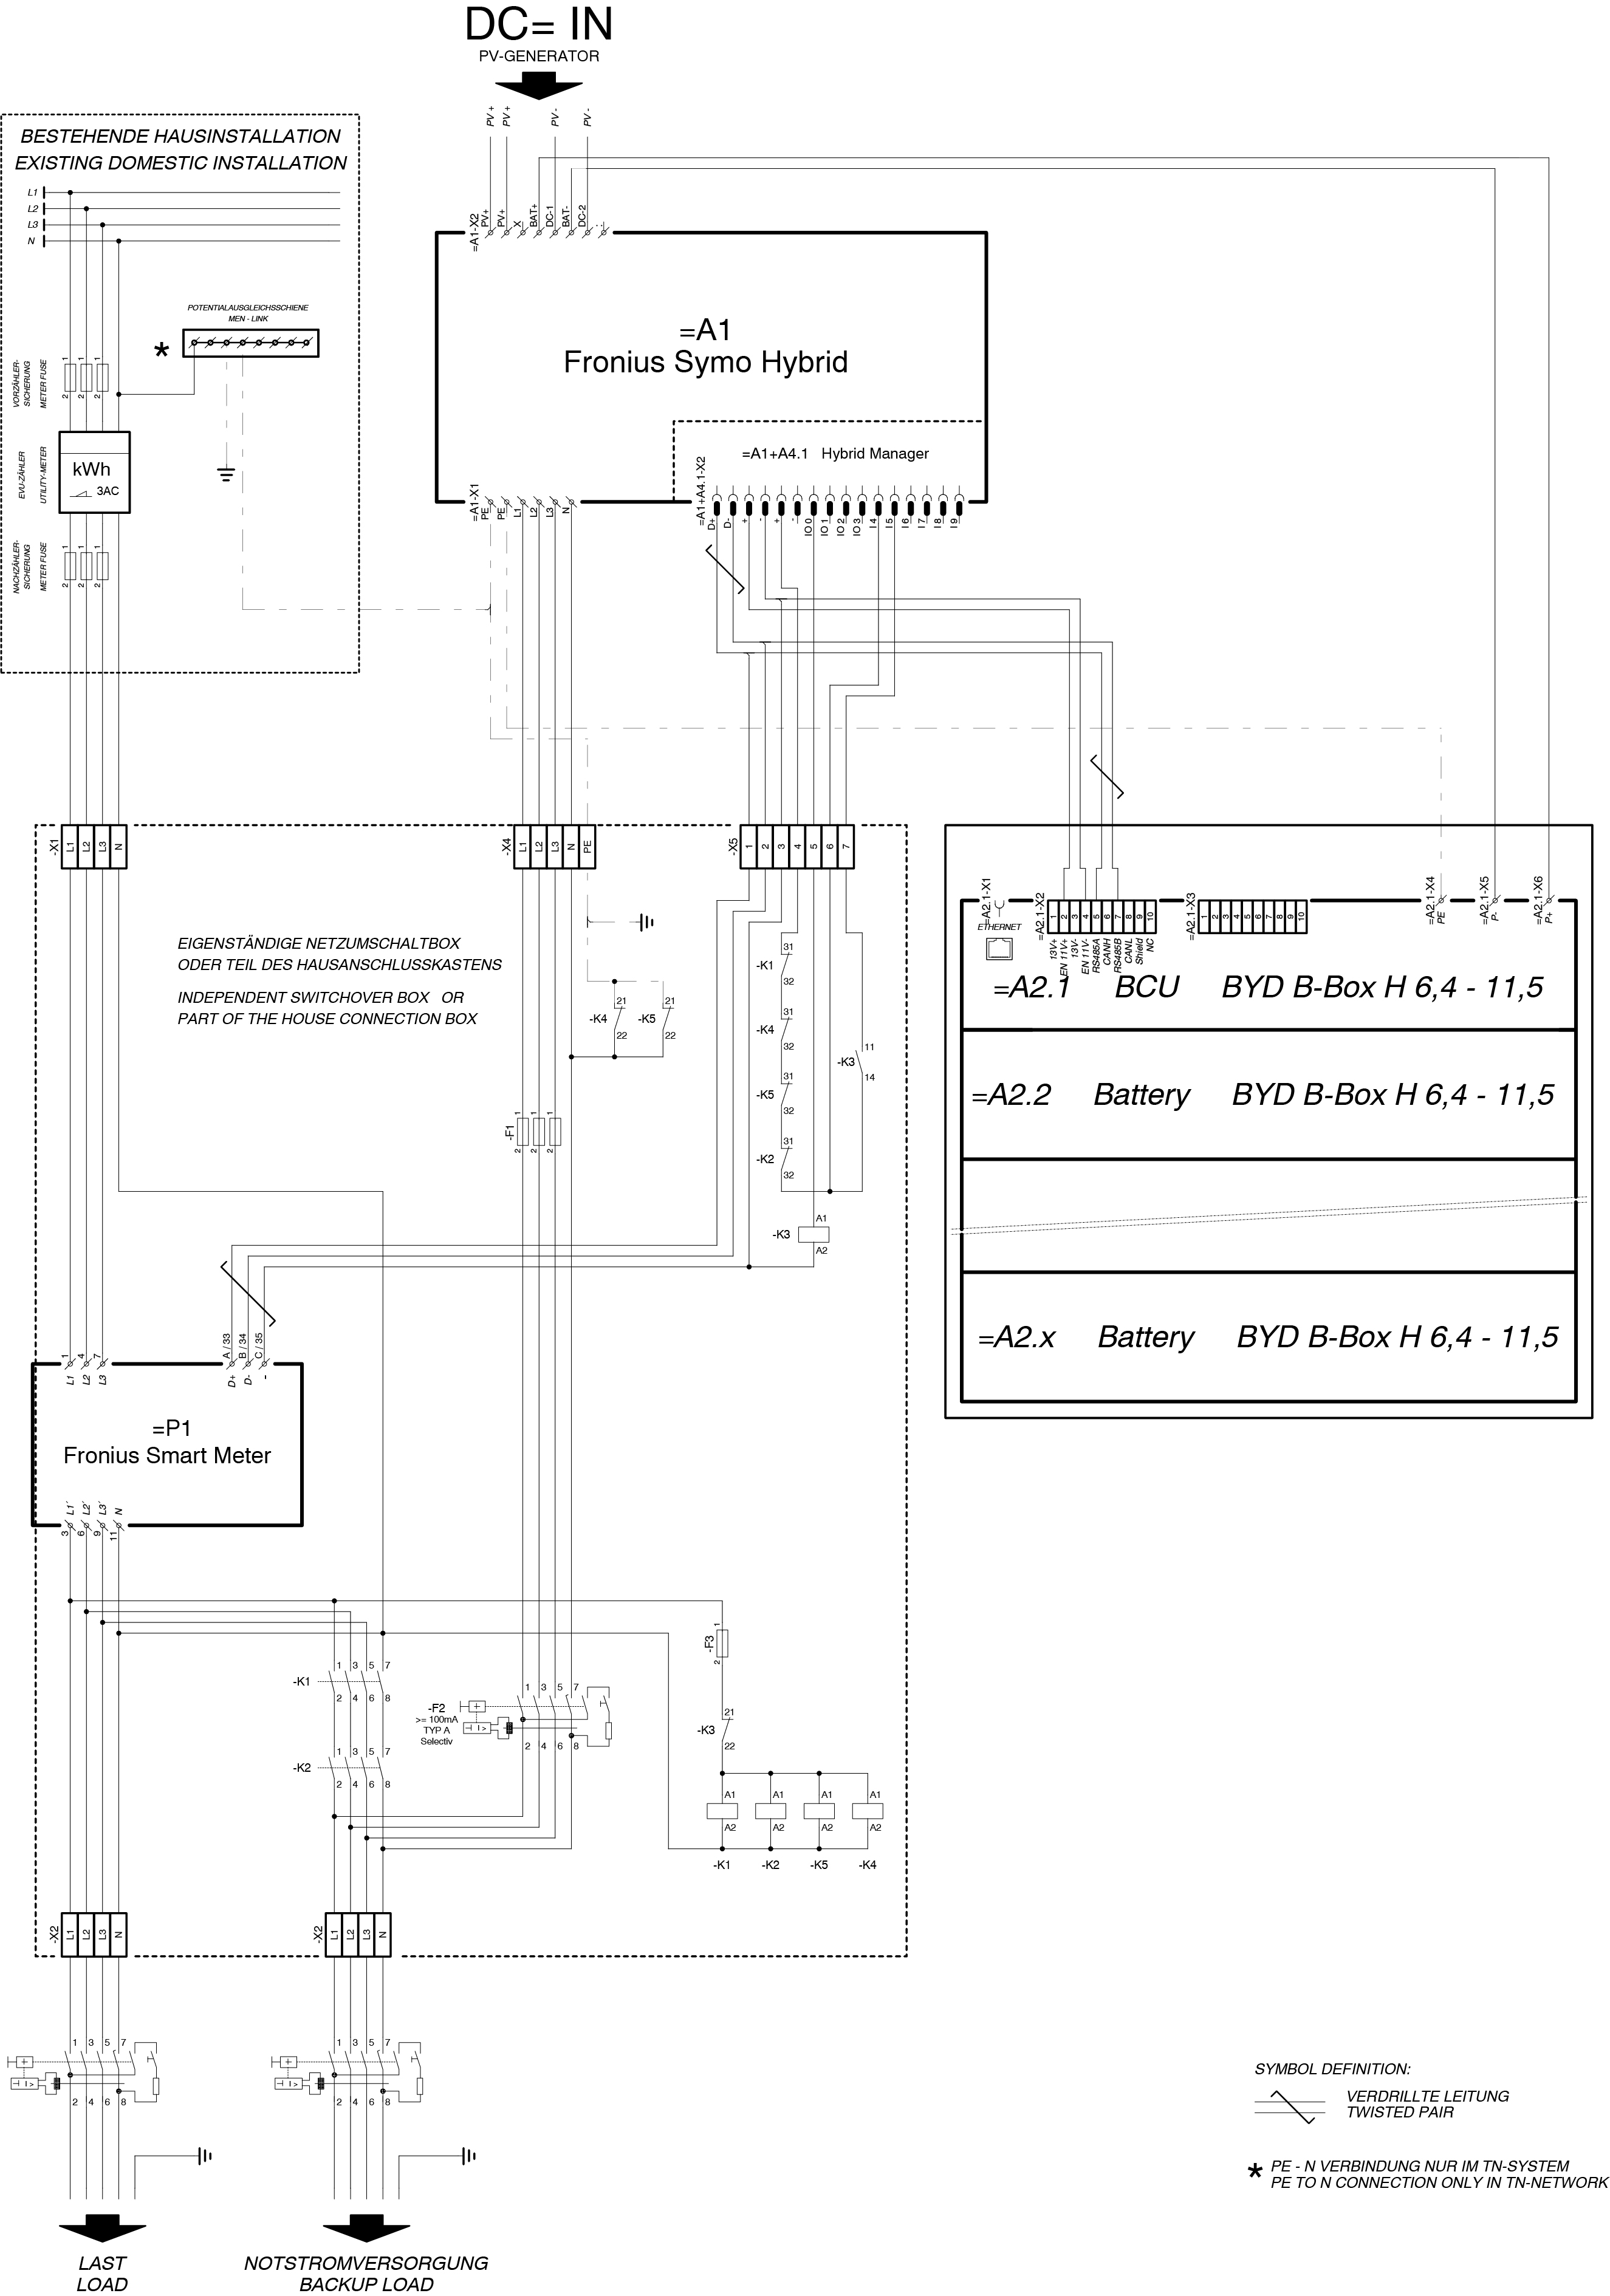
Appendix: 4-pin separation with grid and system protection Germany with Solar Battery
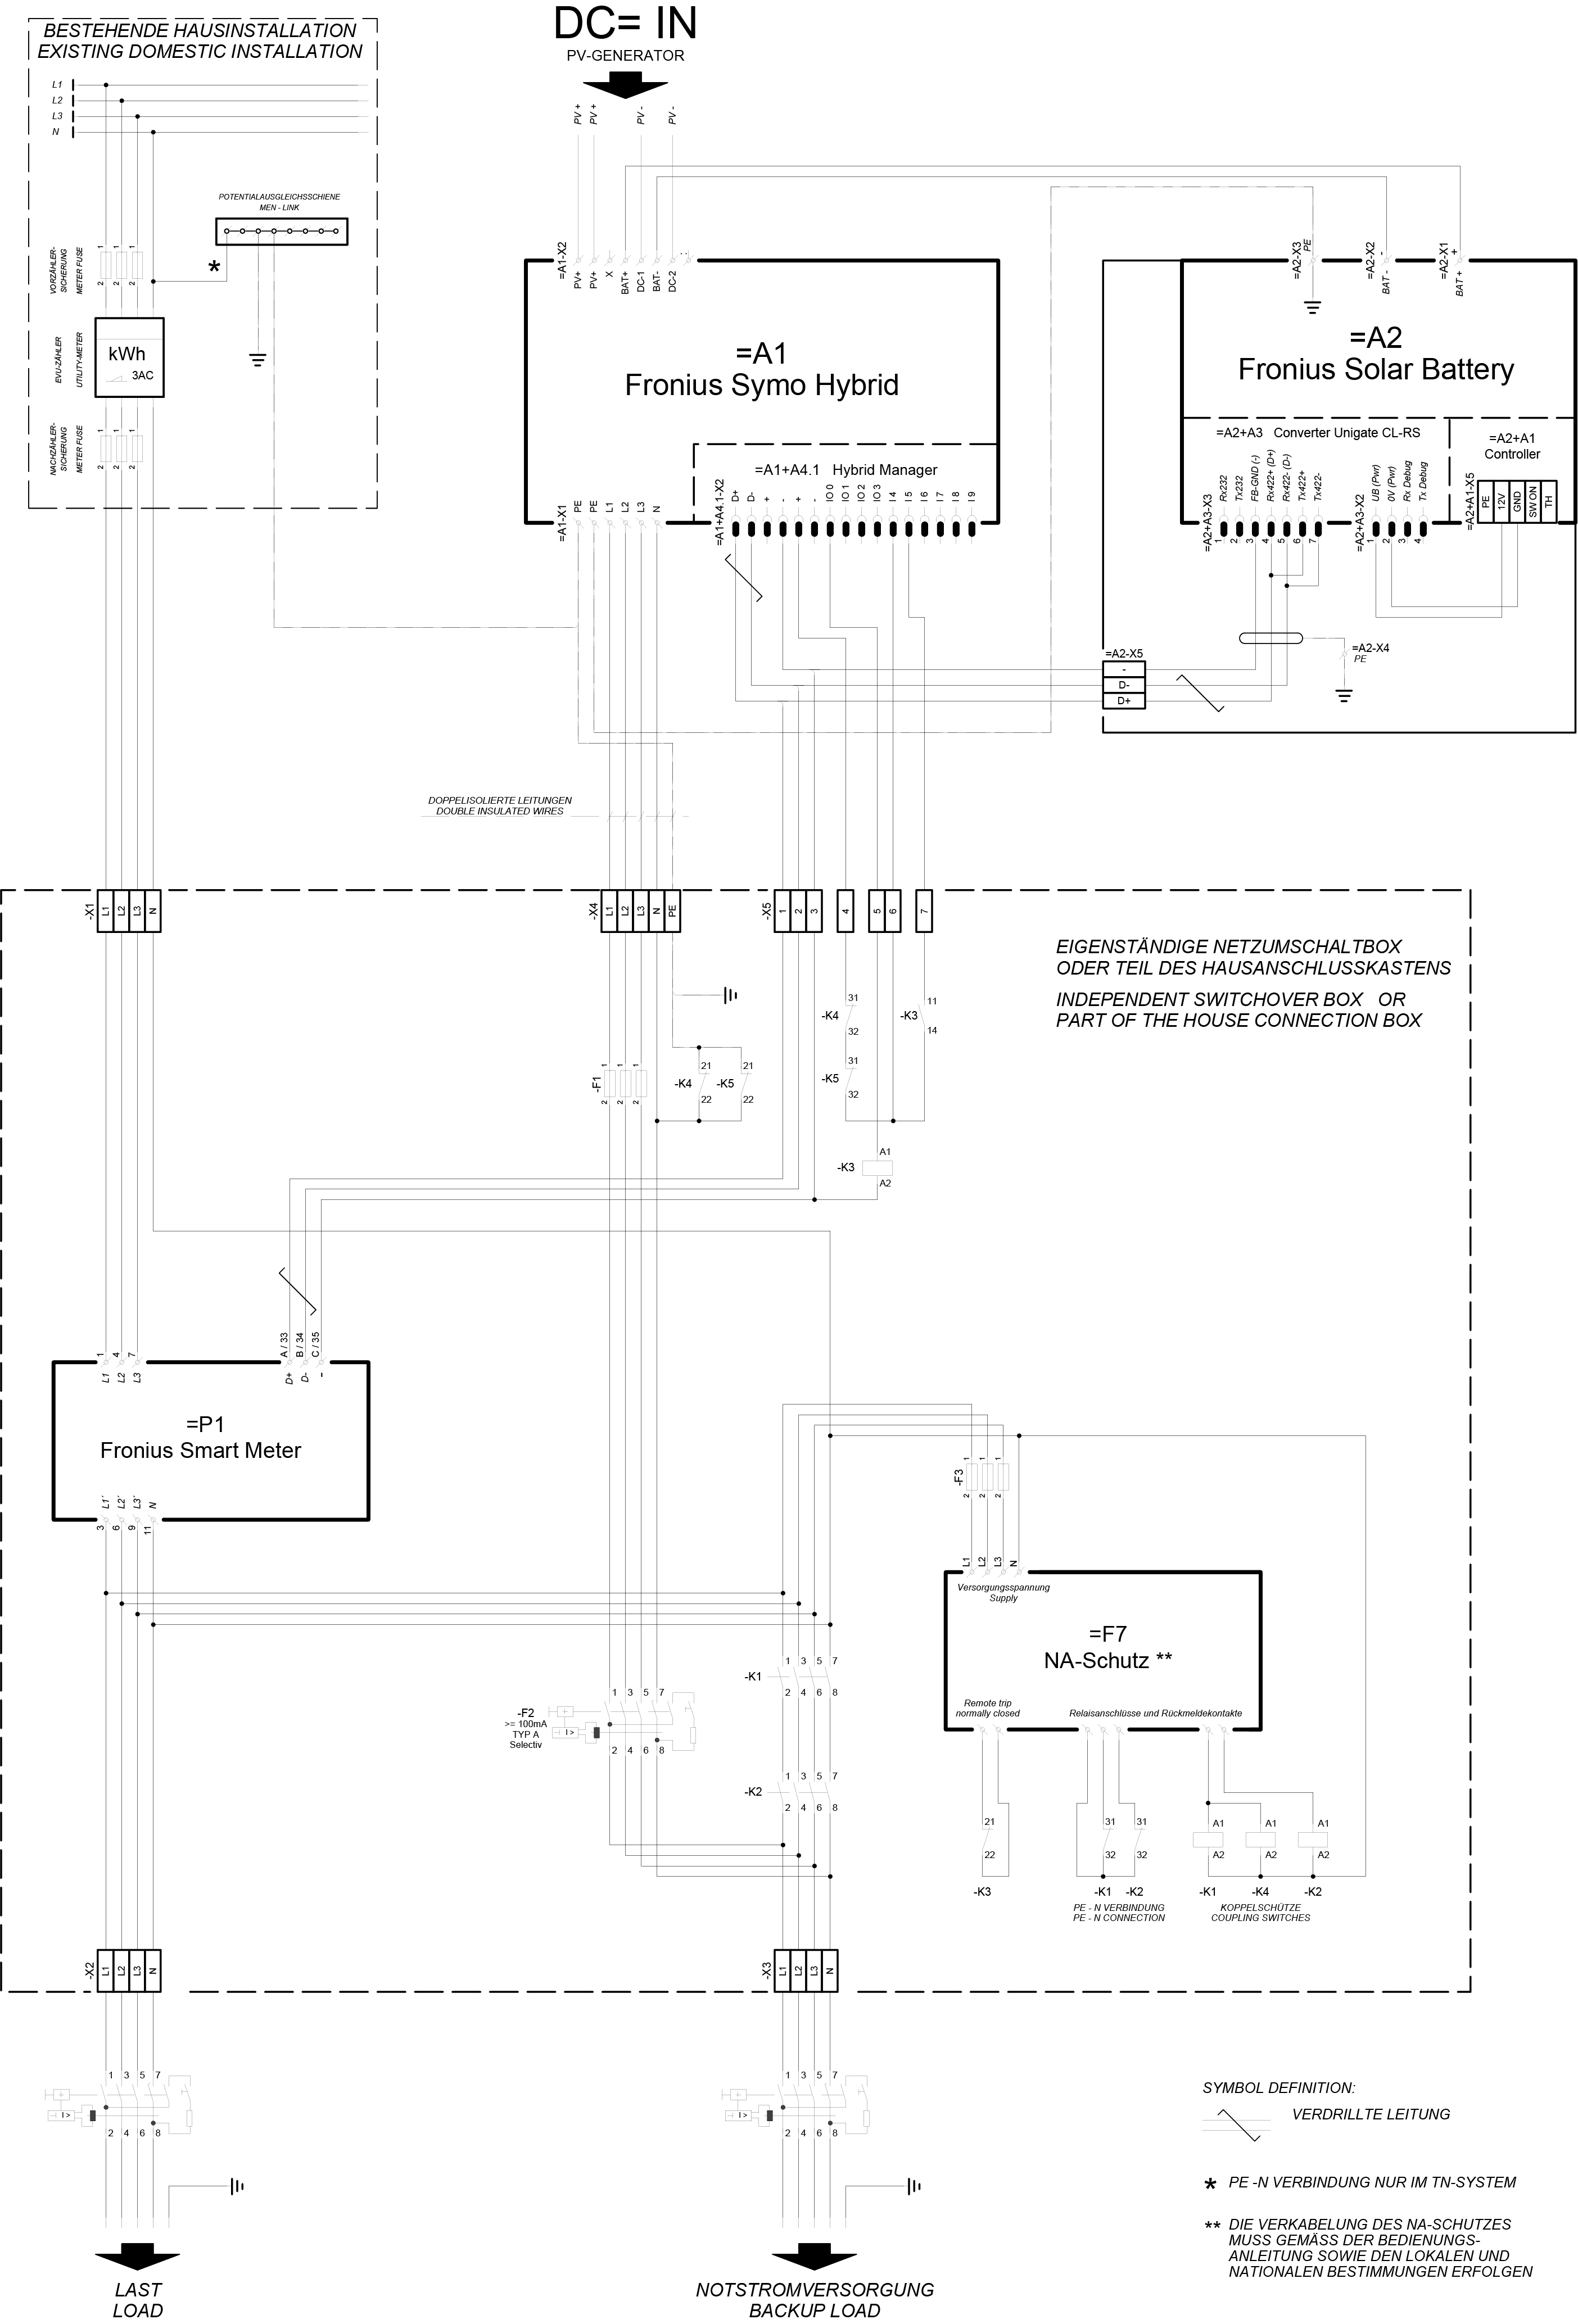
Appendix: 4-pin seperation with grid and system protection Italy with Solar Battery
