- Operating instructionsWeldCube Navigator
- General information
- Installation
- Operation
- More functions
- Maintenance
005-16102025
General information
General
Purpose of the document
These Operating Instructions describe the functionality, installation, operation, and maintenance of the Fronius WeldCube Navigator software.
The Operating Instructions are intended exclusively for technically trained personnel who are familiar with the creation, management, and execution of sequenced welding processes.
Software versions
This documentation corresponds to the development status of the software valid at the time of publication. Changes and extensions with regard to functions and compatibility with system components are documented in the Release Notes accompanying the current software version.
Target group
WeldCube Navigator is aimed at all customers who want to improve manufacturing quality and standardize processes through interactive and visualized guidance for welders in manual welding cells. The software was developed for the following user groups:
- Welding supervisors create, store, and edit digital instructions for manual welding processes in WeldCube Navigator. They define individual specifications (number of permitted welds, seam number, weld job to be used) and release processes in the event of errors.
- The welder is guided safely and specifically through the welding instructions by WeldCube Navigator. Preset parameters and the ability to select and confirm tasks directly on the welding torch simplify workflows.
Safety instructions
WARNING!
Danger from incorrect operation and work that is not carried out properly.
This can result in serious personal injury and damage to property.
All the work and functions described in this document must only be carried out by technically trained and qualified personnel.
Read and understand this document in full.
Read and understand all safety rules and user documentation for this software and all system components.
WARNING!
Danger from operating the software during welding.
This can result in serious personal injury and damage to property.
Do not operate the software during welding.
During welding, pay full attention to the welding torch and the component.
NOTE!
Risk when using the default password.
The default password does not provide sufficient protection for the software and the data managed in it.
When logging in for the first time, replace the default password with a secure password to prevent unauthorized access and tampering.
When selecting the password, consider the usual password guidelines.
NOTE!
Risk of tampering due to insecure connection.
When connecting to external systems, tampering such as data loss may occur.
When connecting WeldCube Navigator to external systems (for example, production planning systems, order processing systems, PLCs, via OPC UA), secure the connection through signing and encryption (policy: Basic256Sha256).
Use client certificates and user certificates.
Alternatively, use encryption with access data (username and password).
NOTE!
Risk of unauthorized access to exported welding instructions.
Exported welding instructions are transmitted as an unencrypted file and are not protected by a password.
Make exported instructions accessible to authorized persons only.
NOTE!
Risk due to the use of an incorrect job number.
Incorrect welding parameters are set due to an incorrect job number. A faulty welding process can be the result.
Ensure that the job stored on the welding machine is valid for the selected instruction.
Data storage
All data resulting from the installation, operation, and update of WeldCube Navigator is stored locally on the control unit.
Data on welding processes are stored on the welding machine.
The user management data are taken over by the welding system and stored on the welding machine or, if available, in Central User Management. Only the user's name and language as well as the preferred system of units are queried and adopted.
Data Privacy Statement
The provisions of the EU General Data Protection Regulation apply. Personal data is processed in WeldCube Navigator exclusively in the form of the name of the creator or modifier of a manufacturing instruction. More detailed information can be found in the license terms of the software, which are provided to the customer by the manufacturer.
System components
WeldCube Navigator functional description
The WeldCube Navigator software enables the creation of digital instructions for manual welding processes, which are processed by welders. The individual manufacturing steps can include text, images, and graphics. WeldCube Navigator consists of the following two software components, which are accessible to authorized users:
- Digital instructions for manual welding processes are created, stored, and managed in the editor.
- Individual specifications can be defined for each manufacturing step, such as the number of permitted welds, the seam number, or the welding job to be used.
- In addition, reactions to defect cases can be defined, which facilitate validation and rapid intervention by the welding supervisor during processing.
- Digital instructions are displayed on a computer with a screen in the welding cell, guiding the user step by step through their tasks.
- The welding parameters are preset on the welding machine.
- For navigation, the welder uses an Up/Down or JobMaster welding torch.
- The function keys of the welding torch are used to select, navigate, and confirm instructions and manufacturing steps.
- Alternatively, operation can be performed via an external touchscreen.
Fronius software solutions
The following Fronius software products interact with WeldCube Navigator and support its functions:
- Intelligent management, statistics, and analysis functions enable centralized welding data documentation to be created with WeldCube Premium.
- If both software products are implemented, a direct link to WeldCube Premium will appear in WeldCube Navigator.
- For example, the welding jobs for the instructions can be edited in this setup.
- When a welding instruction has been completed, the corresponding documentation can be displayed in WeldCube Premium.
- Cloud-based centralized collection of welding data, process metrics, and other functionalities.
- Central management of users and authorizations for Fronius welding systems.
Options (TPS/i, iWave)
The following option packages can be enabled on the welding machine, which enable additional functionality in the software:
- The welding supervisor can set permitted limit values for each job on the welding machine via "Limit Monitoring".
- If these are not adhered to, WeldCube Navigator triggers a status code.
- The welding machine records the actual values of each weld for the weld data documentation.
- When a welding instruction is created in WeldCube Navigator, the job can be edited in the SmartManager for the welding machine or in WeldCube Premium.
- With this option, the welder can use their own key cards instead of the supplied NFC card for logging in to the welding machine and thus also WeldCube Navigator.
- In conjunction with a JobMaster welding torch and with the special 4-step mode selected, this function enables the torch trigger to be used to switch between jobs during welding within defined job groups.
- WeldCube Navigator adopts this behavior. When executing instructions, the system ensures the user cannot leave the linked job group when selecting a job.
Options (Fortis)
On the welding machine, the following option packages must be activated for recording and documenting the welding instructions in WeldCube Navigator:
- The welding machine records the actual values of each weld for the weld data documentation.
- When a welding instruction is created in WeldCube Navigator, the job can be edited in the SmartManager for the welding machine or in WeldCube Premium.
- External NFC card reader
- To lock or unlock the control panel using an NFC key
- To activate/deactivate user management
Enable the following option packages to activate additional functionality in the software:
OPT/i Custom NFC - ISO 14443A- With this option, the welder can use their own key cards instead of the supplied NFC card for logging in to the welding machine and thus also WeldCube Navigator.
Data communication between WeldCube Navigator and external systems
Overview of data communication, symbolic representation
The software communicates with the following components via the LAN or WLAN interface of the computer on which WeldCube Navigator is installed:
- Connected welding machine
- Fronius software products (if present)
- External customer systems and devices (if present)
NOTE!
Network connection
In production environments, the wireless network connection (WLAN) may be affected by external factors.
It is recommended to use the LAN interface of the welding machine (TPS/i and iWave) for the network connection.
Add the OPT/s Ethernet option for the Fortis welding machine.
Users and roles
The following users and roles are defined in WeldCube Navigator:
- The Administrator manages and creates the instructions as a welding supervisor.
- They have access to all administrative functions.
- As a welding machine user, they can also actively perform welding manufacturing steps and execute instructions.
- The User's role is limited to production, i.e., working through the instructions displayed in WeldCube Navigator.
- The Local Administrator is responsible for setting up the software and connecting it to the welding machine and any other systems that may be present.
- They have access to all administrative functions.
- A separate password is set for this role
(default value: Admin123!!), which all administrators can change. - Unlike the welding machine administrator, they cannot manufacture components.
NOTE!
Connection to Windows user management.
WeldCube Navigator is displayed on the Windows operating system on the normal user interface.
The software can be minimized or closed at any time.
The rights of the logged-in user are not changed.
User administration
IMPORTANT!
User data must be managed on the welding system when using WeldCube Navigator.
WeldCube Navigator takes over the user data of the welding system. By logging in to the connected welding machine with an NFC card, the user is logged into WeldCube Navigator.
There are several ways to manage users:
- on the welding machine itself (device display)
- the welding machine SmartManager
- Fronius Central User Management software
An Administrator has the additional option of configuring the authorized NFC cards for the users via an external NFC reader on the computer.
Installation
Prerequisites for the installation
Welding system
A Fronius welding system with the following components is required for processing welding instructions in WeldCube Navigator:
- Fronius welding machine in the TPS/i series (TPS 320i or higher)
- Fronius welding machine in the iWave series (190-500i)
- Fronius welding machine in the Fortis series (Fortis 270 or higher)
- OPT/i WeldCube Navigator option enabled (item number 4,067,029)
The welding machine and the control unit must have a stable network connection and be on the same network.
Firmware versions
The following firmware versions of the welding systems are a prerequisite for operating WeldCube Navigator.
Welding machine | Firmware version |
|---|---|
TPS/i (320i or higher) iWave (300i or higher) | ≥ 4.1.0 |
iWave (190-230i) | ≥ 2.2.1 |
Fortis (270 or higher) | ≥ 1.1.0 |
Recommended welding torches
The use of Fronius welding torches with the JobMaster- and Up/Down Function is recommended. WeldCube Navigator is controlled directly via the function keys on these welding torches (see Welding torch navigation).
In the case of third-party devices, an alternative control option is required for the software.
IMPORTANT!
Fronius welding torches with the JobMaster function can only be used in combination with TPS/i and iWave welding machines.
Requirements for the control unit
WeldCube Navigator can be operated with the following configurations:
- Office setup: PC with mouse and keyboard
- Production setup: Industrial PC or tablet controlled by touch sensor or directly by the welding torch. Authentication is performed by the NFC card reader on the welding machine.
The welding machine and the control unit must have a stable network connection and be on the same network.
For use in production, control by the Fronius welding torch is recommended. Installation is only possible on devices with a Windows operating system.
The control unit must meet the following system requirements:
- Processor: Intel Core i5 or equivalent
- Memory: 8 GB
- Network: Data transfer rate of 1 Gbit/s, IPv4 protocol
- Display: Screen with Full HD resolution (1920x1080 pixels) or higher
- Operating system: Microsoft Windows 10 (64bit) or higher
Installation
Installing WeldCube Navigator
WeldCube Navigator is ordered and delivered via the Fronius sales network.
To install the software, perform the following steps:
1Download the installation file from the download area of the Fronius website.
2Execute the file via Windows Explorer.
3Follow the instructions of the installation wizard.
The customer can configure the software themselves at the respective welding workstation. Configuration will only be provided by Fronius if this has been expressly agreed with the customer.
Fronius will provide the customer with the detailed license conditions in the form of a separate document.
Logging in and out
The login process in WeldCube Navigator is performed differently depending on the user group and the status of the system:
- Local Administrator: Open the software on the PC and enter the one-time password (Admin123!!) in the login dialog. The user is logged into the software only. The Manufacturing area is not accessible for this user. The one-time password must be changed after logging in for the first time.
- User: Hold the NFC card in front of the card reader on the welding machine. The user is logged in to the welding machine and into the software, and can start manufacturing.
- Administrator: Hold the NFC card in front of the card reader on the welding machine. The user is logged in to the welding machine and into the software. The areas Manufacturing, Manage instructions and the user administration are enabled for this user.
There are also several options for logging out:
- Logout with NFC card ("User" and "Administrator"): Hold the NFC card in front of the card reader on the welding machine again. The user is logged out.
- Logout via the user interface (all user groups): All user groups can also log out directly from the user interface. In the top menu bar, click on the user name and then the Logout button.
Resetting password
Proceed as follows to reset the password for the local administrator:
1Close WeldCube Navigator.
2Open the Microsoft Services application as an administrator.
3Exit the WeldCube Navigator service.
4In the C:\ProgramData\Fronius\WeldCube Navigator\Service\database folder, delete the User.db and Users-log.db files
NOTE!
Program files
Risk of data loss
Only ever delete data in the ProgramData folder.
Do not change or delete data in the Programs folder.
NOTE!
Display settings
If the files referred to above are not shown, check the Windows display settings.
5Start the WeldCube Navigator service.
6Open WeldCube Navigator.
Activating the OPT/i WeldCube Navigator option
The customer receives a license file with the purchase of WeldCube Navigator. This can be used to activate the OPT/i WeldCube Navigator (item number 4,067,029) option on the welding machine.
To do this, proceed as follows:
1Open the SmartManager for the welding machine.
2Open the overview of available function packages.
3Search for the function package and upload the license file.
For new welding machines, this option is already enabled at the factory.
OPT/i WeldCube Navigator can also be activated using the trial license. The trial license allows you to use and test all currently available function packages free of charge on the welding machine. After activating the trial license, all function packages and extensions are available for a limited arc time.
Proceed as follows to install the trial license:
1Defaults / Administration / Trial License
2Press the selection dial
The information for activating the trial license is displayed.
The information for activating the trial license is displayed.
3Select "Next"
4Register via WeldConnect
5Select "Next"
6Start trial license by selecting "Next"
7Confirm prompt
The confirmation that the trial license has been started is displayed.
The confirmation that the trial license has been started is displayed.
8Select "End"
The remaining time until the trial license expires is displayed under Administration.
The remaining time until the trial license expires is displayed under Administration.
Establishing a connection to the welding machine
The functions of WeldCube Navigator are not displayed to the user until the software is connected to a compatible welding system (see Welding system).
To establish a connection to the welding machine:
1Open the System settings.
2Enter the IP address of the device in the Settings menu.
3Click Save.
✓A green check mark is displayed next to the welding machine icon when the connection is established.
As of WeldCube Navigator version 2.3, a secure client connection must be established to the welding machine once only. To do this, proceed as follows:
1Open the System settings.
2Click the Request secure connection button in the Settings menu (see Settings.
3Confirm the secure connection request on the welding machine.
✓The secure client connection has been established.
These steps only have to be carried out once. The settings are saved. The connection is automatically restored, e.g., after a network failure.
Settings in WeldCube Navigator
System information
This menu area is visible to all users. The software log files can be downloaded here. The system information provides an overview of the active system components:
- Machine information
- Name
- Device type
- IP address of the device
- Location
- Installed firmware version
- Active option packages on the welding machine
- PC information
- Device type of the PC / tablet on which WeldCube Navigator is installed
- Installed operating system
- Storage space ...
- Version
- Installed software version
- Links to terms and conditions of use
- Link to download the software updates
- Open source licenses
- Name
- Version
- License texts
- Copyright texts
Settings
For the "Administrator" and "Local Administrator" users, the following settings are available in this menu area:
- Connect to a welding machine (see section Establishing a connection to the welding machine) via the IP address.
- Enable the Prevent welding in case of loss of connection function in order to block the welding process on the welding machine if the network connection is lost.
Reconnect the welding machine to WeldCube Navigator once the network connection is active again. Without a connection, welding instructions cannot be processed and data exchange is not possible. - Establish a connection to WeldCube Premium
- Enable processing exclusively via the API
- Activate Suspend Mode via torch control (see section Pausing and skipping processing)
- Hide personal data
- Automatic continuation
- OPC UA-Server connection
- Password and user language of the local administrator
Some of the settings are described in the following paragraphs. Each change to the system settings must be confirmed as follows:
1Click Save to save the settings for all tabs.
2Click the house icon to return to the main menu.
Establishing a connection to WeldCube Premium
Connect to WeldCube Premium to enable centralized welding data documentation:
1Select the General tab.
2Enter the URL of the existing WeldCube Premium installation.
3Activate the Use WCP button.
Establishing a connection to an OPC UA server
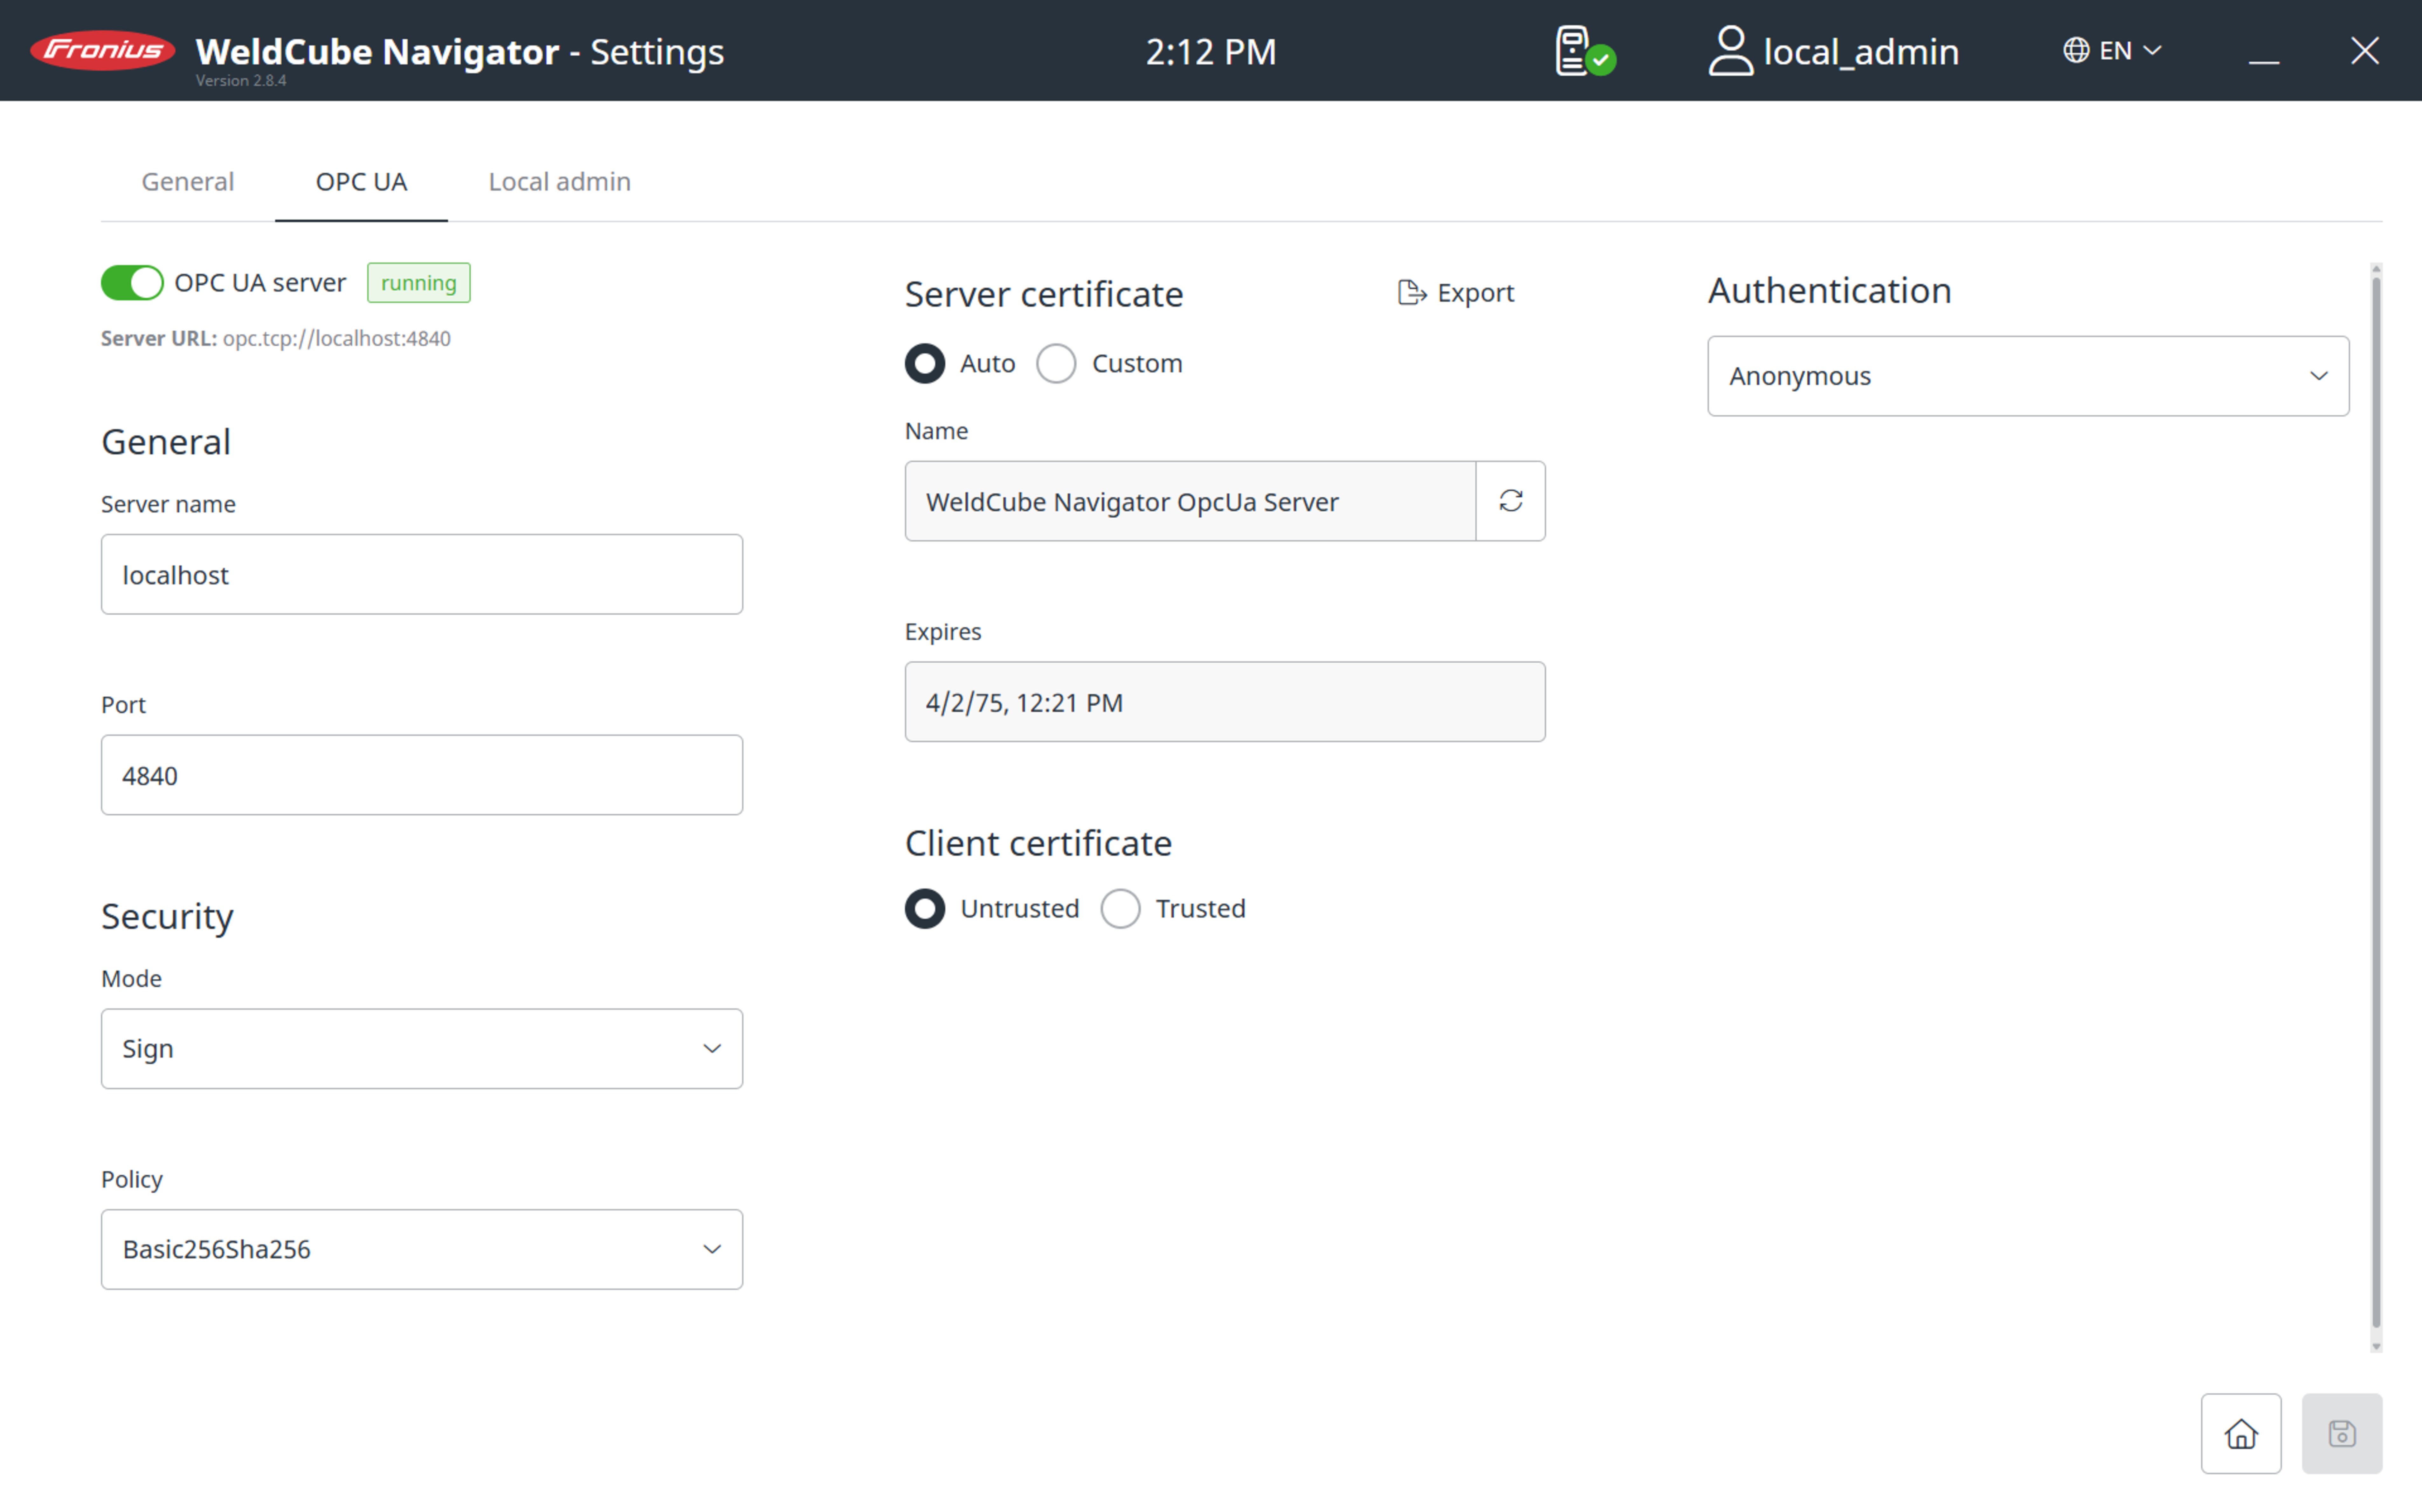
Establish a connection to an OPC UA server to enable WeldCube Navigator to communicate with an external customer system:
1Select the OPC UA tab.
2Configure the server connection.
3Select the type of authentication.
NOTE!
Risk of tampering due to insecure connection.
When connecting to external systems, tampering such as data loss may occur.
When connecting WeldCube Navigator to external systems (for example, production planning systems, order processing systems, PLCs, via OPC UA), secure the connection through signing and encryption (policy: Basic256Sha256).
Use client certificates and user certificates.
Alternatively, use encryption with access data (username and password).
Functions of the OPC UA server are described in the chapter OPC UA server functions .
Enabling processing exclusively via the API
Enable processing exclusively via the API:
1Check the Enter part manufacturing via API only checkbox in the System settings menu.
2Establish connection to the OPC UA server (see previous paragraph).
3Call the OPC UA API in the external customer system.
In this way, the processing of the instructions is controlled via the customer system. WeldCube Navigator is started with these settings, but the Manufacturing area is locked.
Changing settings of the local administrator
Change the settings for the local administrator:
1Open the Local admin tab.
2Customize password and user language.
- Minimum length 10 characters, maximum 16 characters
- Contains a capital letter
- Contains a lowercase letter
- Contains a number (0-9)
- Contains a special character (@, #, etc.)
Language settings
The user has several options to set the language of the user interface:
- In the upper menu bar the currently used language is indicated as an abbreviation (for example EN). Here you can select one of the available languages for each session.
- Change stored user language permanently:
1Click on the username.
2Set the language in the user settings.
Operation
Editor
User interface editor
This user interface is visible to the "Administrator" and "Local Administrator" users and provides the following functions:
- Create instructions
- Manage instructions
- Software configuration
- System settings
The general "User" is authorized exclusively to work through instructions and therefore has no access to the editor.
Types of manufacturing steps
In the editor, three different types of steps can be created when creating instructions:
- Generic: This general manufacturing step is selected if pre- or post-processing activities (preparation of the weld seam, clamping, or repositioning of the workpiece) are to be performed.
- Welding: Used for welding manufacturing steps. A seam number and job can be selected for each weld. In the case of instructions with several welds, the minimum and maximum number of welds can be defined to allow the user to put the equipment down or to complete several tack welds in one step.
Creating instructions
Create a manufacturing instruction as follows:
1Click Manage instructions. An overview of the available instructions appears.
2Click the + button. The New instruction dialog appears.
3In the Instruction name input field, enter the name of the instruction.
4Enter the part number of the workpiece to be processed in the Part item number field.
5Upload an overview image (optional).
6Click Edit instruction to edit the created instruction.
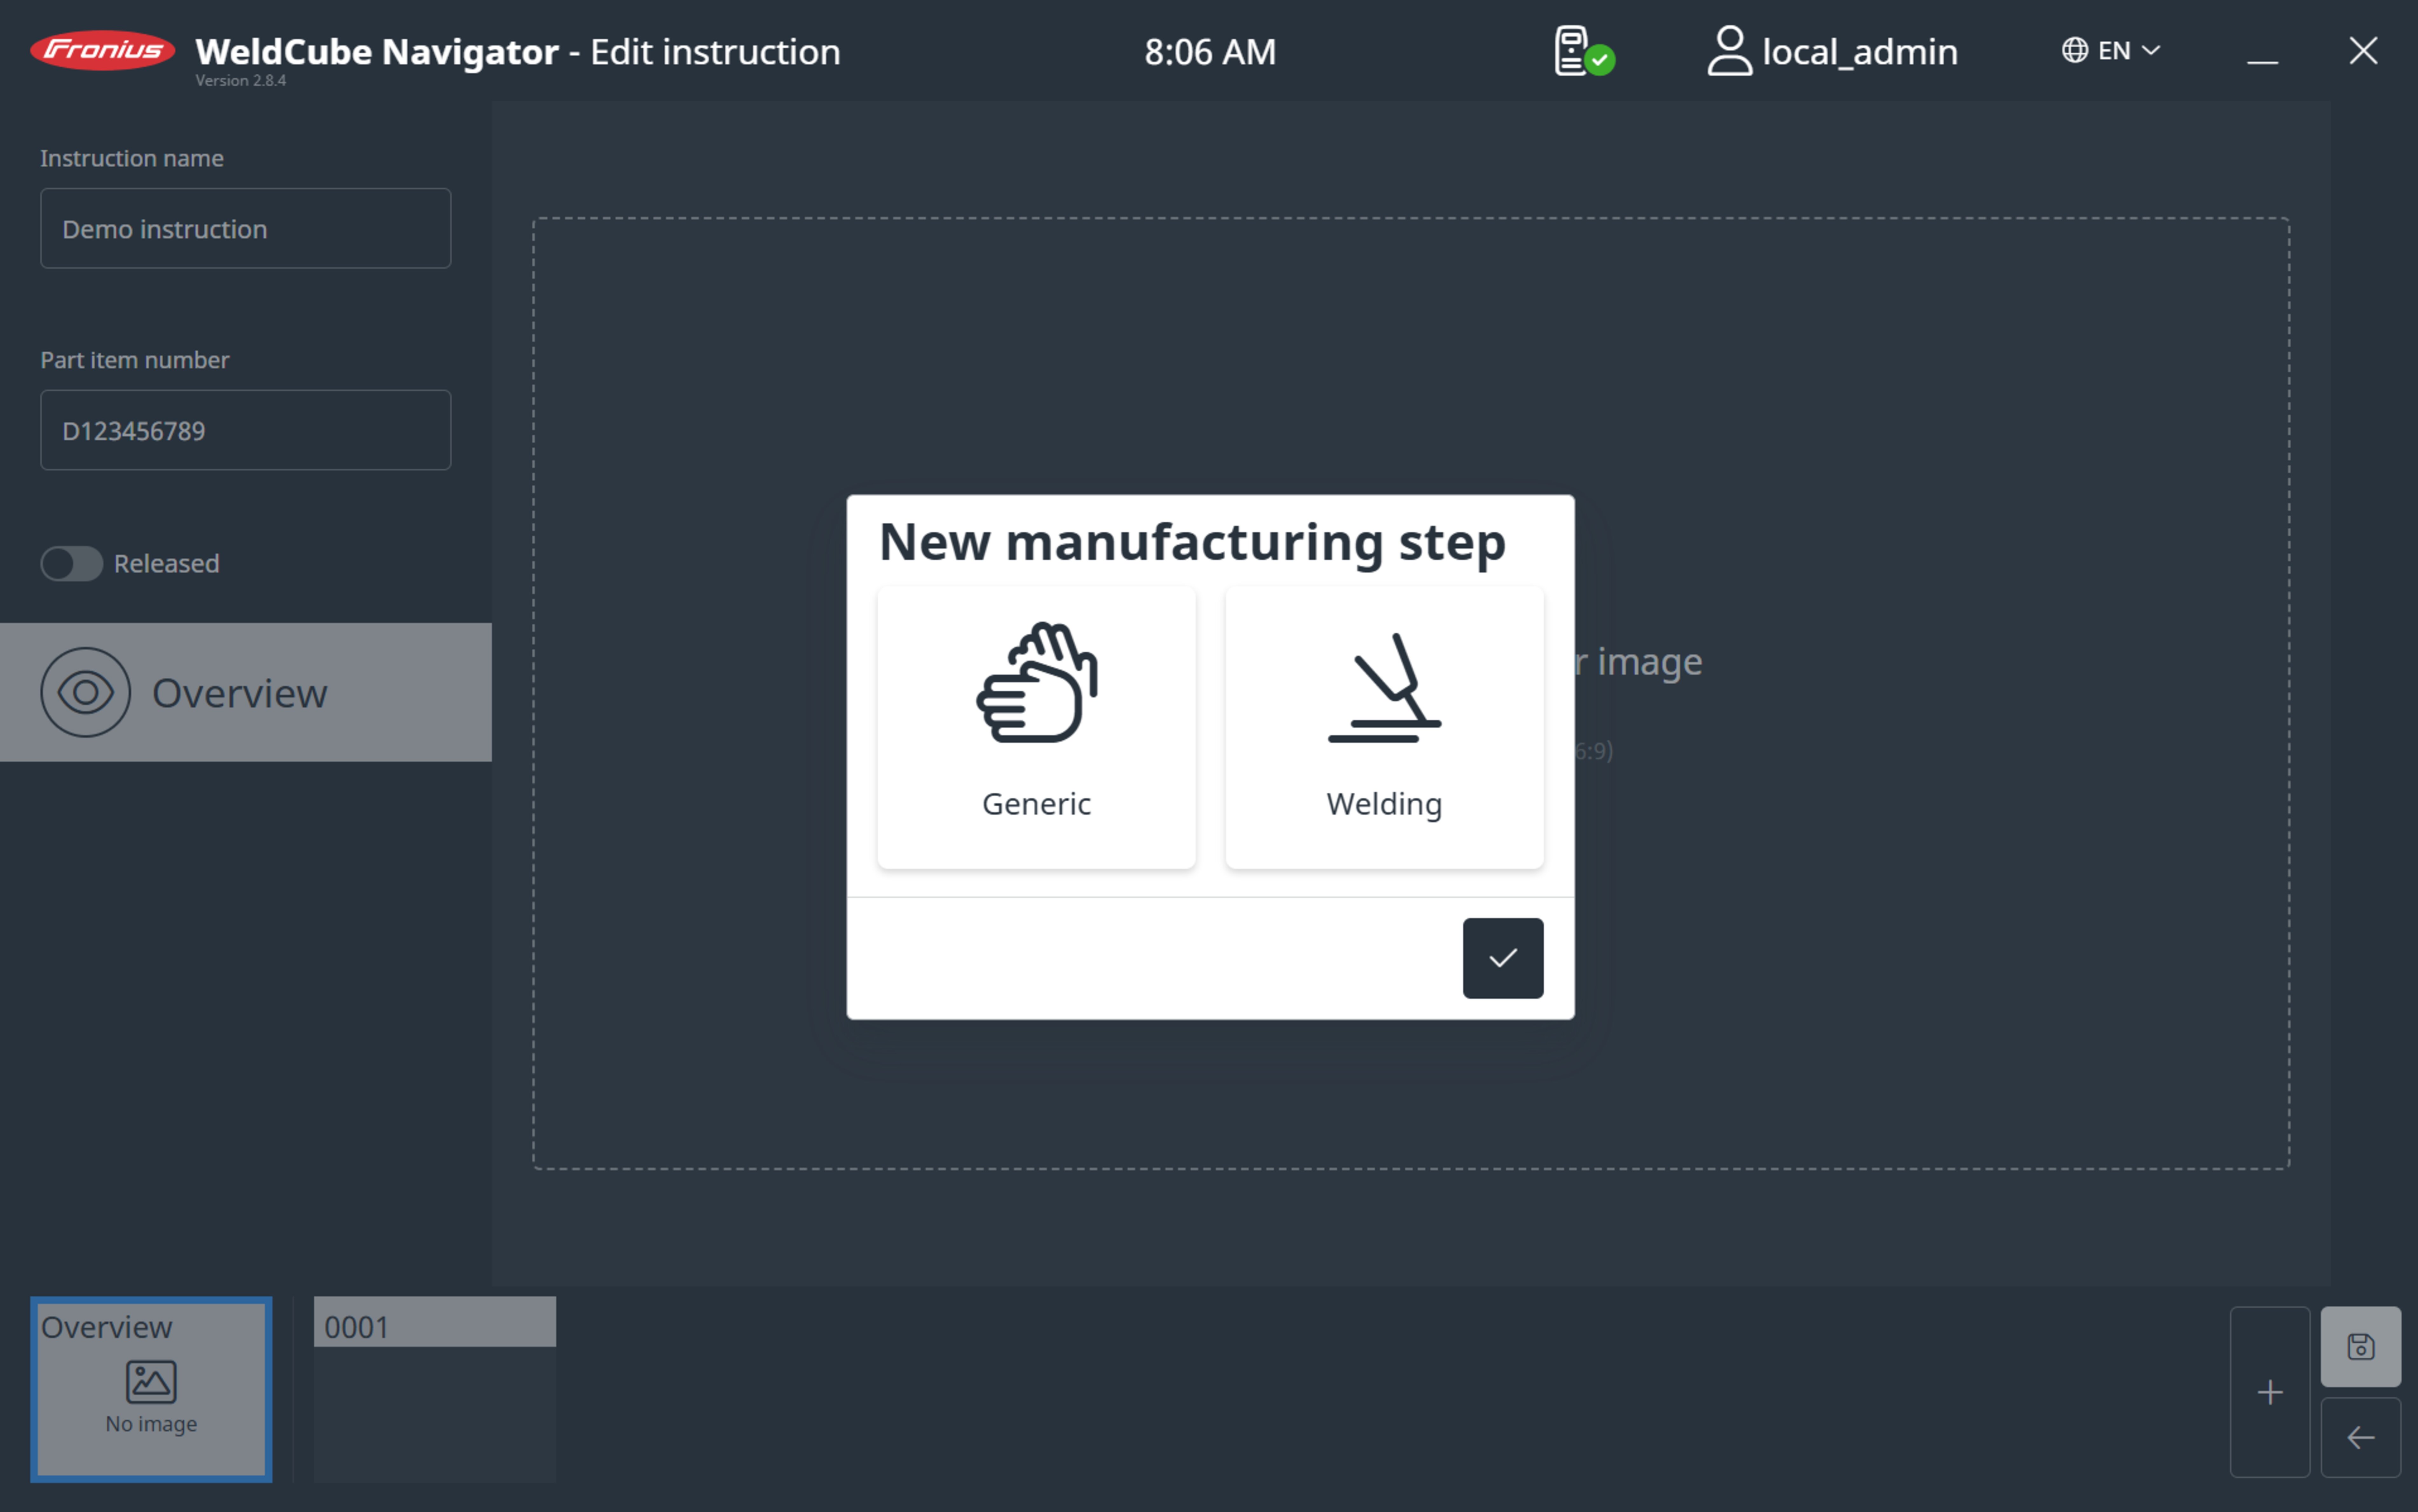
7Click + in the menu area of the created instruction. The New manufacturing step dialog opens.
8Select the type of manufacturing step.
9Upload an image for each manufacturing step. Click Upload image and select an image from a computer location.
The following image formats are allowed:
- png
- jpeg
- bmp
- gif
IMPORTANT!
The maximum file size per image file is 50 MB.
10Set parameters for the manufacturing steps:
- Seam number: Weld number.
- Job number: Number of the welding job.
- Edit the job if necessary by clicking the Edit job link in the SmartManager for the welding machine.
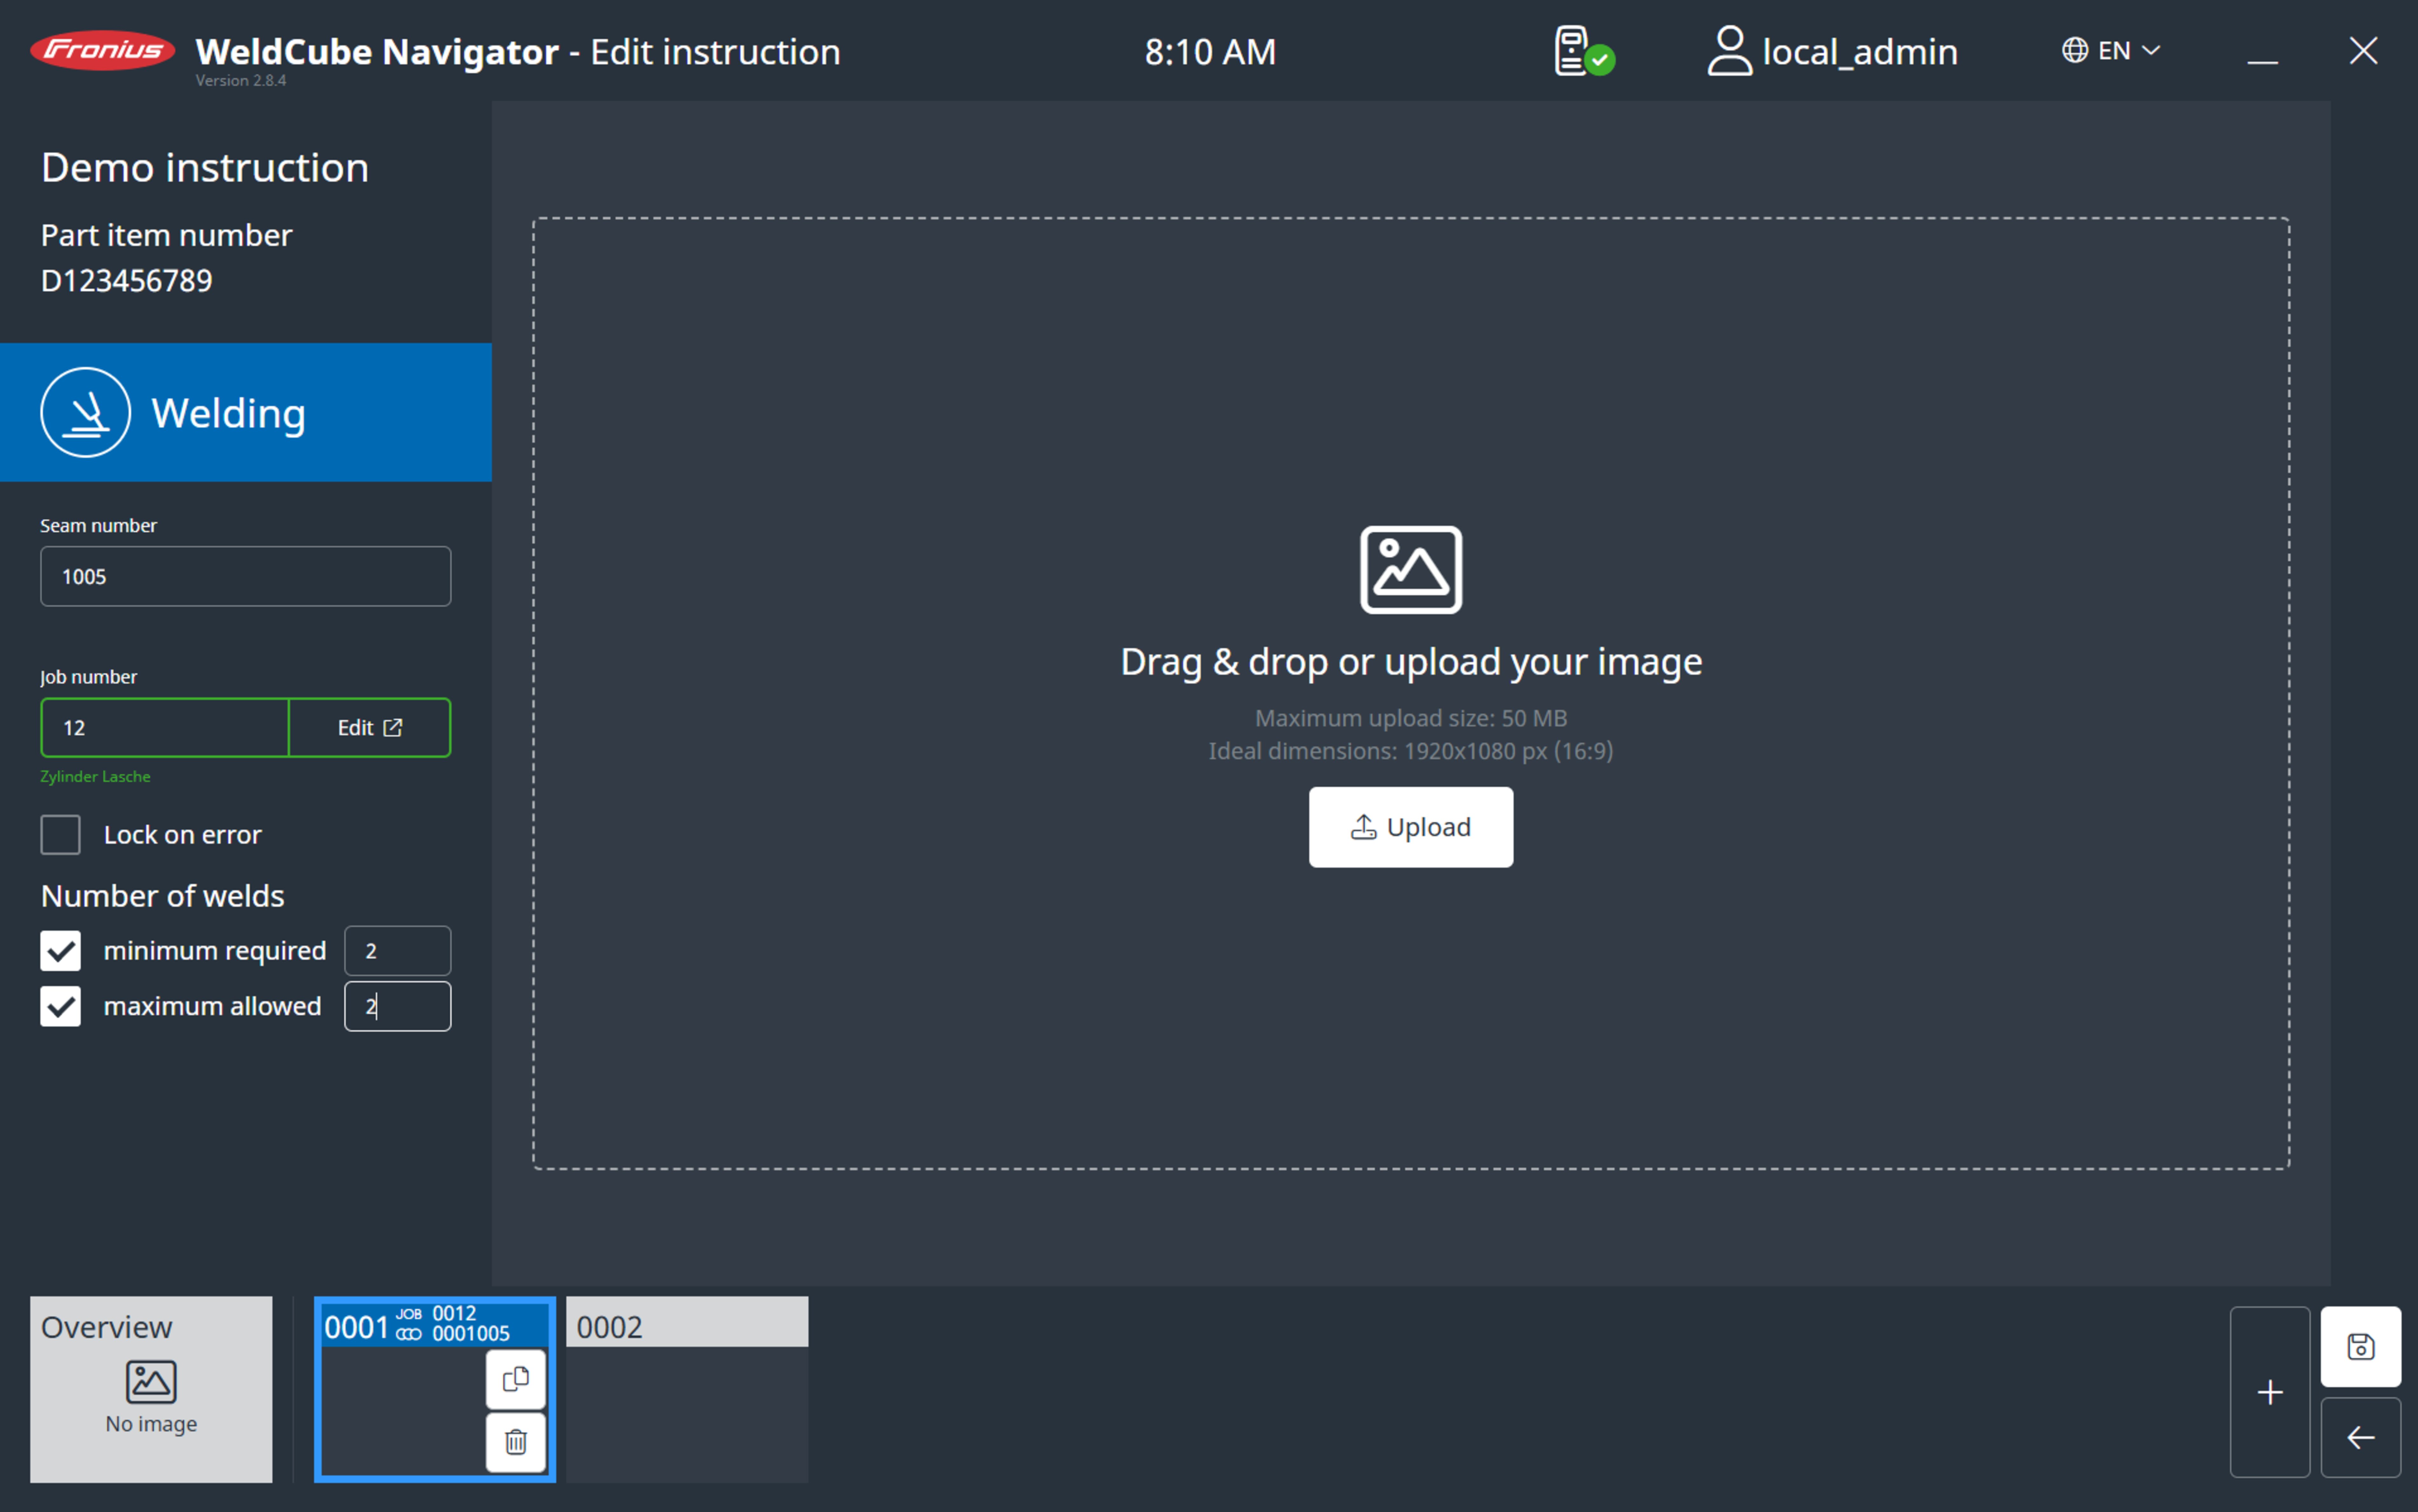
Additional parameters can be added for multiple welds:
- Number of welds: The minimum required and maximum allowed number of welds is defined and monitored by WeldCube Navigator during processing.
- Lock on error: WeldCube Navigator stops processing as soon as the maximum permitted number of welds is exceeded or the welding machine transmits a Limit Monitoring error. The welding supervisor must acknowledge the error so that processing can continue.
11Click Save when the creation and editing of the instruction and manufacturing steps are complete.
Creating additional information
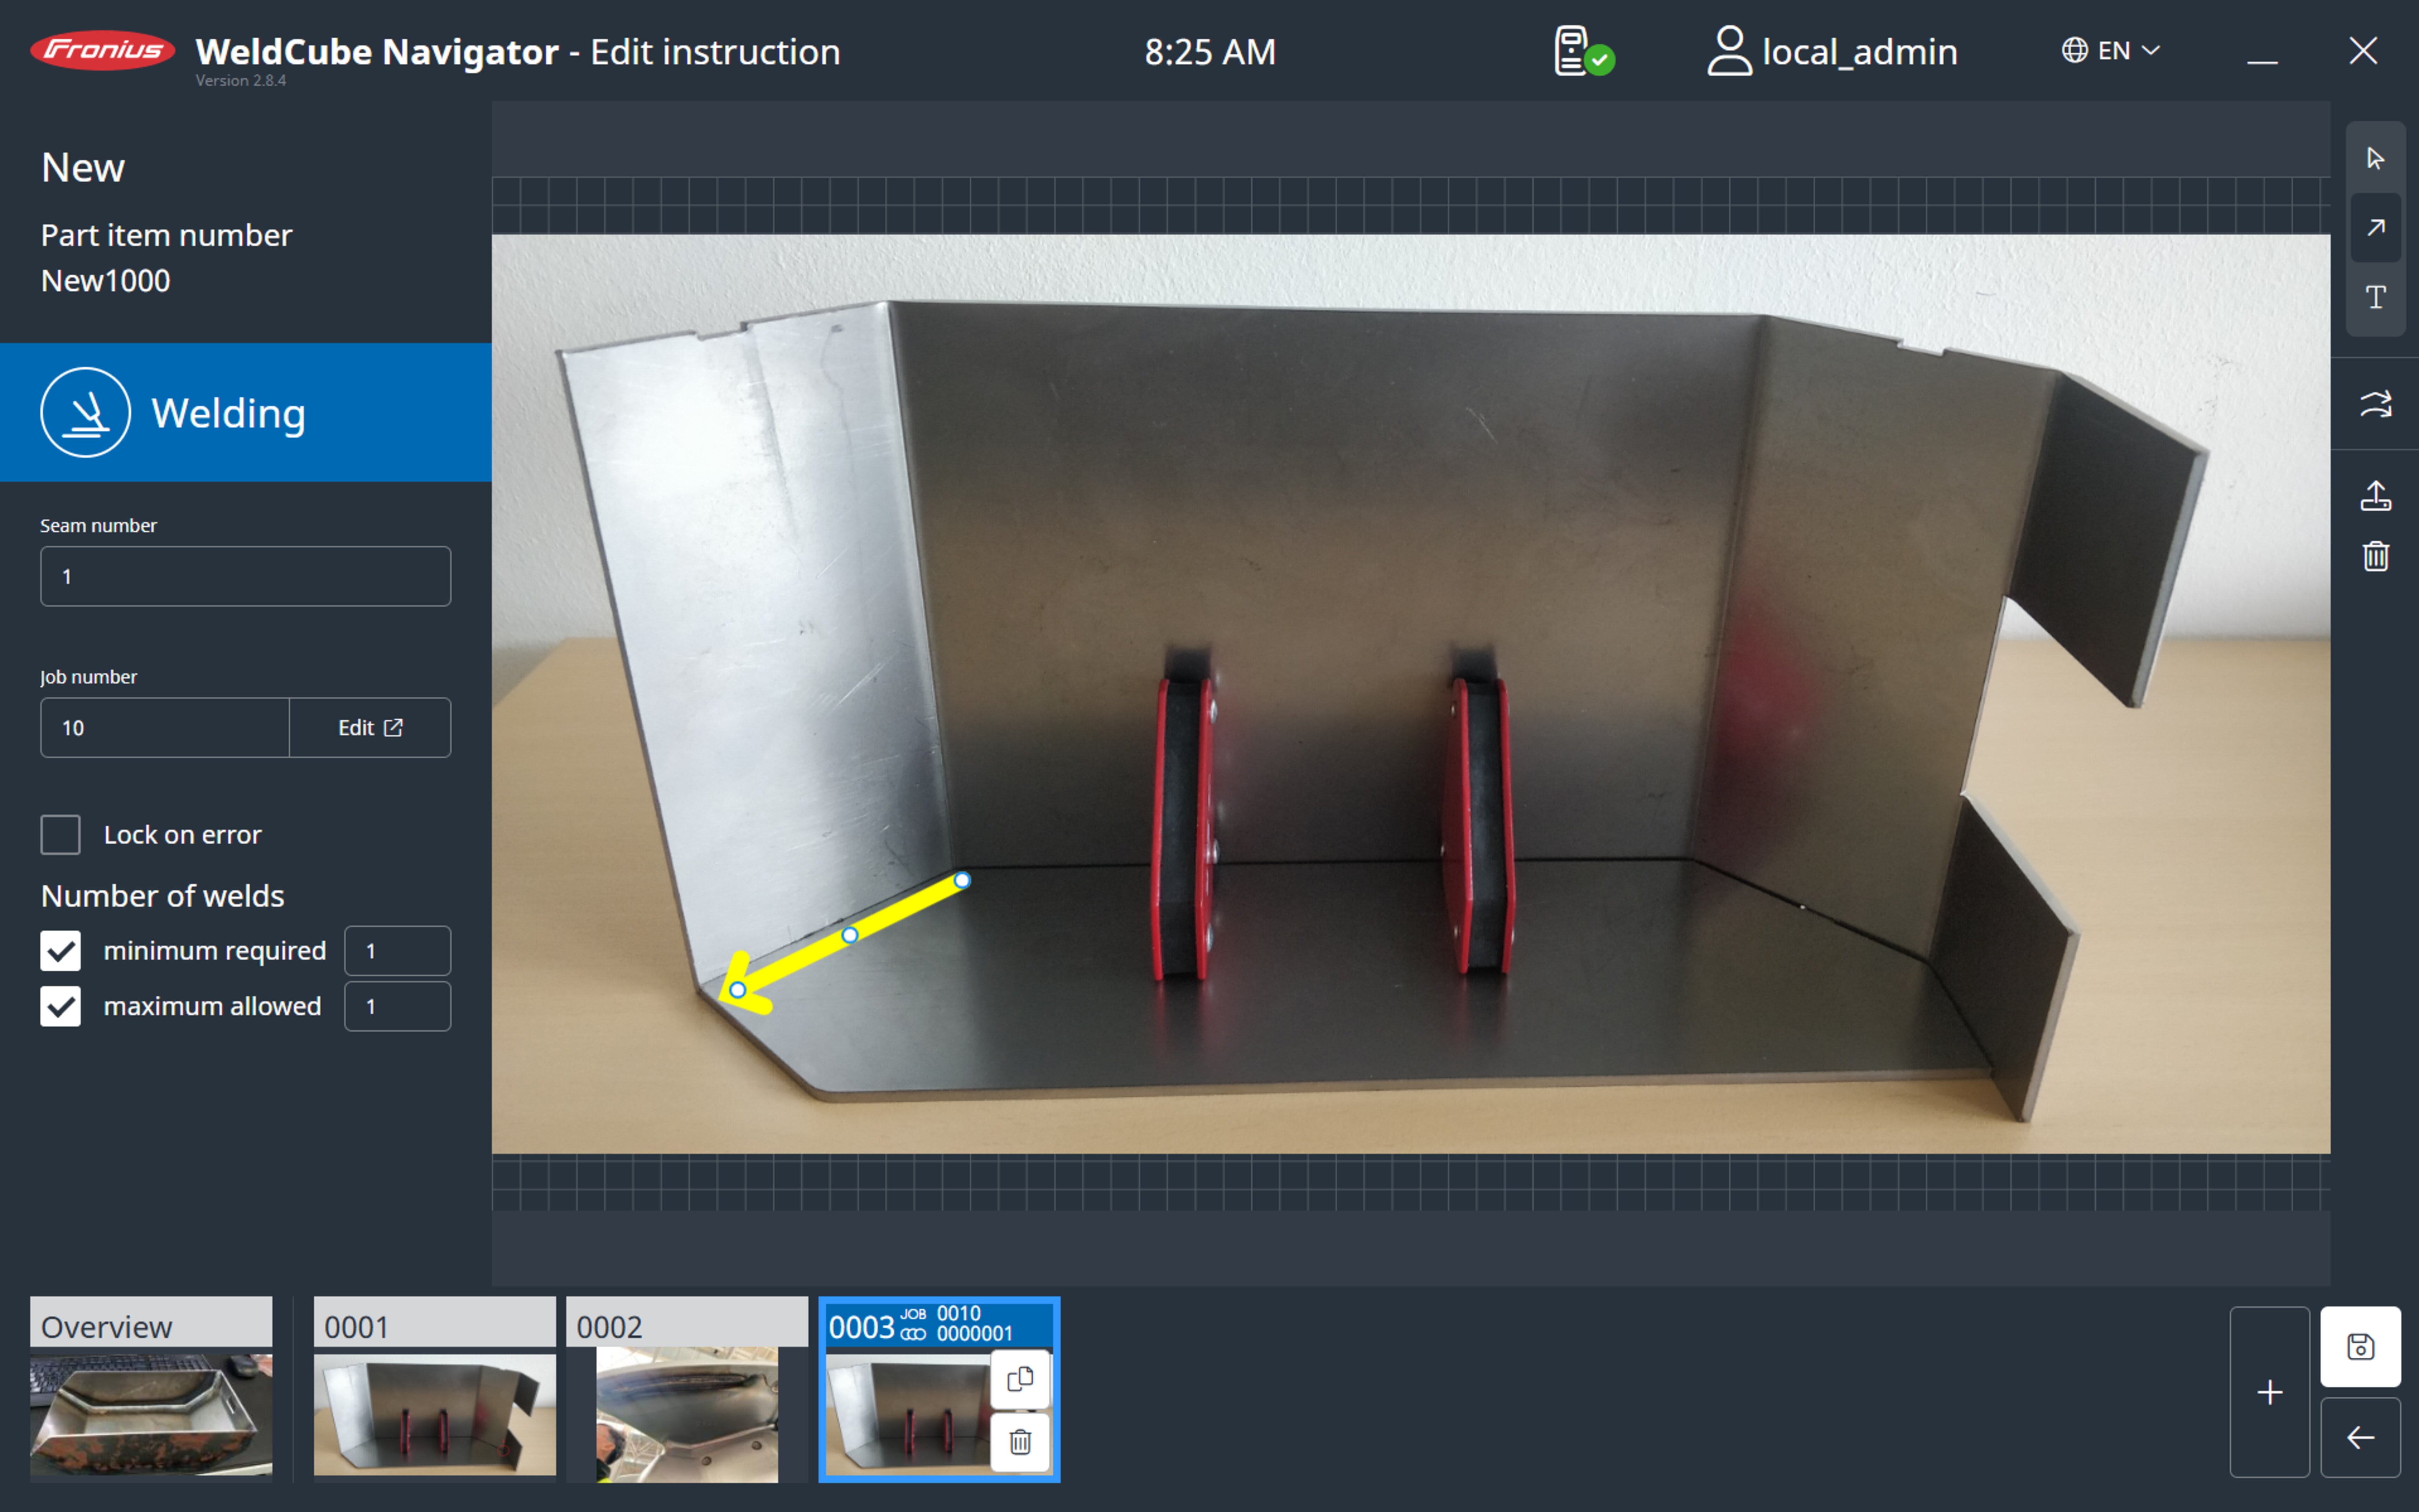
Additional graphic and text information simplifies the creation of welding instructions and makes the welder's work easier. The following elements are available:
- Arrows that are individually positioned by means of anchor points
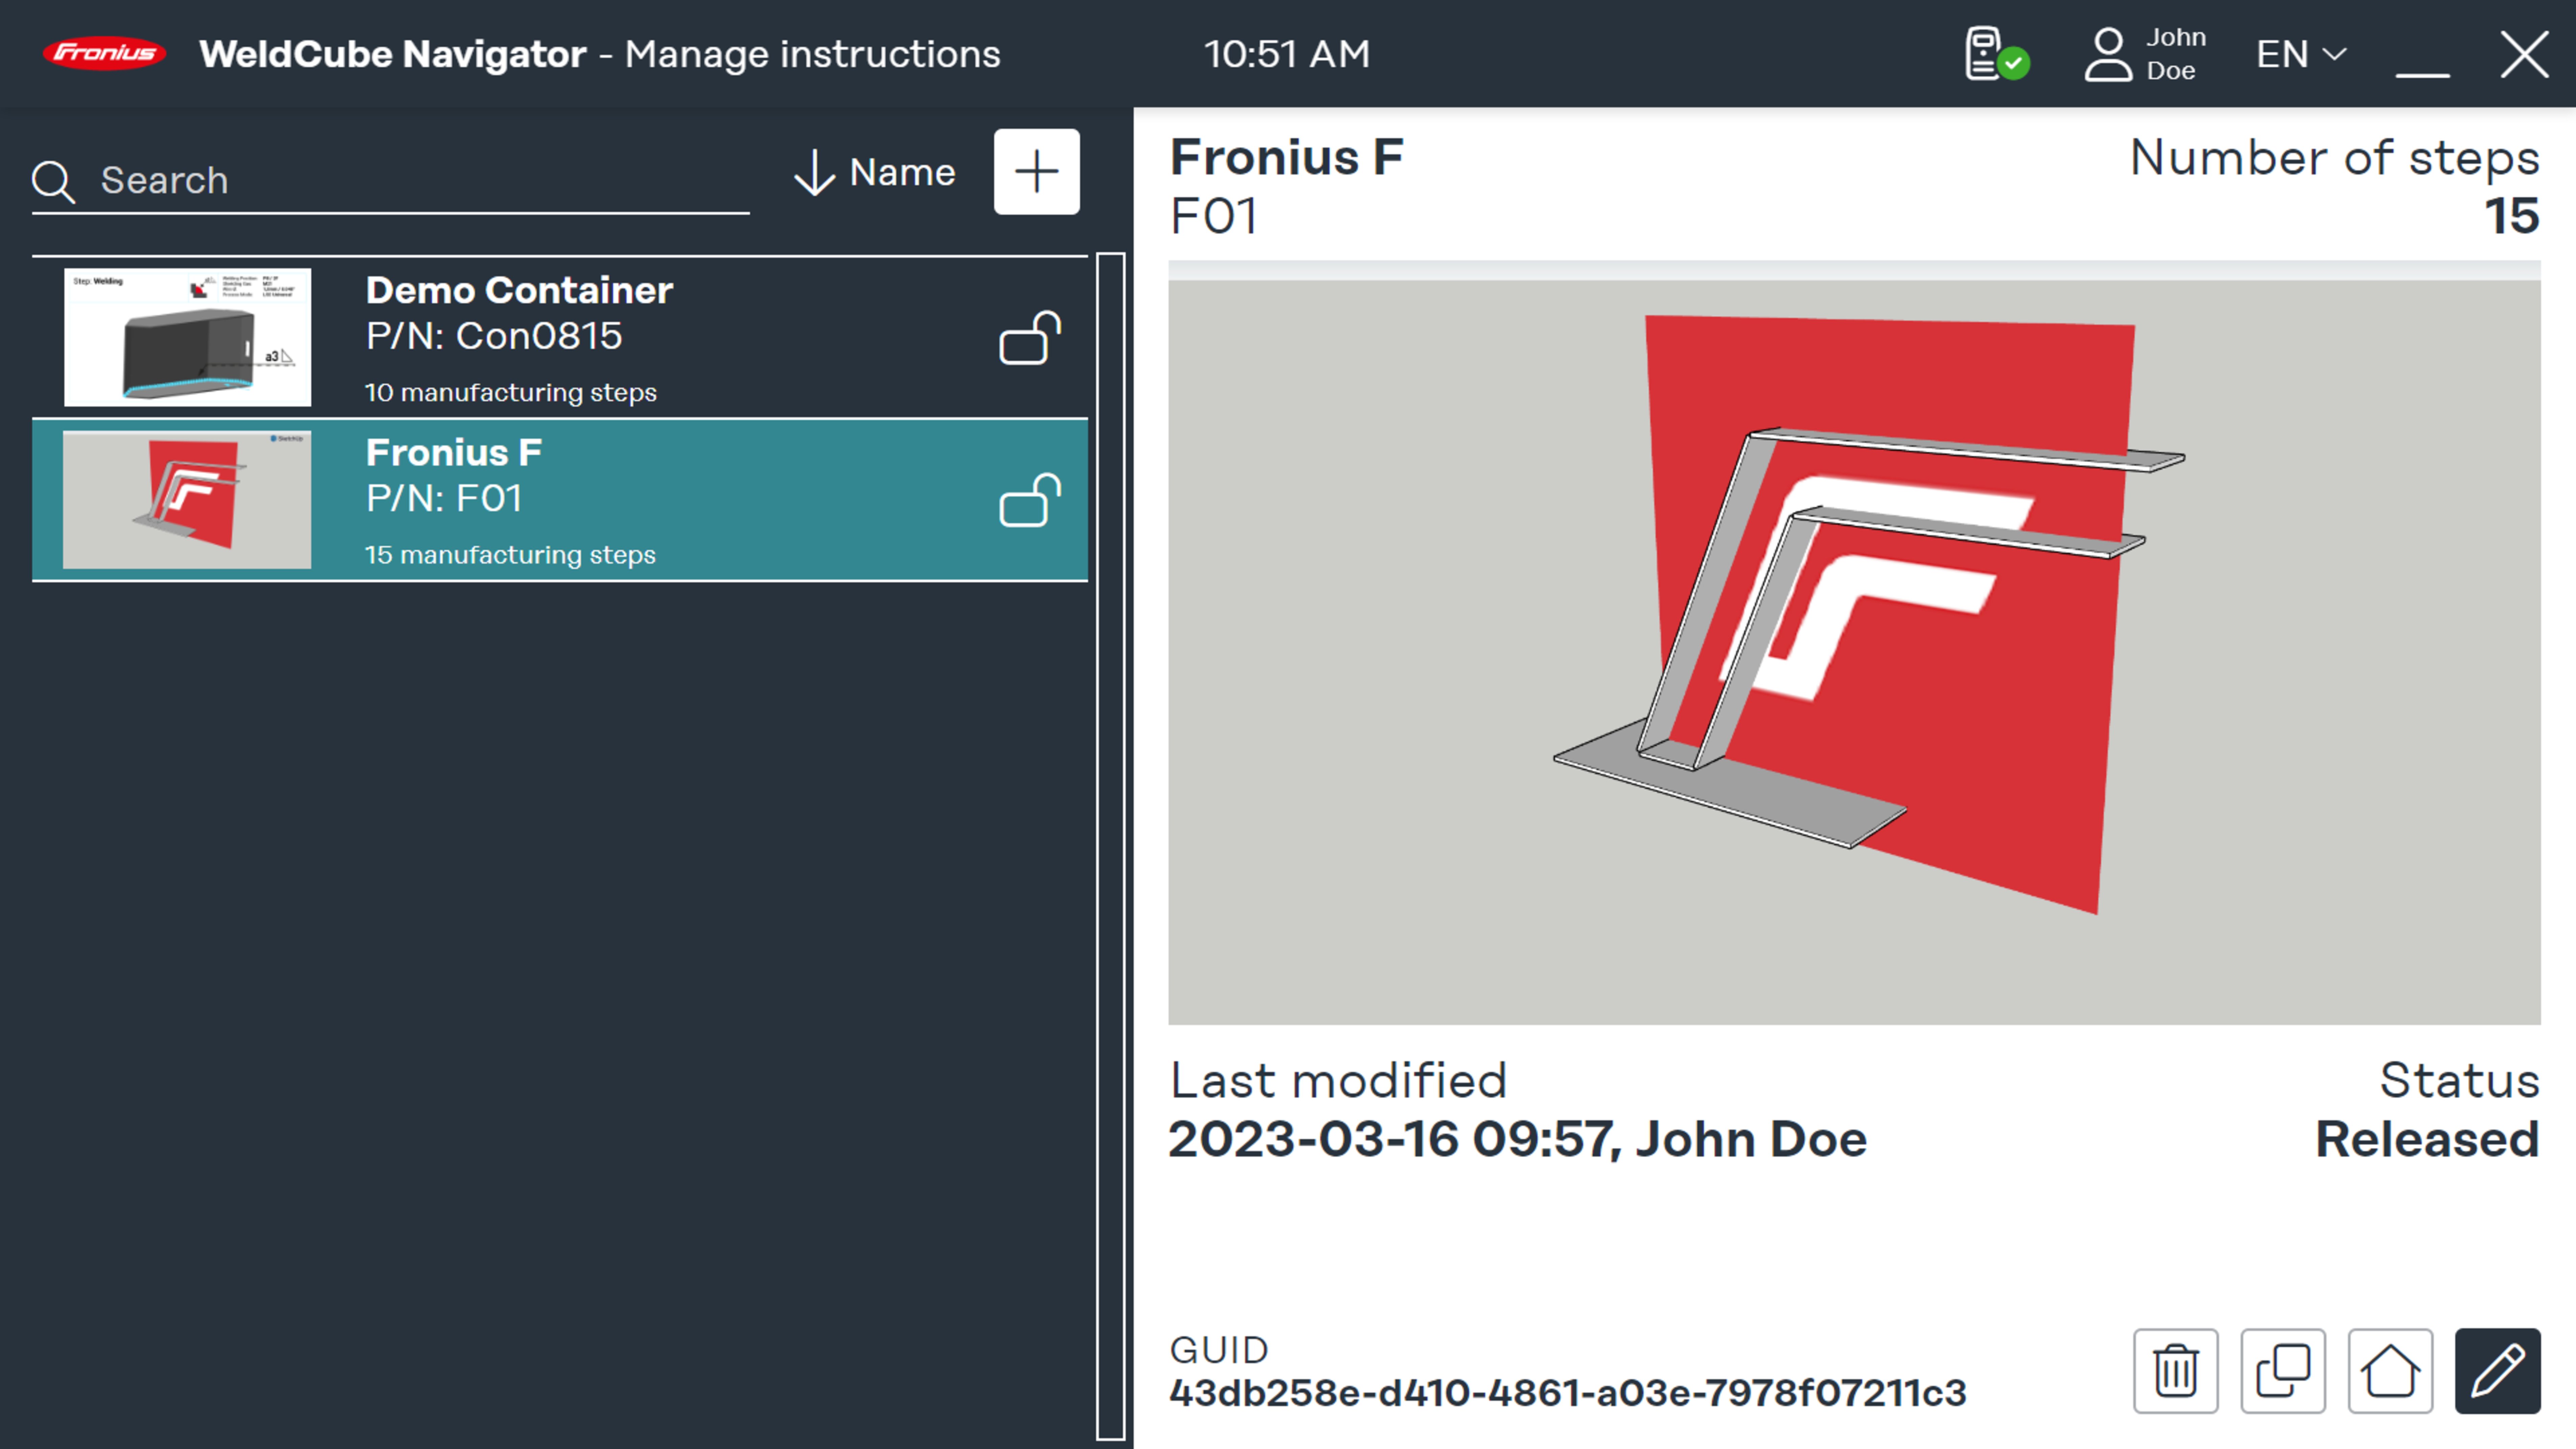
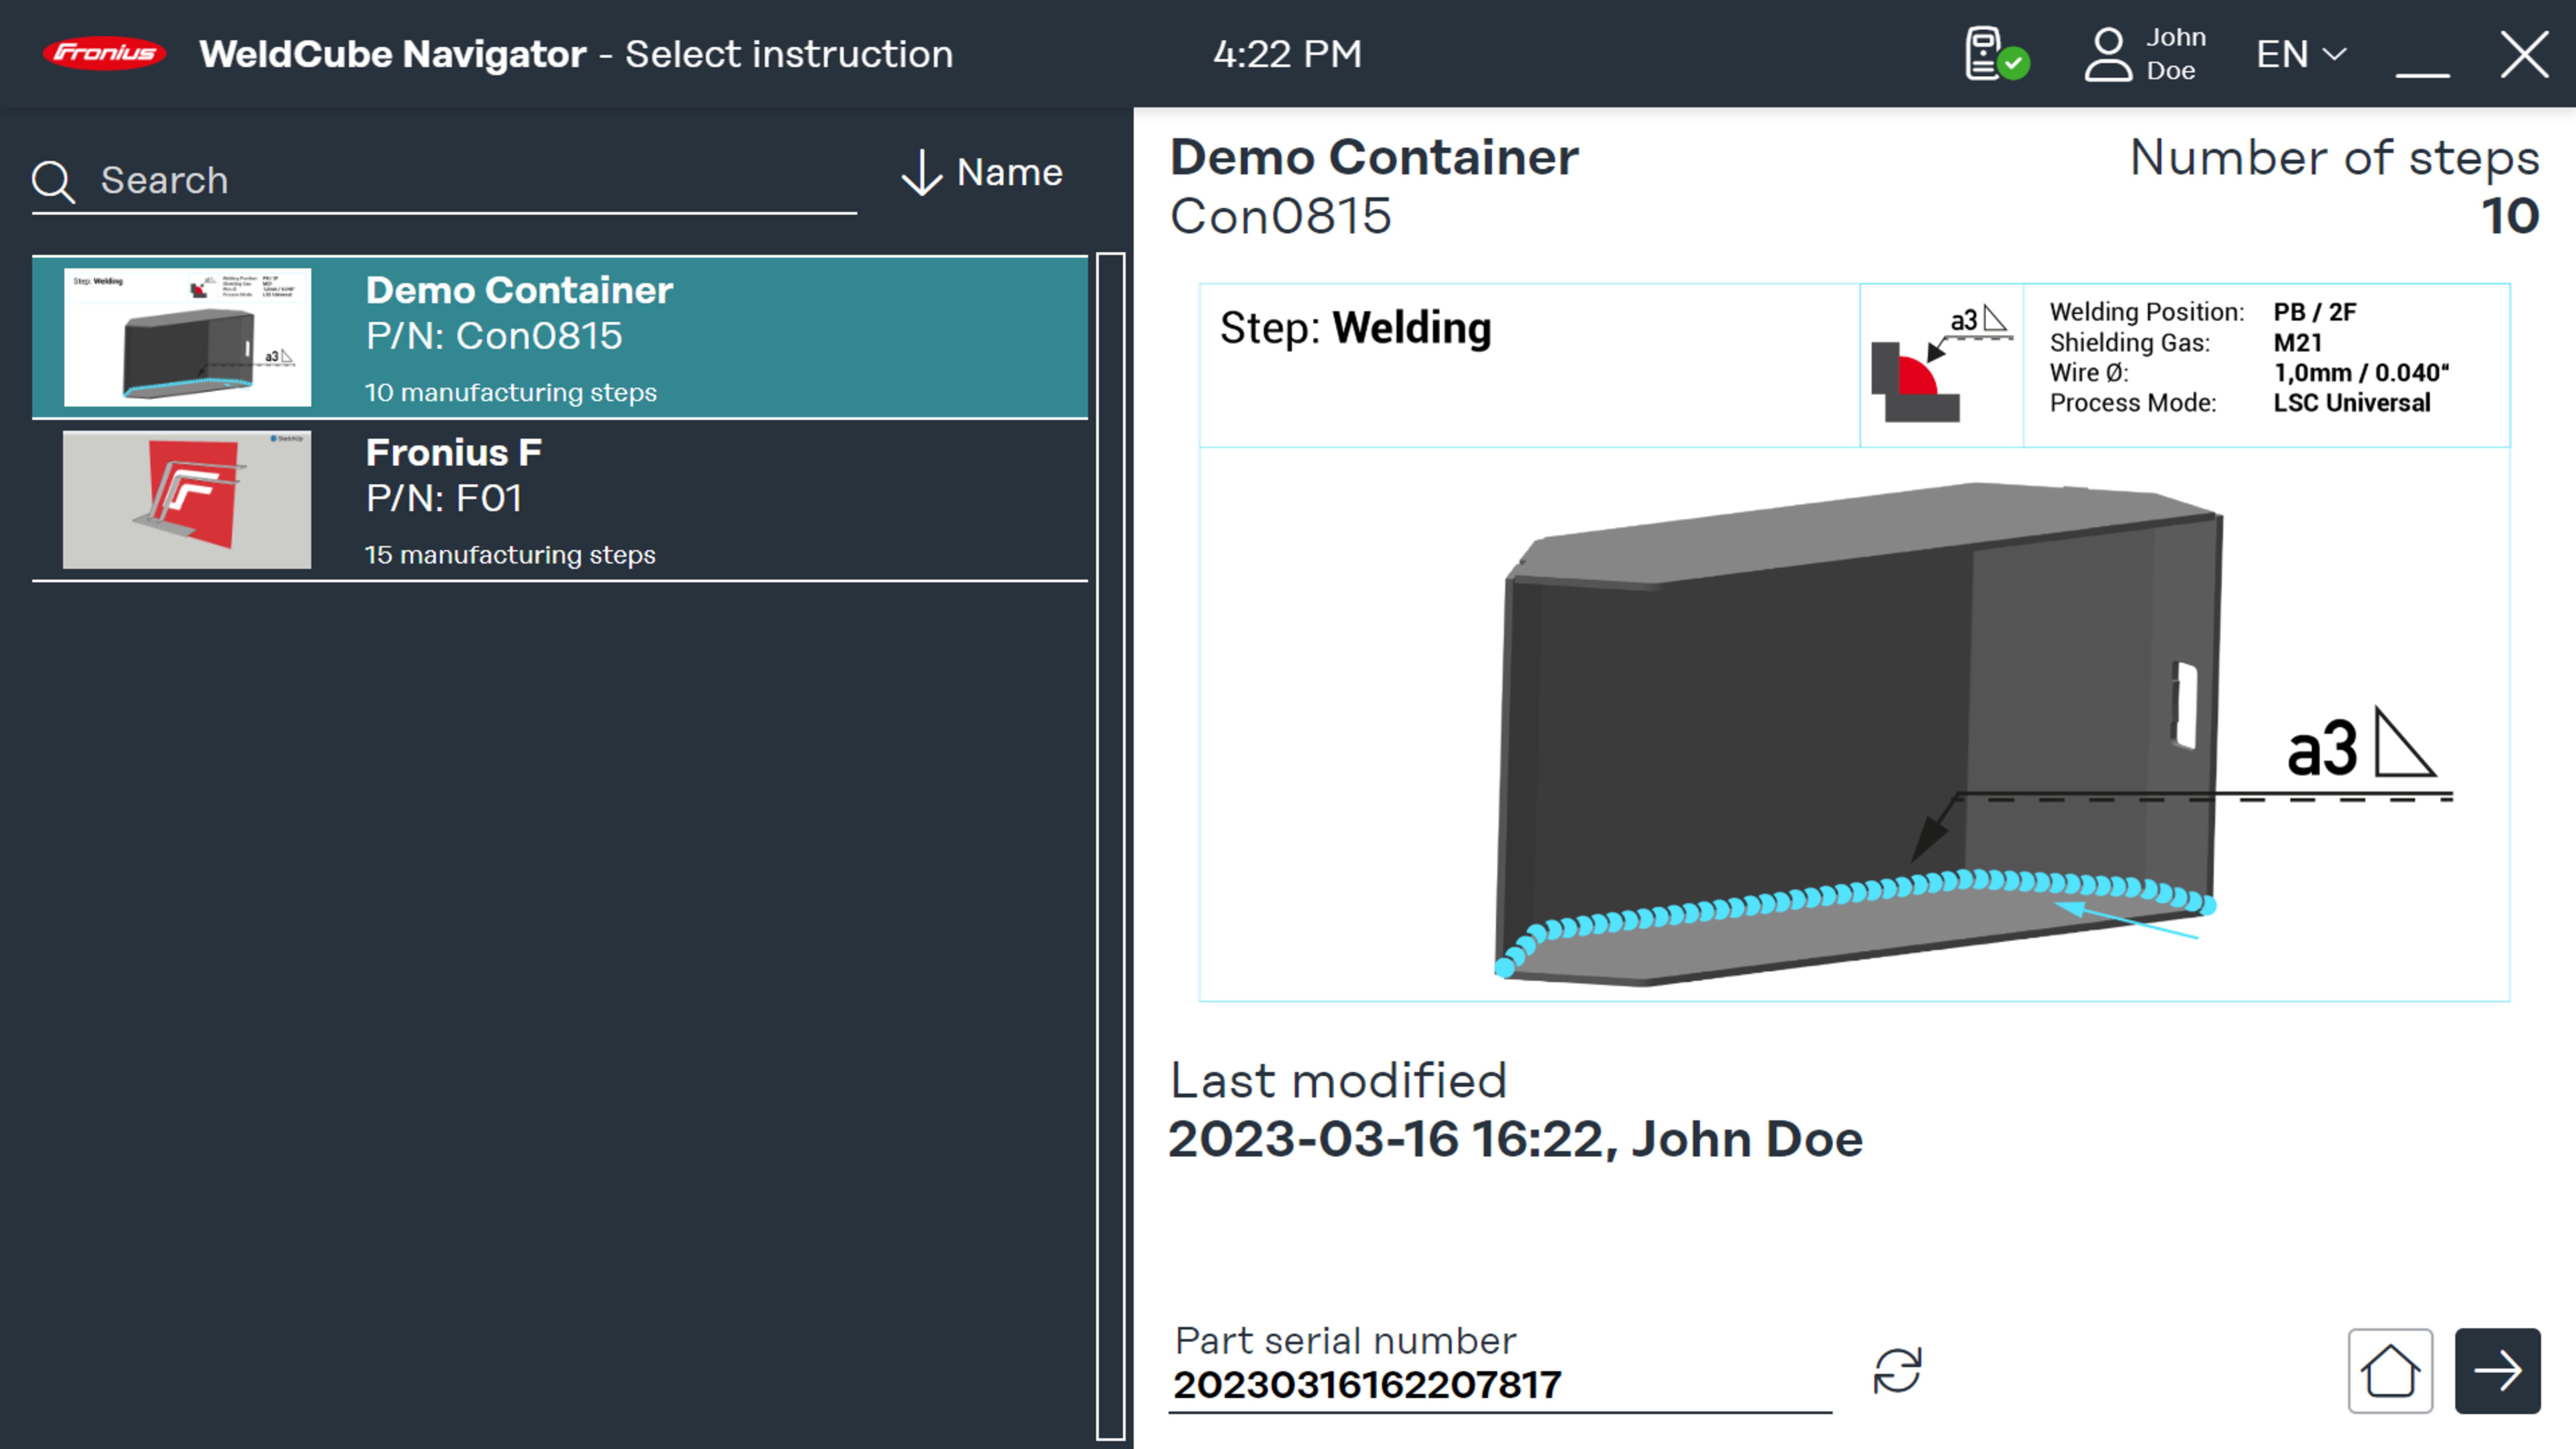
Managing instructions

In the overview of available manufacturing instructions, they can be edited, copied, and deleted. In the search box, you can search for a specific instruction and sort the selection by criteria. The following parameters are displayed in the right-hand preview area of the user interface:
- Name
- Part item number
- Creator or modifier
- Number of manufacturing steps
- Modification date
- Status
Instructions with the status Locked can be edited in the editor. They are not released for processing by a welder. The status Released unlocks the instructions for processing in the sequencer.
Sequencer
Sequencer user interface
The "Sequencer" shows the available welding instructions and guides the user through the individual manufacturing steps.
The general "User" can only access the Manufacturing and System information buttons. "Administrator" users can also access the editor functions in addition to manufacturing.
Welding torch navigation
The welding torch navigation function is only available for Fronius welding torches with the Up/Down and JobMaster function. To begin manufacturing using the welding torch, perform the following steps:


Up/Down torch
1Press the + function key on the welding torch in the main menu of the software.


JobMaster welding torch
IMPORTANT!
Fronius welding torches with the JobMaster function can only be used in combination with TPS/i and iWave welding machines.
1Select WeldCube Navigator mode on the welding torch display. The +/- function keys are now enabled for WeldCube Navigator.
2Press the + function key on the welding torch in the main menu of the software.
The following navigation steps and actions are controlled via the function keys:
Program area | Key | Function |
|---|---|---|
Main menu | + | Opens the selection of available welding instructions |
Overview of welding instructions | + | Go to the previous list item |
- | Go to the next list item | |
| + | Press and hold to open the selected instruction |
| - | Press and hold to enter the main menu |
Welding instruction start page | + | Start execution of the welding instruction |
| - | Press and hold to switch back to the welding instructions overview |
Processing | - | Activate/deactivate Suspend Mode (see Pausing and skipping processing) |
| - | Press and hold to navigate back one manufacturing step |
| + | Switch to the next manufacturing step |
Processing summary | +
| Repeat the processing with a new serial number (if the function Enabling processing exclusively via the API is not activated). |
| - | Press and hold to navigate back one manufacturing step |
Processing instructions
WARNING!
Danger from operating the software during welding.
Serious personal injury and damage to property may result
Do not operate the software during welding.
During welding, pay full attention to the welding torch and the component.
Perform the following steps before executing a welding instruction:
1 Log in to the welding machine with the NFC card.
2Open WeldCube Navigator on the control unit.
3Click the Manufacturing button to go to the overview of released instructions.
You can search for individual instructions in the search field. Sorting, for example by instruction number, is also possible.
4Press the function key on the welding torch (see section Welding torch navigation) or the right arrow on the screen to call up the overview of the selected instruction.
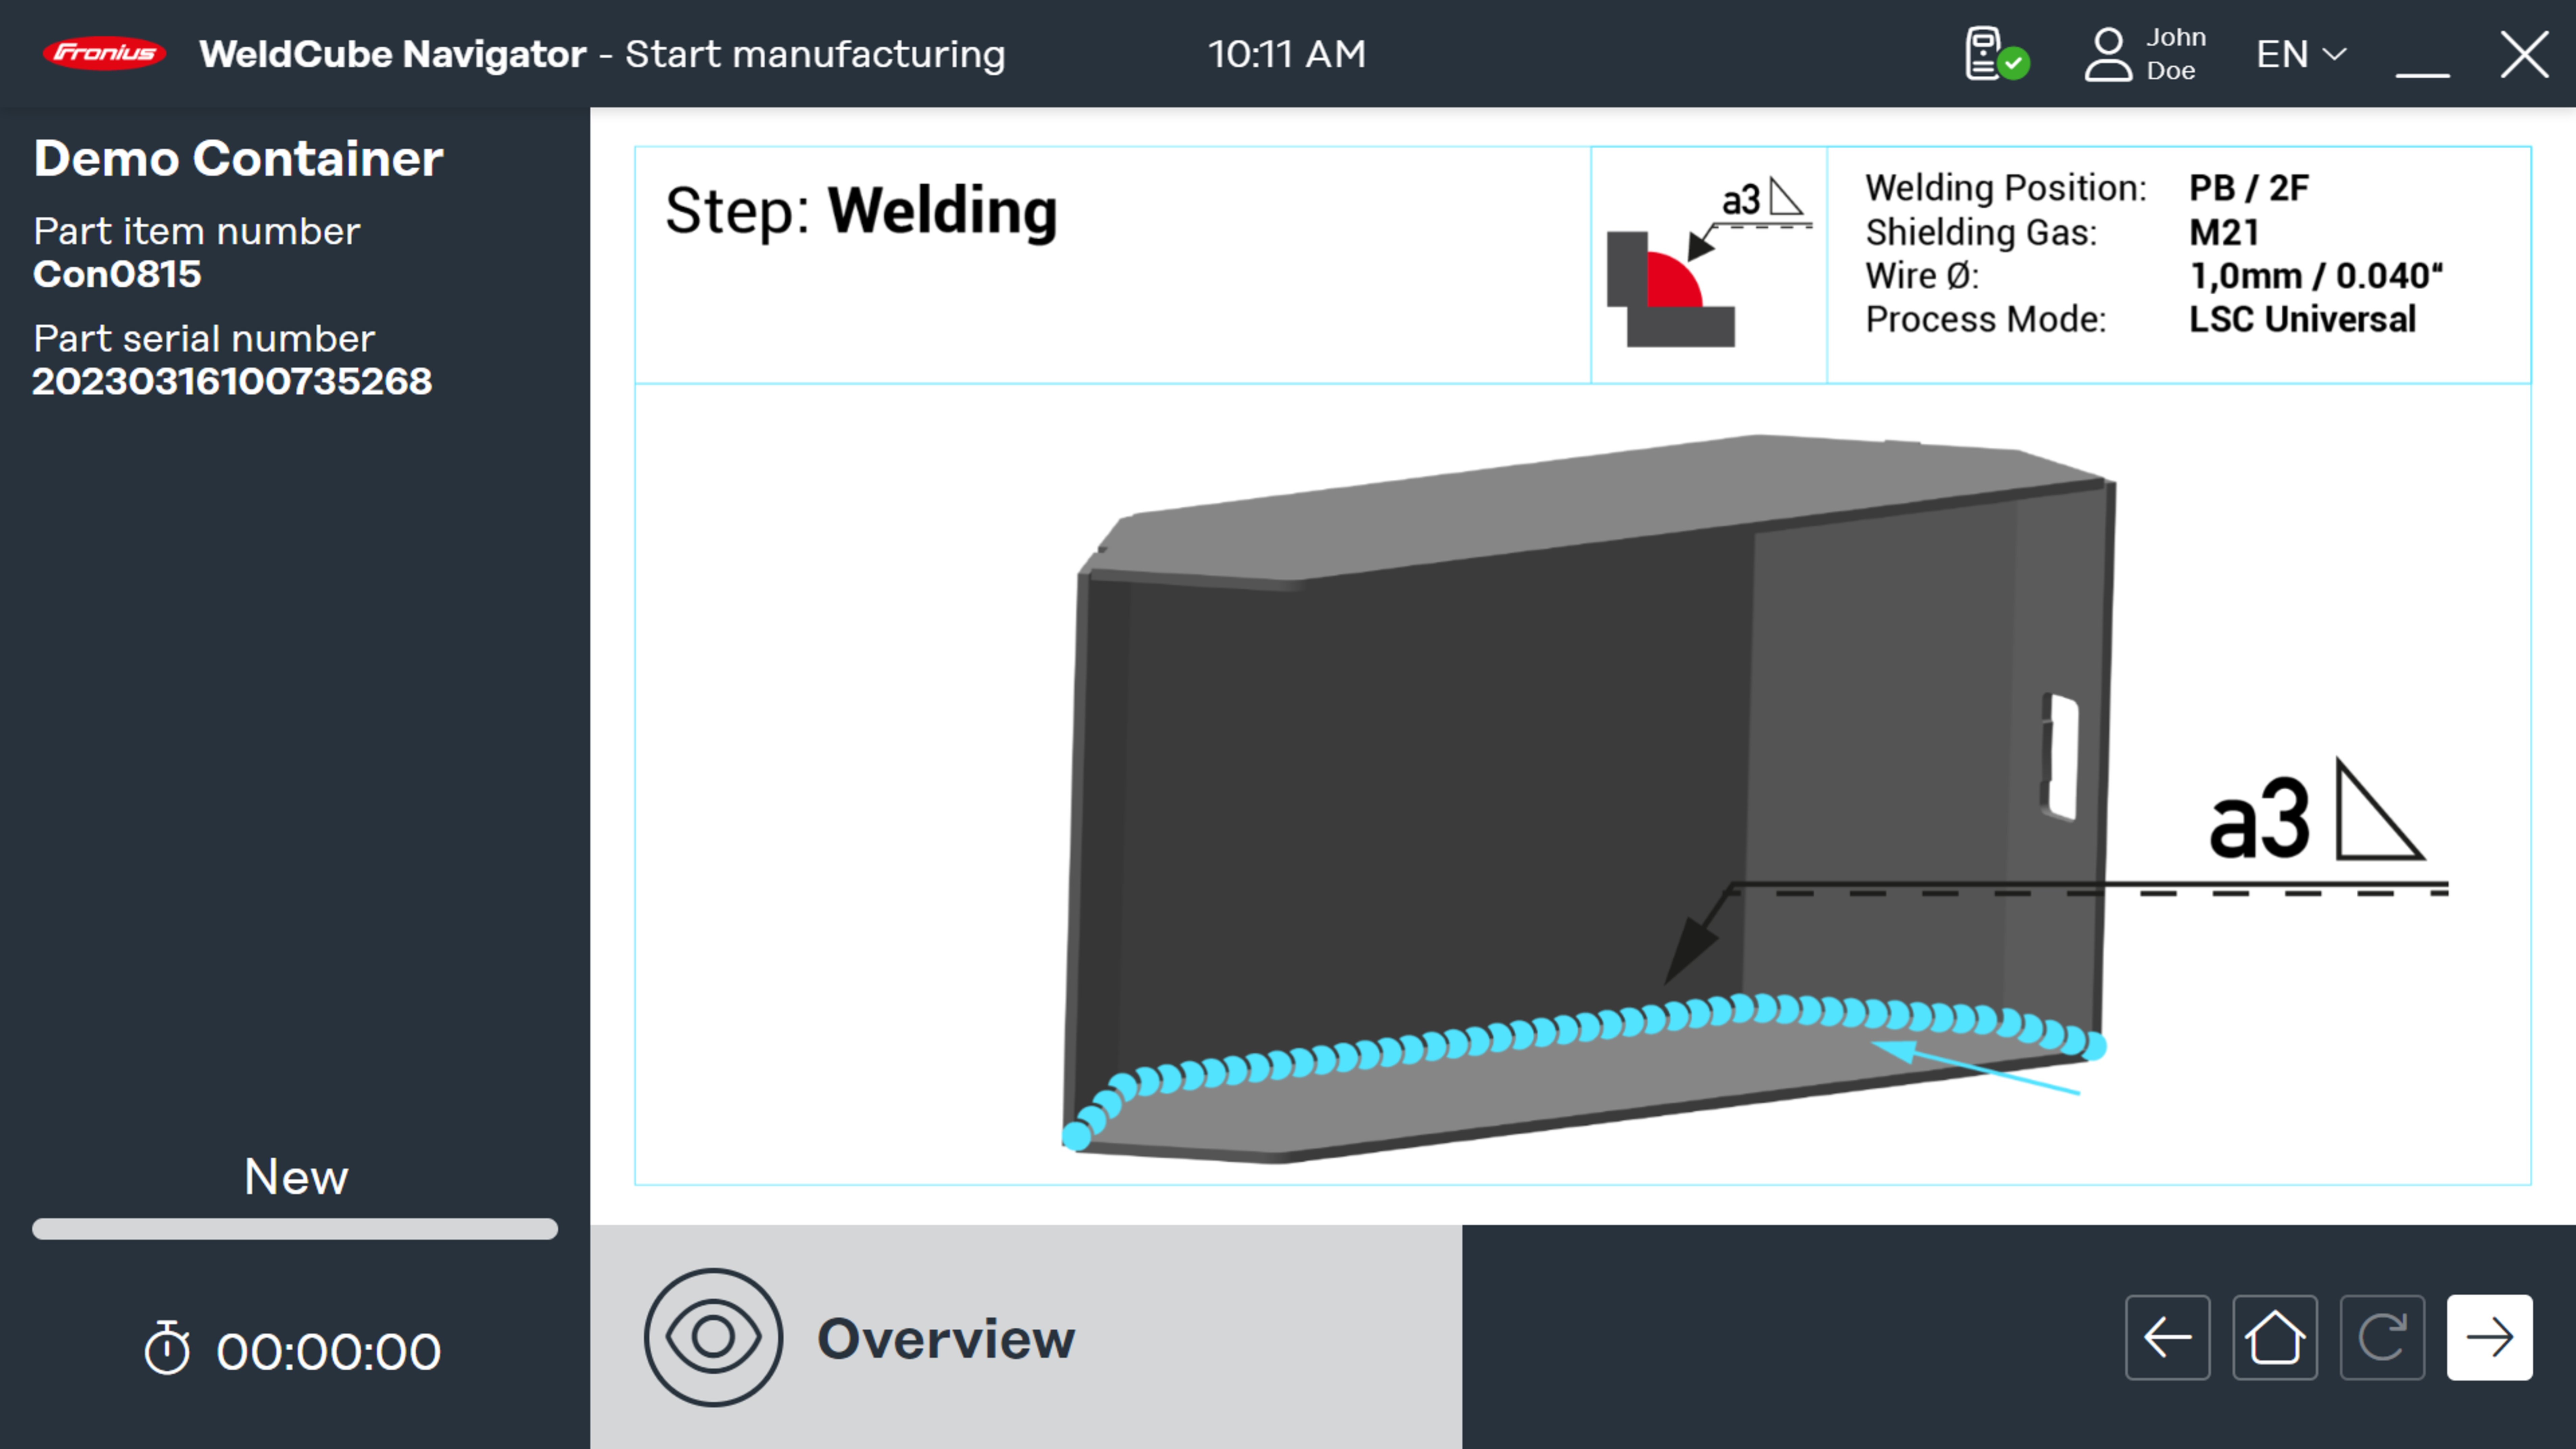
5Press the function key on the welding torch (see section Welding torch navigation) again or click the right arrow on the screen to display the first manufacturing step.
From this point on, the production time is recorded and the welder can start work:
6Press the function key of the welding torch (see Welding torch navigation) or click the right arrow on the screen to start welding or the generic manufacturing step.
7After the last manufacturing step, press the function key again (see Welding torch navigation) or click the right arrow on the screen.
- Instruction name
- Part item number
- Part serial number
- User (multiple users can be recorded, see Re-registration)
- Start and end time
- Number of manufacturing steps with the status "OK", "not OK", "skipped"
- Number of performed welds in normal mode and in Suspend Mode
8Click the house icon to go to the main menu.
9Click Documentation to view a detailed report in WeldCube Premium (optional).
10Click the arrow key and process the same part again with a new serial number (optional).
Example of multiple welds
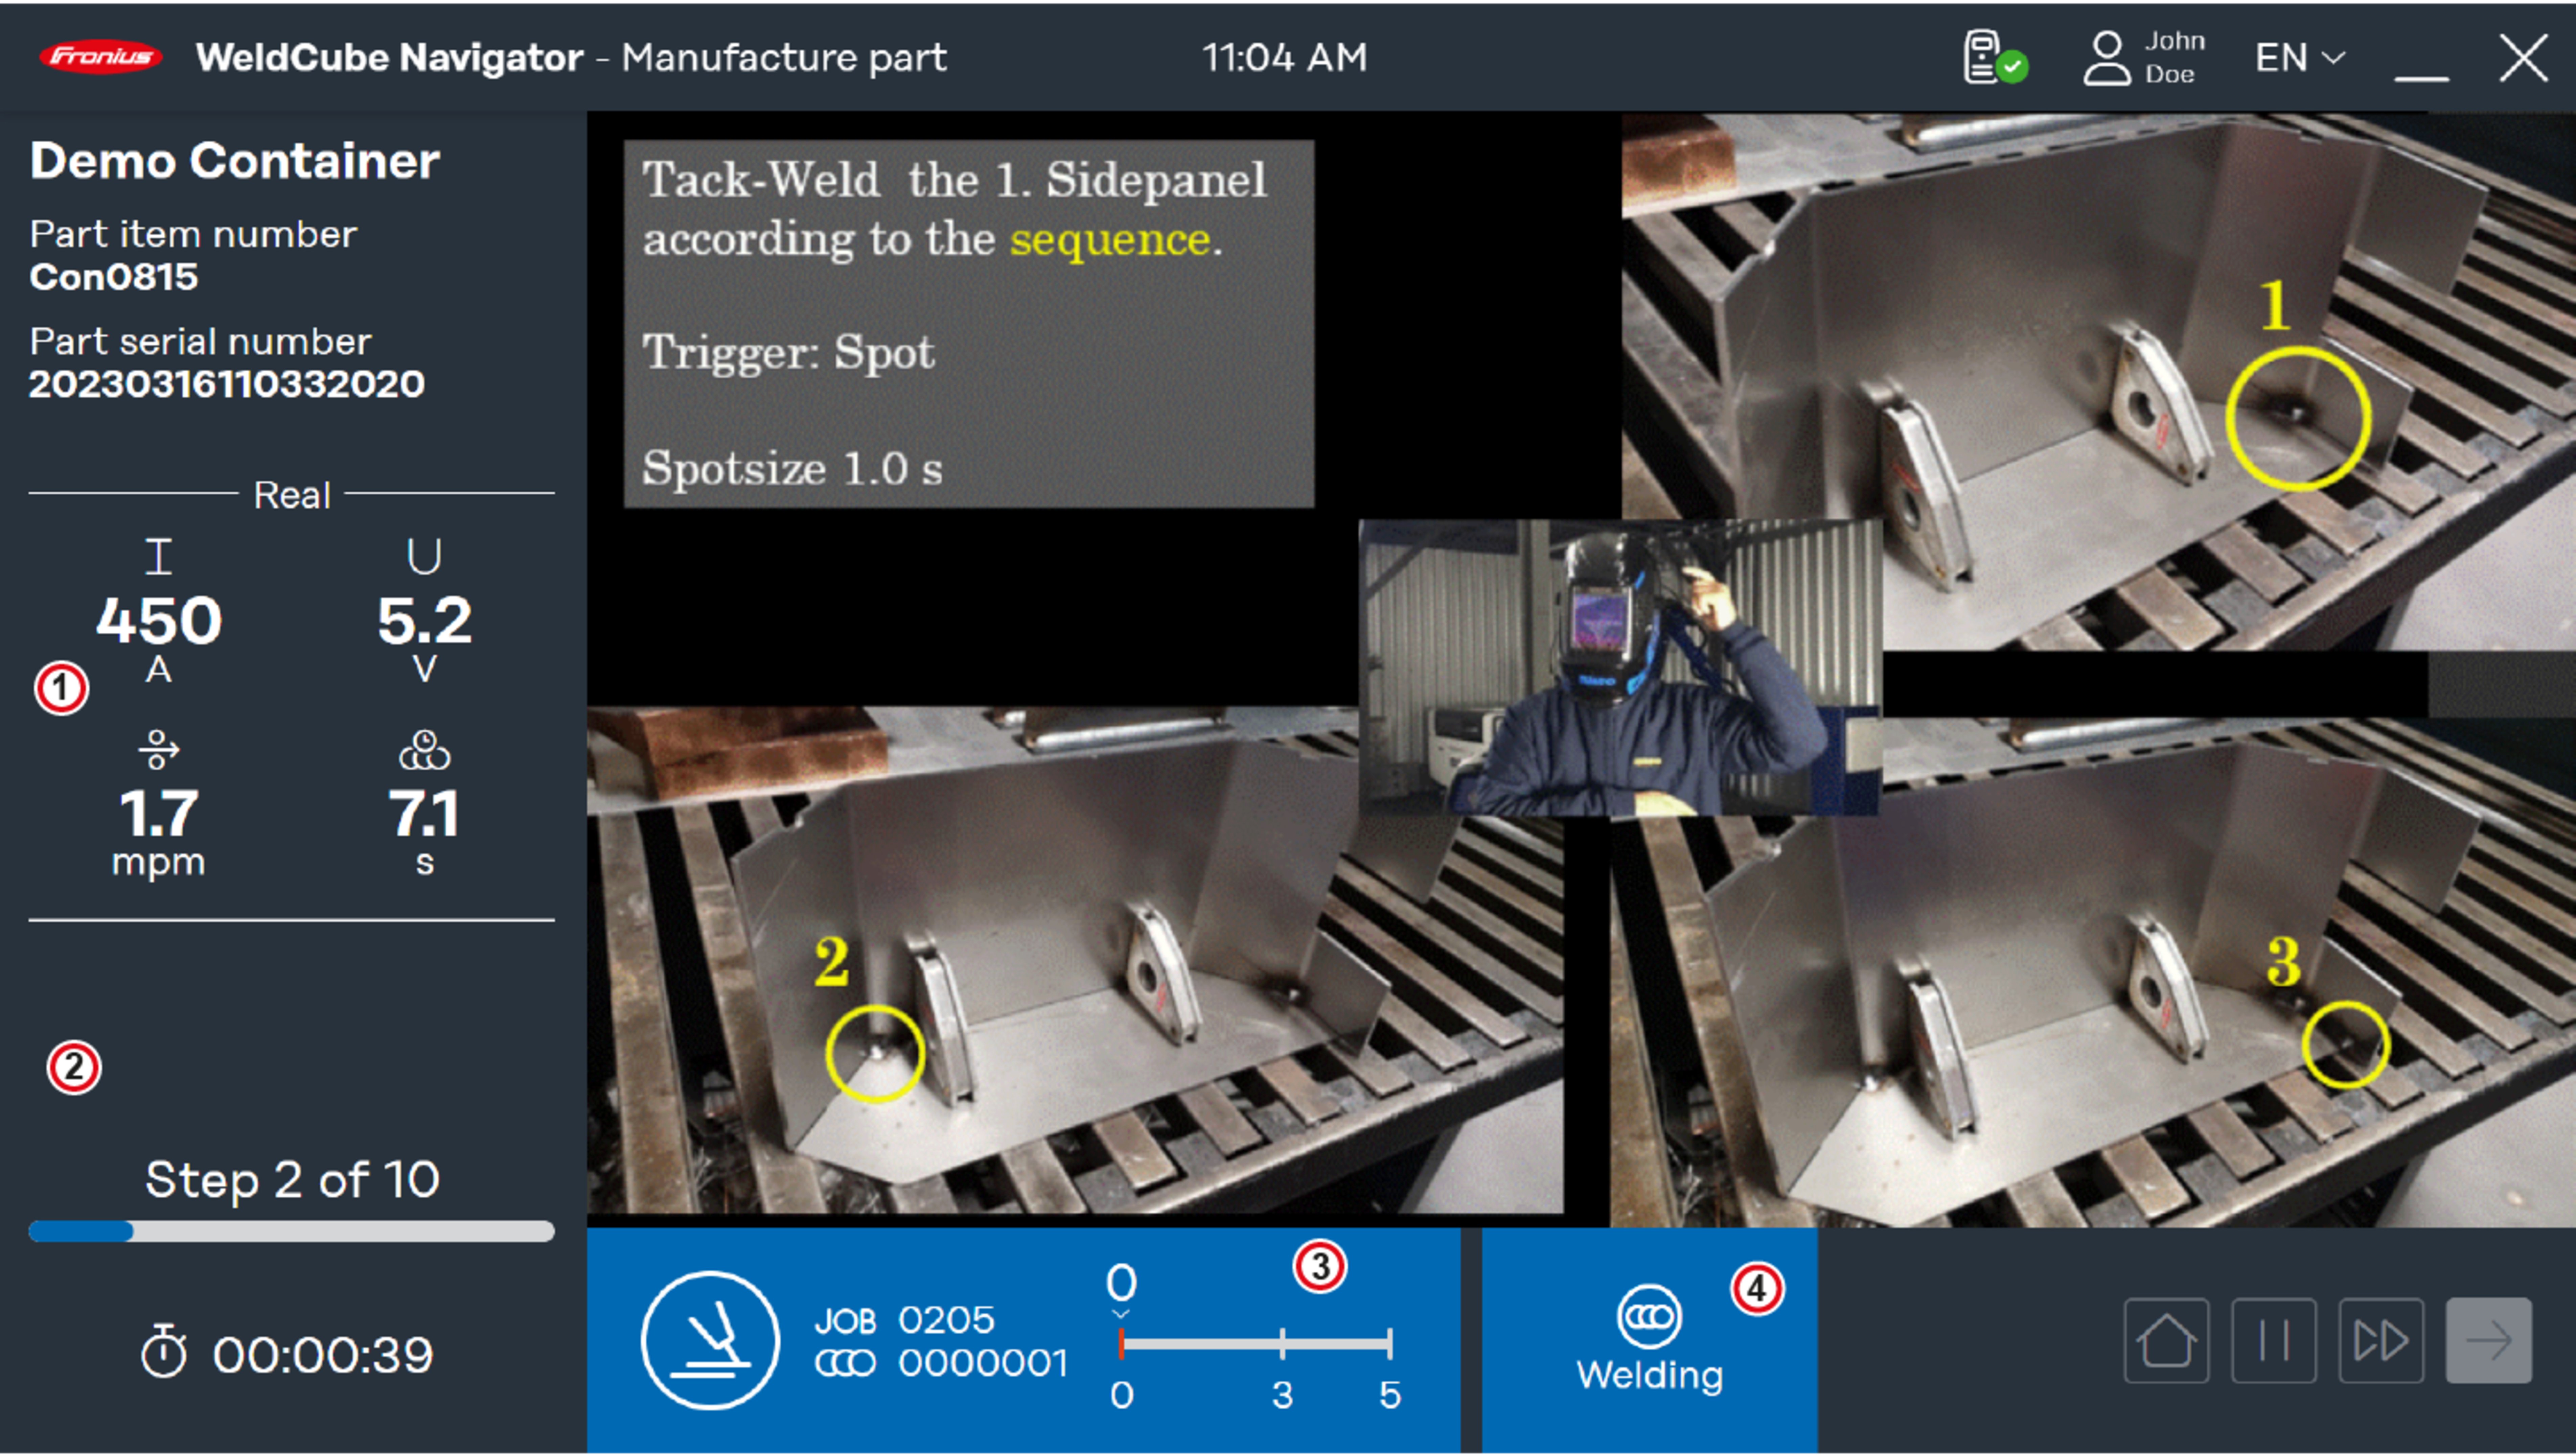
- Welding parameters: Preset parameters transmitted from the welding machine and shown in 4 displays:
- Command: Set values before welding
- Real: Real-time values during welding
- Hold: Last value recorded at the end of the operation
- Mean: Mean values over the weld
- Status of manufacturing instruction
- Result of the last weld, either a green check mark (status: OK) or a red exclamation mark ( Status: not OK) appears
- Current number and total number of manufacturing steps
- Production time already elapsed
- Blue bar
- Symbol for category of the manufacturing step
- Job number
- Weld number
- Progress and allowed number of welds (here it is minimum 2 and maximum 6 welds)
- Status of manufacturing step
- Ready to weld: The Sequencer is ready for welding.
- Welding: Welding is being performed.
- Locked: Further processing is blocked.
- Error: An error has occurred.
Examples of limit violation
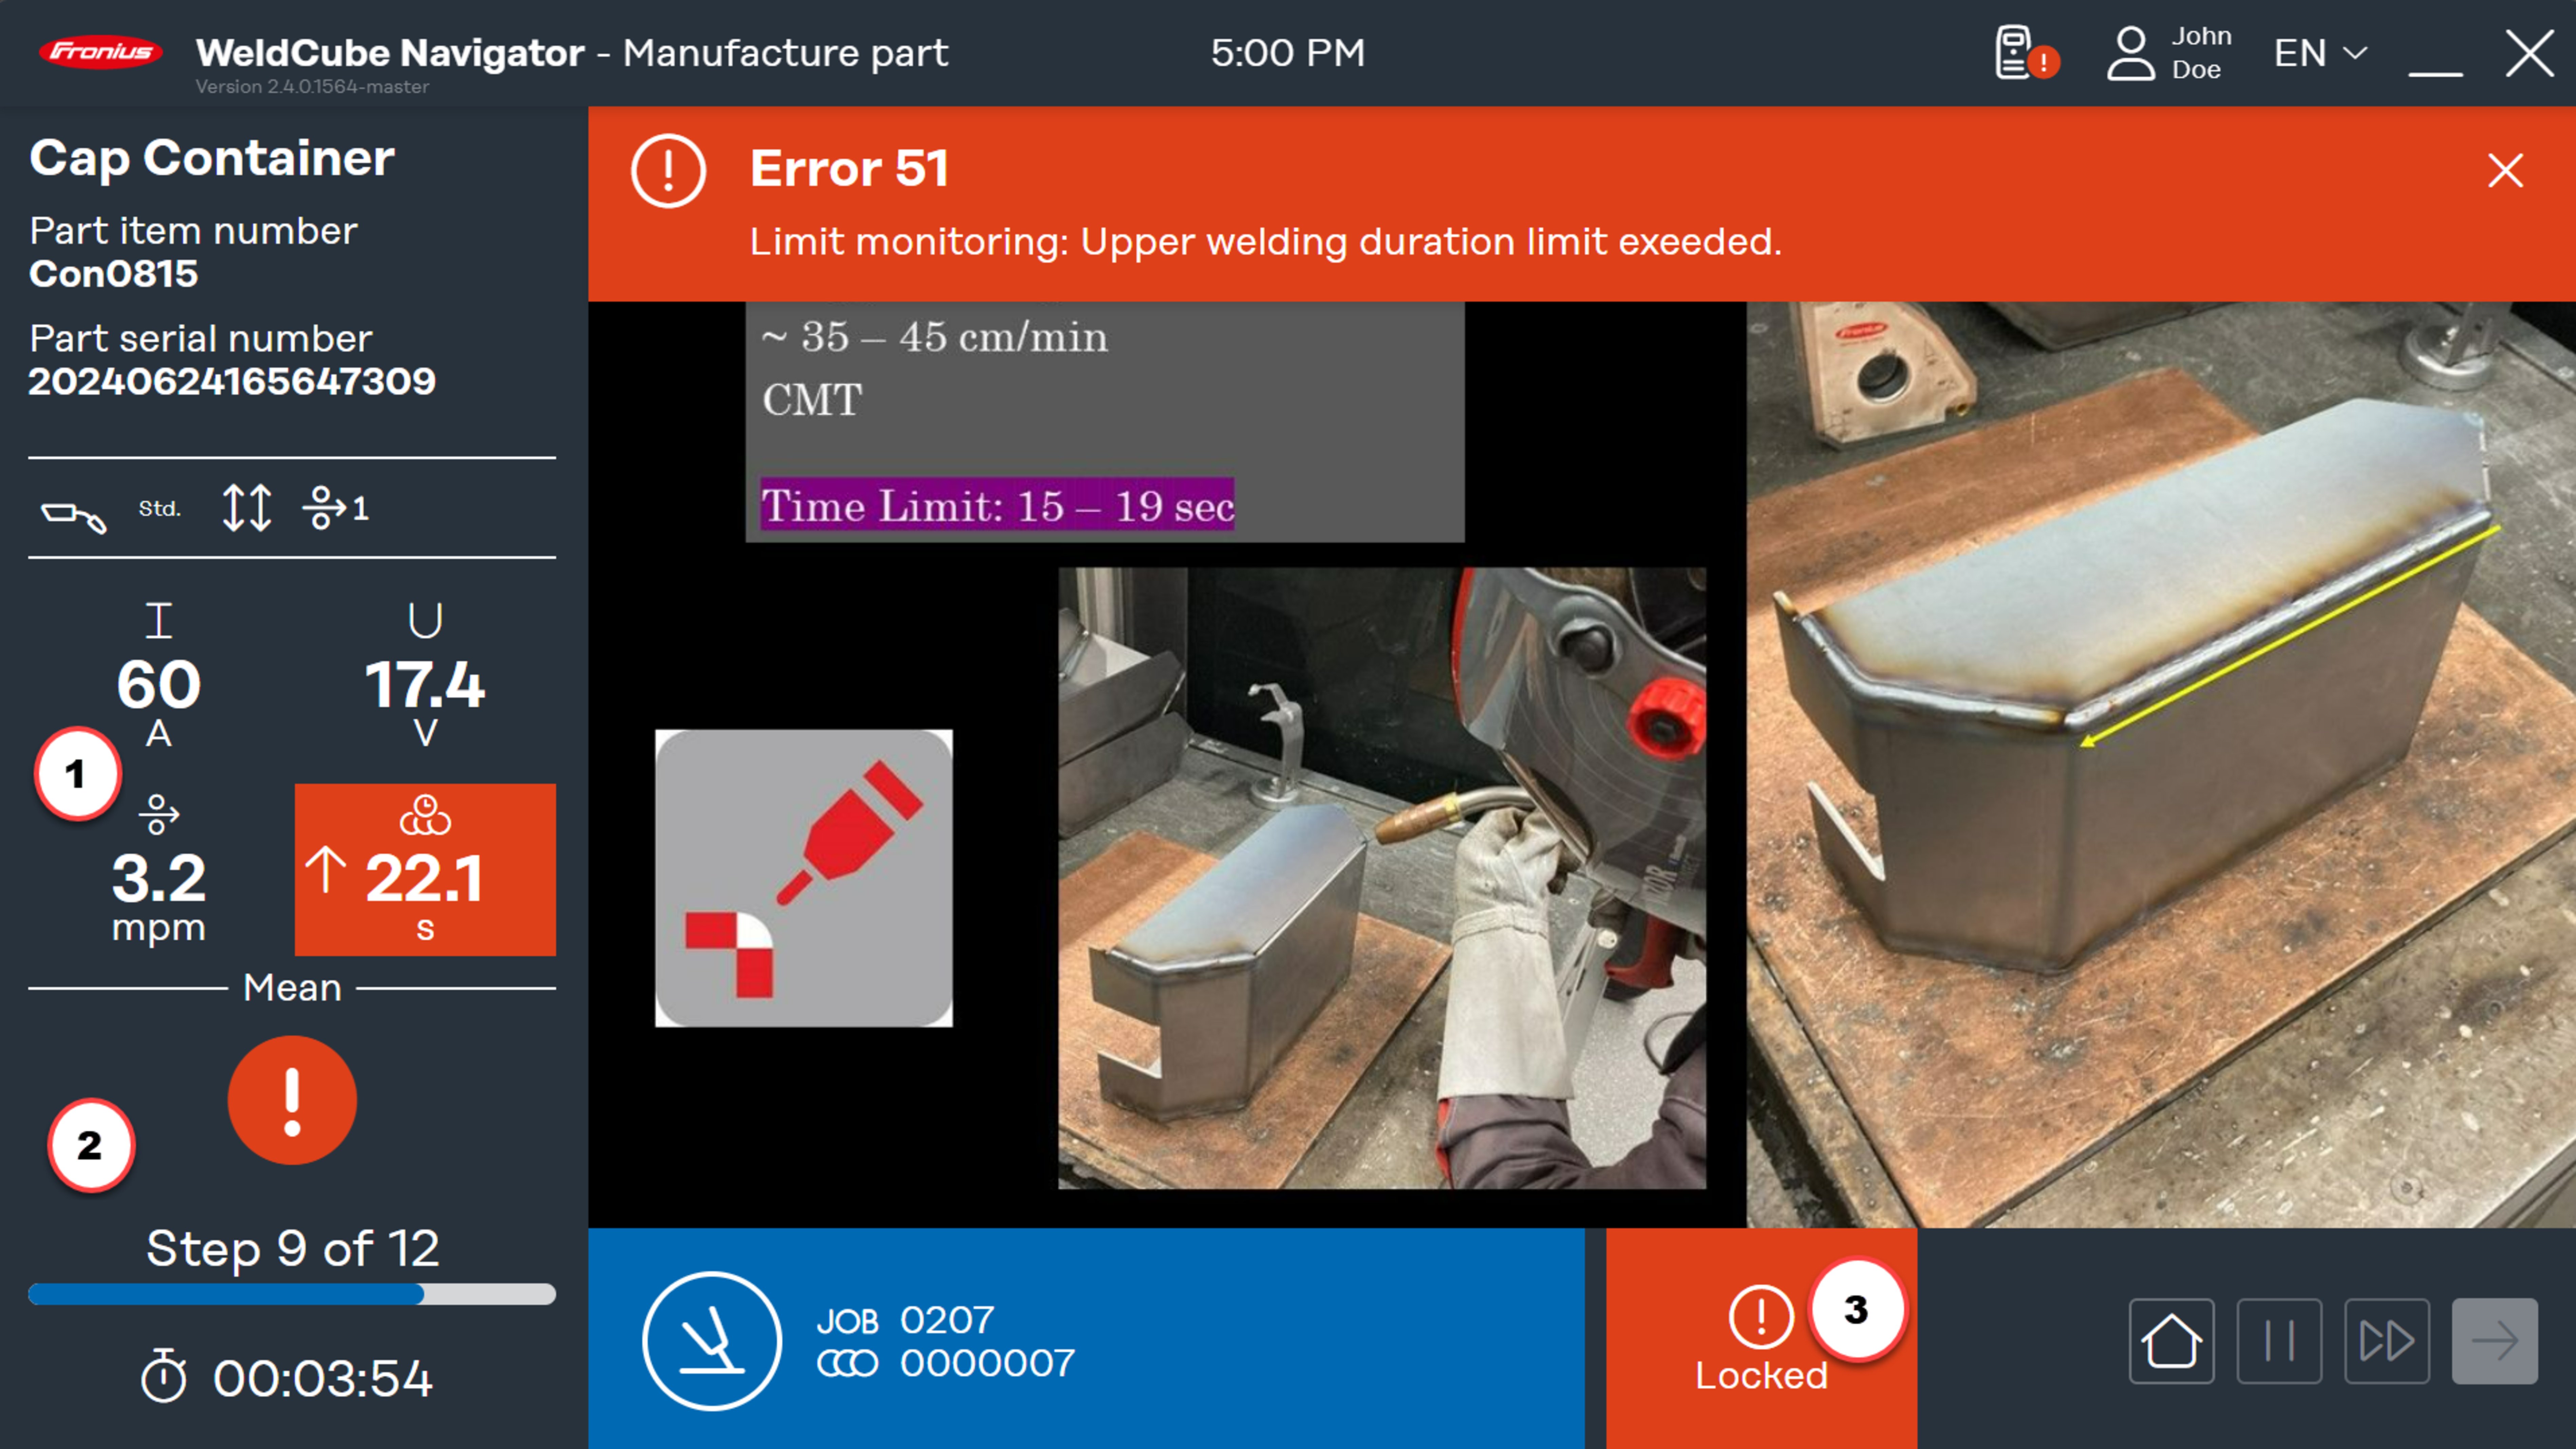
WeldCube Navigator stops processing as soon as an error occurs in the welding process. If the Lock on error function is active, the display changes in the event of an error:
- The display of the welding parameters is set to Hold. The parameters are highlighted in red. The arrows symbolize deviations from the parameters that trigger an error:
- Up arrow: Value too high
- Down arrow: Value too low
- Double arrow: Value in interval too high and too low
- Status of manufacturing instruction: The result of the last weld is highlighted with a red exclamation mark.
- Manufacturing step system status is Locked
- Error bar: Errors that occur on the welding machine are displayed here.
- Type of error
- Error code
- Short description of the error
NOTE!
The OPT/i Limit Monitoring option is a prerequisite for evaluating limit value violations. It is not available for welding machines from the Fortis series;
on these systems, only welding machine errors and welding process errors are detected.
In order for the error bar to be displayed in WeldCube Navigator, apply the following settings on the welding machine:
1Activate the function "limit reaction: error".
2Alternatively, activate the option "limit reaction: warning" to display warnings.
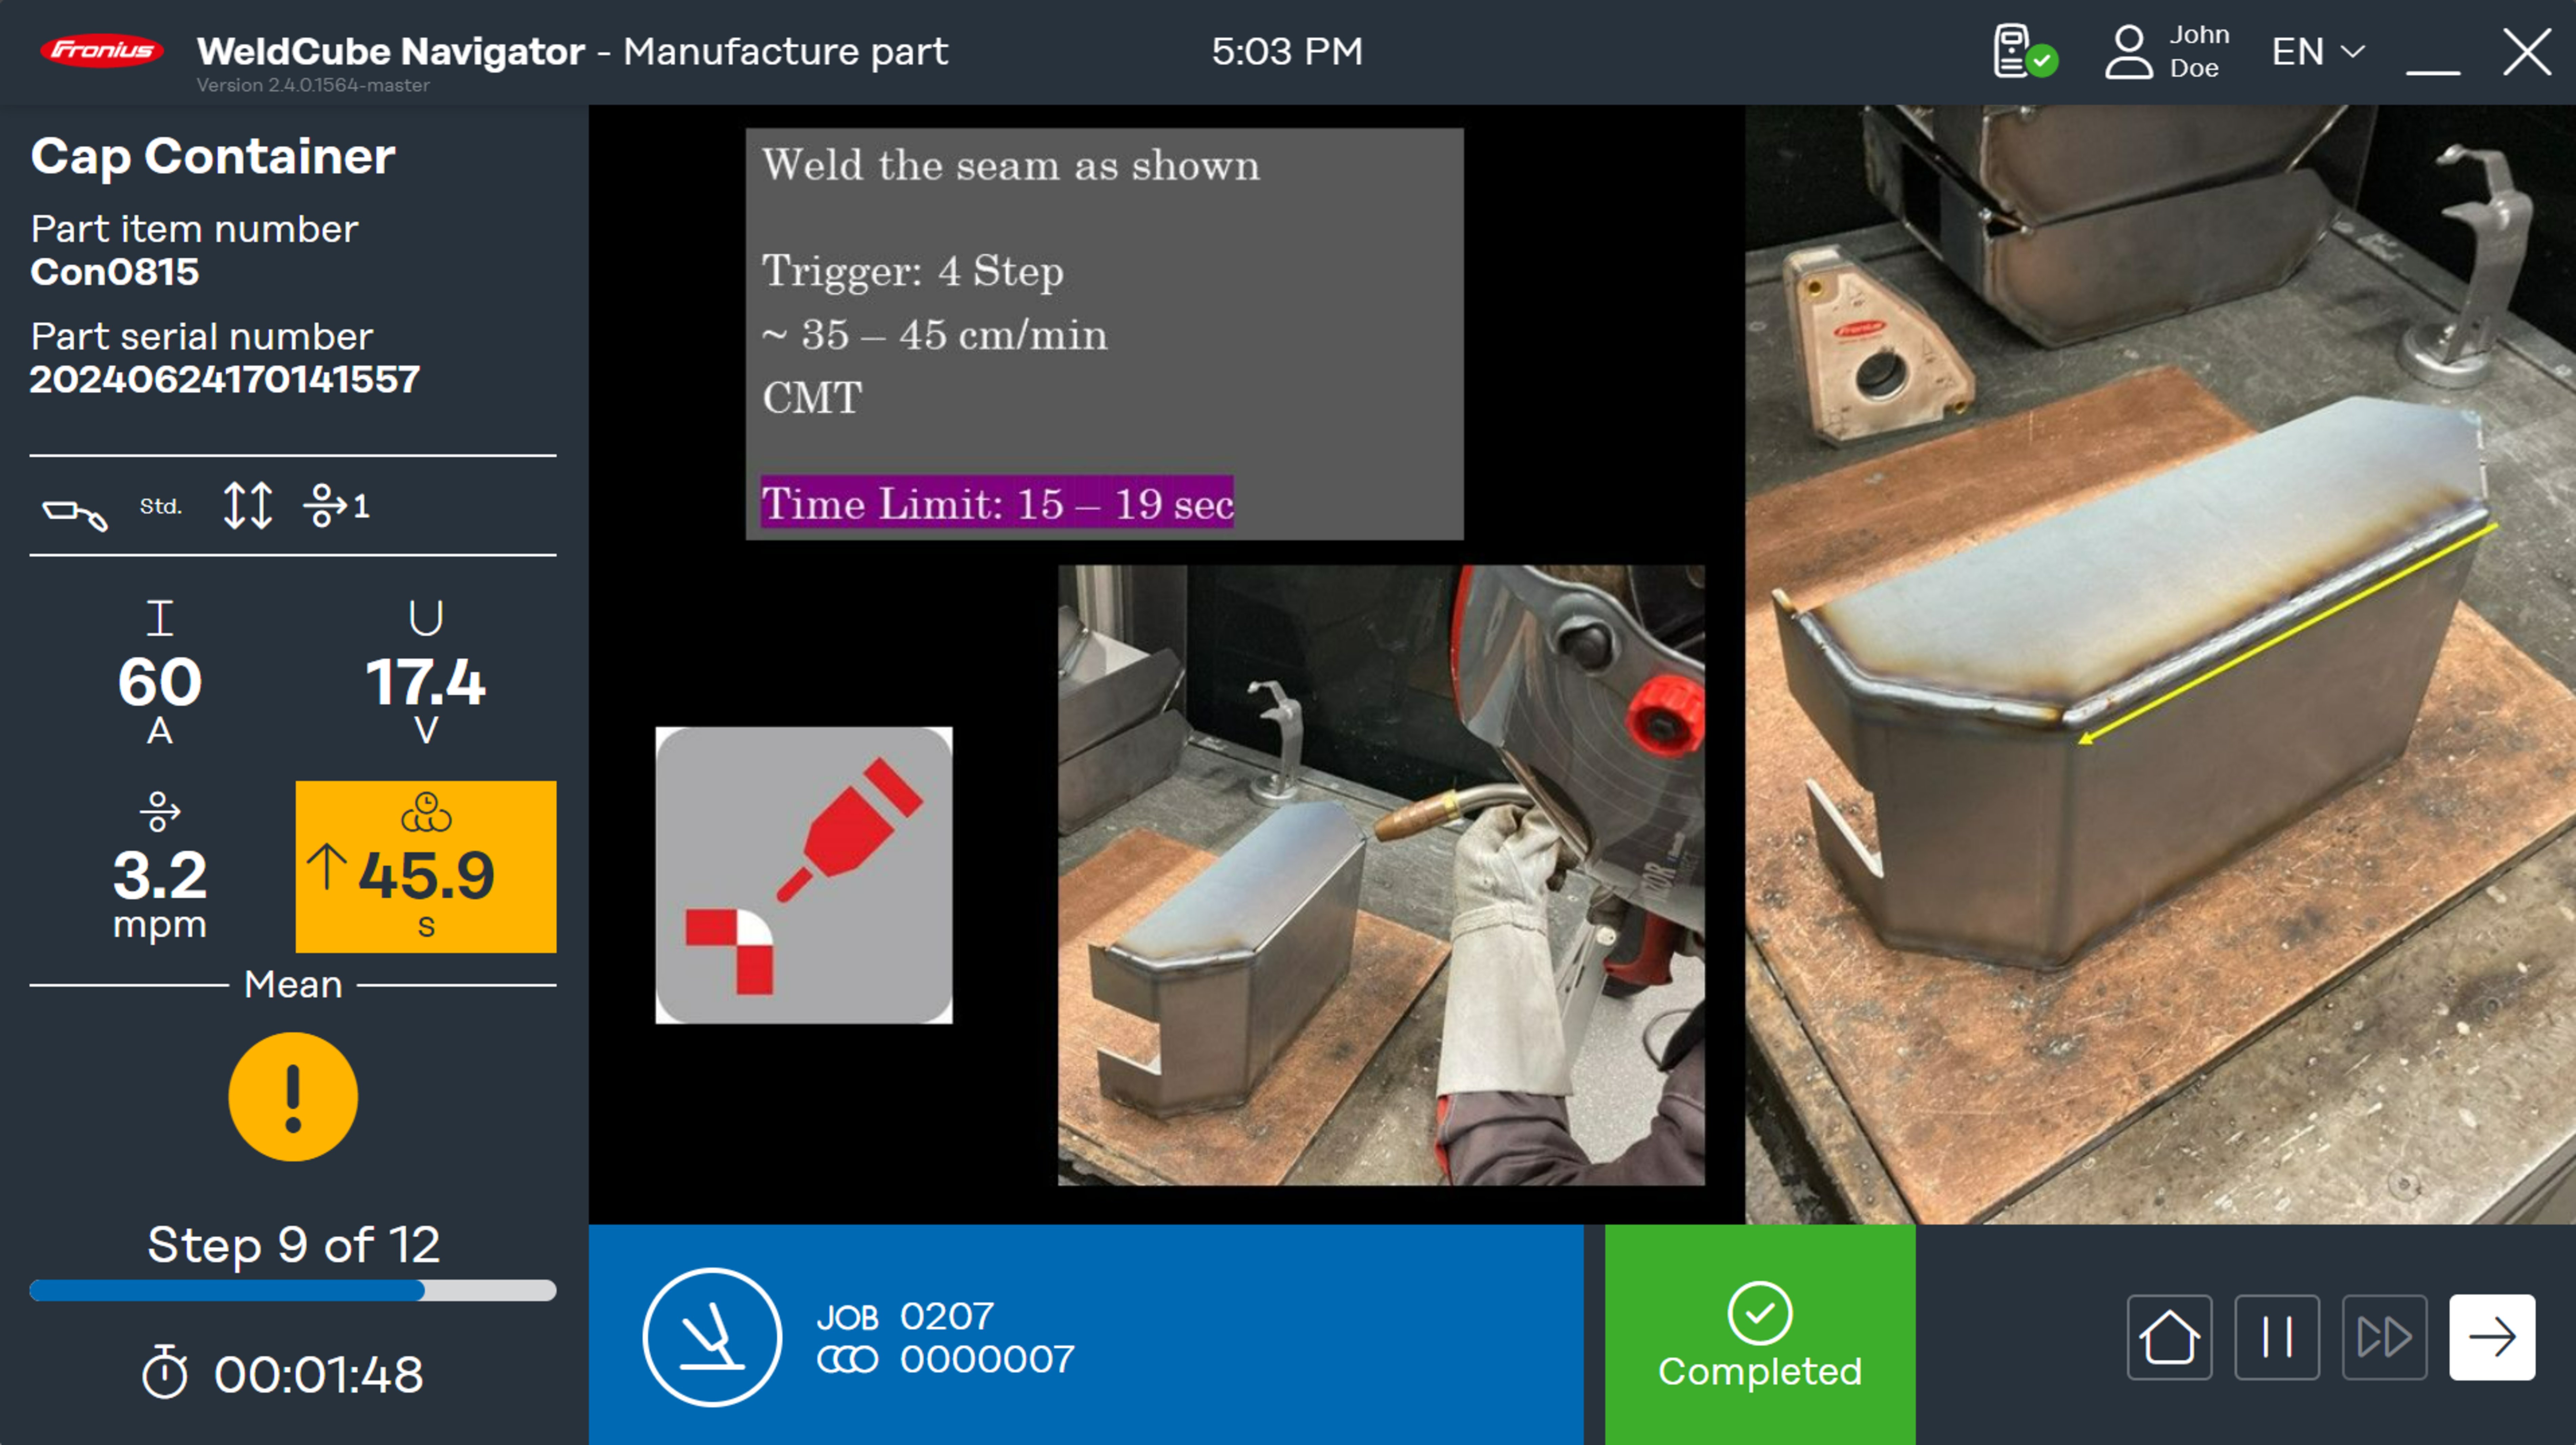
The "limit reaction: warning" option results in changes to the display:
- Affected welding parameter is highlighted in yellow.
- Warning is displayed as a yellow exclamation mark for the manufacturing instruction status.
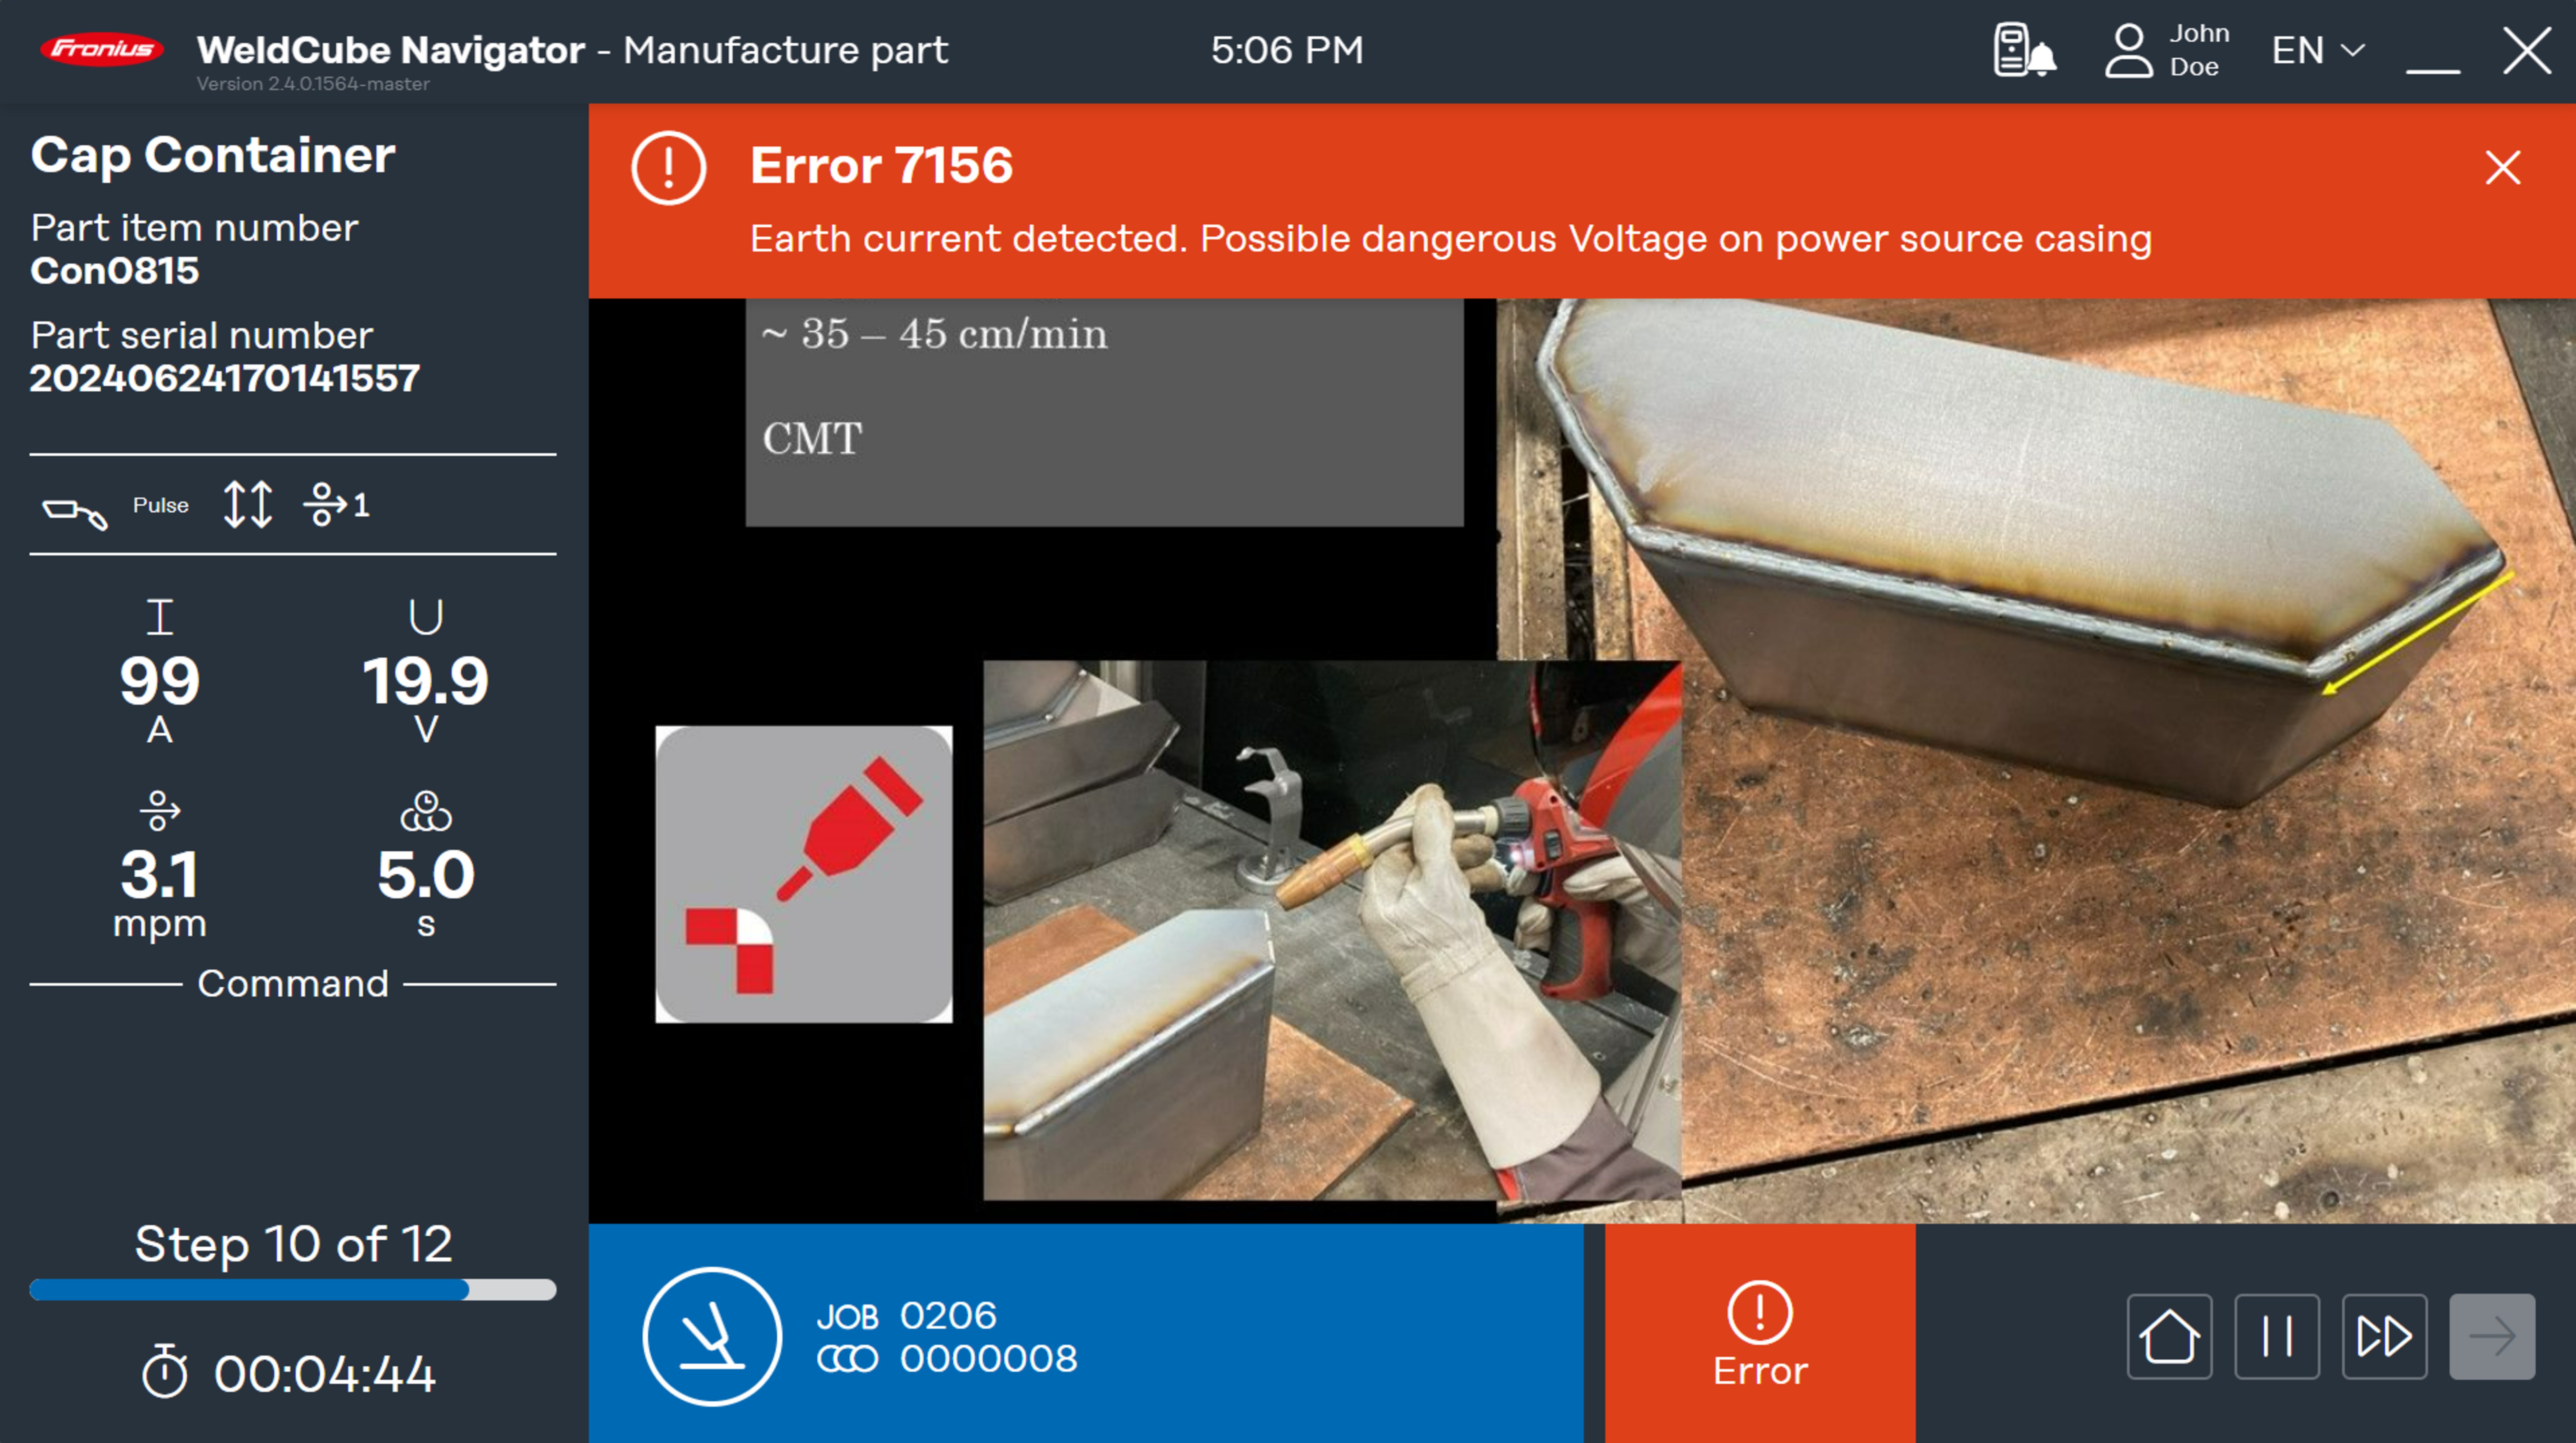
Another scenario for a limit violation is a general error:
- Manufacturing step system status is Error
- Error bar shows the error code and the description of the error
- Unlike the Locked status, Error allows you to navigate to the next step and pause the instruction.
Pausing and skipping processing
WeldCube Navigator offers two additional functions to increase the flexibility of the welding process and to facilitate the handling of defects:
Suspend Mode:- Click the Pause button to perform a step that is not part of the instruction.
- The current processing is paused.
- The preselected job remains activated.
- This function is required when, for example, the repair of a weld is necessary.
- In the Settings, a limit for the number of permitted welds can be set for Suspend mode.
- Click the double arrow button to skip a manufacturing step.
- This function is only available if no error is being displayed for the current instruction.
OPC UA server
OPC UA server functions
WeldCube Navigator is equipped with an OPC UA server. Software and the connected welding machine can be connected to external systems via OPC UA to enable automatic welding applications.
The OPC UA server supports the following Methods (functions):
Method | Description |
|---|---|
Load Instruction via ID | GUID (Global Unique Identifier) is the unique identification number of each welding instruction. The GUID is displayed in the Manufacturing menu. External systems call up instructions via the OPC UA server directly on the basis of the GUID. The welder is shown the welding instruction to be processed. A list selection is not necessary.  |
Load Instruction via Part Item Number | External systems call up instructions via the OPC UA server directly on the basis of the part item number. The welder is directly shown the instruction to be processed. A list selection is not necessary. |
Set Instruction Search Text | In the Select instruction menu area, the external system performs searches using predefined search terms to display specific instructions. There is no need for manual input by the welder. |
Set Part Serial Number | A serial number is entered in the overview of the selected instruction. This replaces the automatically generated serial number of the software. All data are linked to the set serial number and documented. |
Cancel Manufacturing | The external system interrupts processing. WeldCube Navigator switches to the Select instruction menu area. This makes it easier to rework and repair defective components. |
Logout User | All users are automatically logged out of the software and the welding machine. The system is thus protected against unauthorized access. |
Unlock Current Manufacturing Step | The welding supervisor resets a pending error via the external system. Processing of the current step is released again. |
Via the following data nodes, the OPC UA server transmits signals from the production control, the welding machine, and the PC to an external system:
Manufacturing Status
Data node | Description | Value |
|---|---|---|
Current Manufacturing Status | Describes the current status of the software:
|
The values can be used to synchronize the status with a PLC controller. |
Current Manufacturing step | The number of the current manufacturing step | Int32 (example) |
Current Part - Instruction Id | GUID of the currently selected instruction | GUID |
Current Part - Instruction Name | Name of the currently selected instruction | String |
Current Part - Manufacturing steps | Number of manufacturing steps in the selected instruction | Int32 (example) |
Current Part - Part Item Number | Part item number of the selected instruction | String |
Current Part - Part Serial Number | Serial number of the processed part | String |
Welding Machine
Data node | Description | Value |
|---|---|---|
IP Address | Assigned IP address of the welding system | String |
Location | Location of the welding system | String |
Name | Name of the welding system | String |
Function Packages | List of active function packages for the welding machine | LicenseOption Array |
Serial Number | Serial number of the welding system | String |
System Information
Data node | Description | Value |
|---|---|---|
Disk Drives | List of hard disks installed on the PC | Strings list |
Installed Memory | Installed RAM memory | String |
Network Adapters | List of installed network adapters | Strings list |
Operating System | Name of the installed operating system | String |
Processor | Name of the installed processor | String |
System Manufacturer | Device manufacturer | String |
System Model | Device type designation | String |
System Name | Host name of the system | String |
System ID | ID of the system | String |
Status
Welding system status
Data node | Description | Value |
|---|---|---|
Disconnected | Network connection could not be established | 0 |
Connected | Network connection is established, welding system is operational | 1 |
Error | The welding system is in an error state, welding is not possible | 2 |
OPC UA server functions
WeldCube Navigator is equipped with an OPC UA server. Software and the connected welding machine can be connected to external systems via OPC UA to enable automatic welding applications.
The OPC UA server supports the following Methods (functions):
Method | Description |
|---|---|
Load Instruction via ID | GUID (Global Unique Identifier) is the unique identification number of each welding instruction. The GUID is displayed in the Manufacturing menu. External systems call up instructions via the OPC UA server directly on the basis of the GUID. The welder is shown the welding instruction to be processed. A list selection is not necessary. |
Load Instruction via Part Item Number | External systems call up instructions via the OPC UA server directly on the basis of the part item number. The welder is directly shown the instruction to be processed. A list selection is not necessary. |
Set Instruction Search Text | In the Select instruction menu area, the external system performs searches using predefined search terms to display specific instructions. There is no need for manual input by the welder. |
Set Part Serial Number | A serial number is entered in the overview of the selected instruction. This replaces the automatically generated serial number of the software. All data are linked to the set serial number and documented. |
Cancel Manufacturing | The external system interrupts processing. WeldCube Navigator switches to the Select instruction menu area. This makes it easier to rework and repair defective components. |
Logout User | All users are automatically logged out of the software and the welding machine. The system is thus protected against unauthorized access. |
Unlock Current Manufacturing Step | The welding supervisor resets a pending error via the external system. Processing of the current step is released again. |
Via the following data nodes, the OPC UA server transmits signals from the production control, the welding machine, and the PC to an external system:
Manufacturing Status
Data node | Description | Value |
|---|---|---|
Current Manufacturing Status | Describes the current status of the software:
|
The values can be used to synchronize the status with a PLC controller. |
Current Manufacturing step | The number of the current manufacturing step | Int32 (example) |
Current Part - Instruction Id | GUID of the currently selected instruction | GUID |
Current Part - Instruction Name | Name of the currently selected instruction | String |
Current Part - Manufacturing steps | Number of manufacturing steps in the selected instruction | Int32 (example) |
Current Part - Part Item Number | Part item number of the selected instruction | String |
Current Part - Part Serial Number | Serial number of the processed part | String |
Welding Machine
Data node | Description | Value |
|---|---|---|
IP Address | Assigned IP address of the welding system | String |
Location | Location of the welding system | String |
Name | Name of the welding system | String |
Function Packages | List of active function packages for the welding machine | LicenseOption Array |
Serial Number | Serial number of the welding system | String |
System Information
Data node | Description | Value |
|---|---|---|
Disk Drives | List of hard disks installed on the PC | Strings list |
Installed Memory | Installed RAM memory | String |
Network Adapters | List of installed network adapters | Strings list |
Operating System | Name of the installed operating system | String |
Processor | Name of the installed processor | String |
System Manufacturer | Device manufacturer | String |
System Model | Device type designation | String |
System Name | Host name of the system | String |
System ID | ID of the system | String |
Status
Welding system status
Data node | Description | Value |
|---|---|---|
Disconnected | Network connection could not be established | 0 |
Connected | Network connection is established, welding system is operational | 1 |
Error | The welding system is in an error state, welding is not possible | 2 |
More functions
Importing and exporting instructions
Importing instructions
In order to distribute instructions to different welding workstations and manufacturing sites, WeldCube Navigator offers the possibility to import and export instructions.
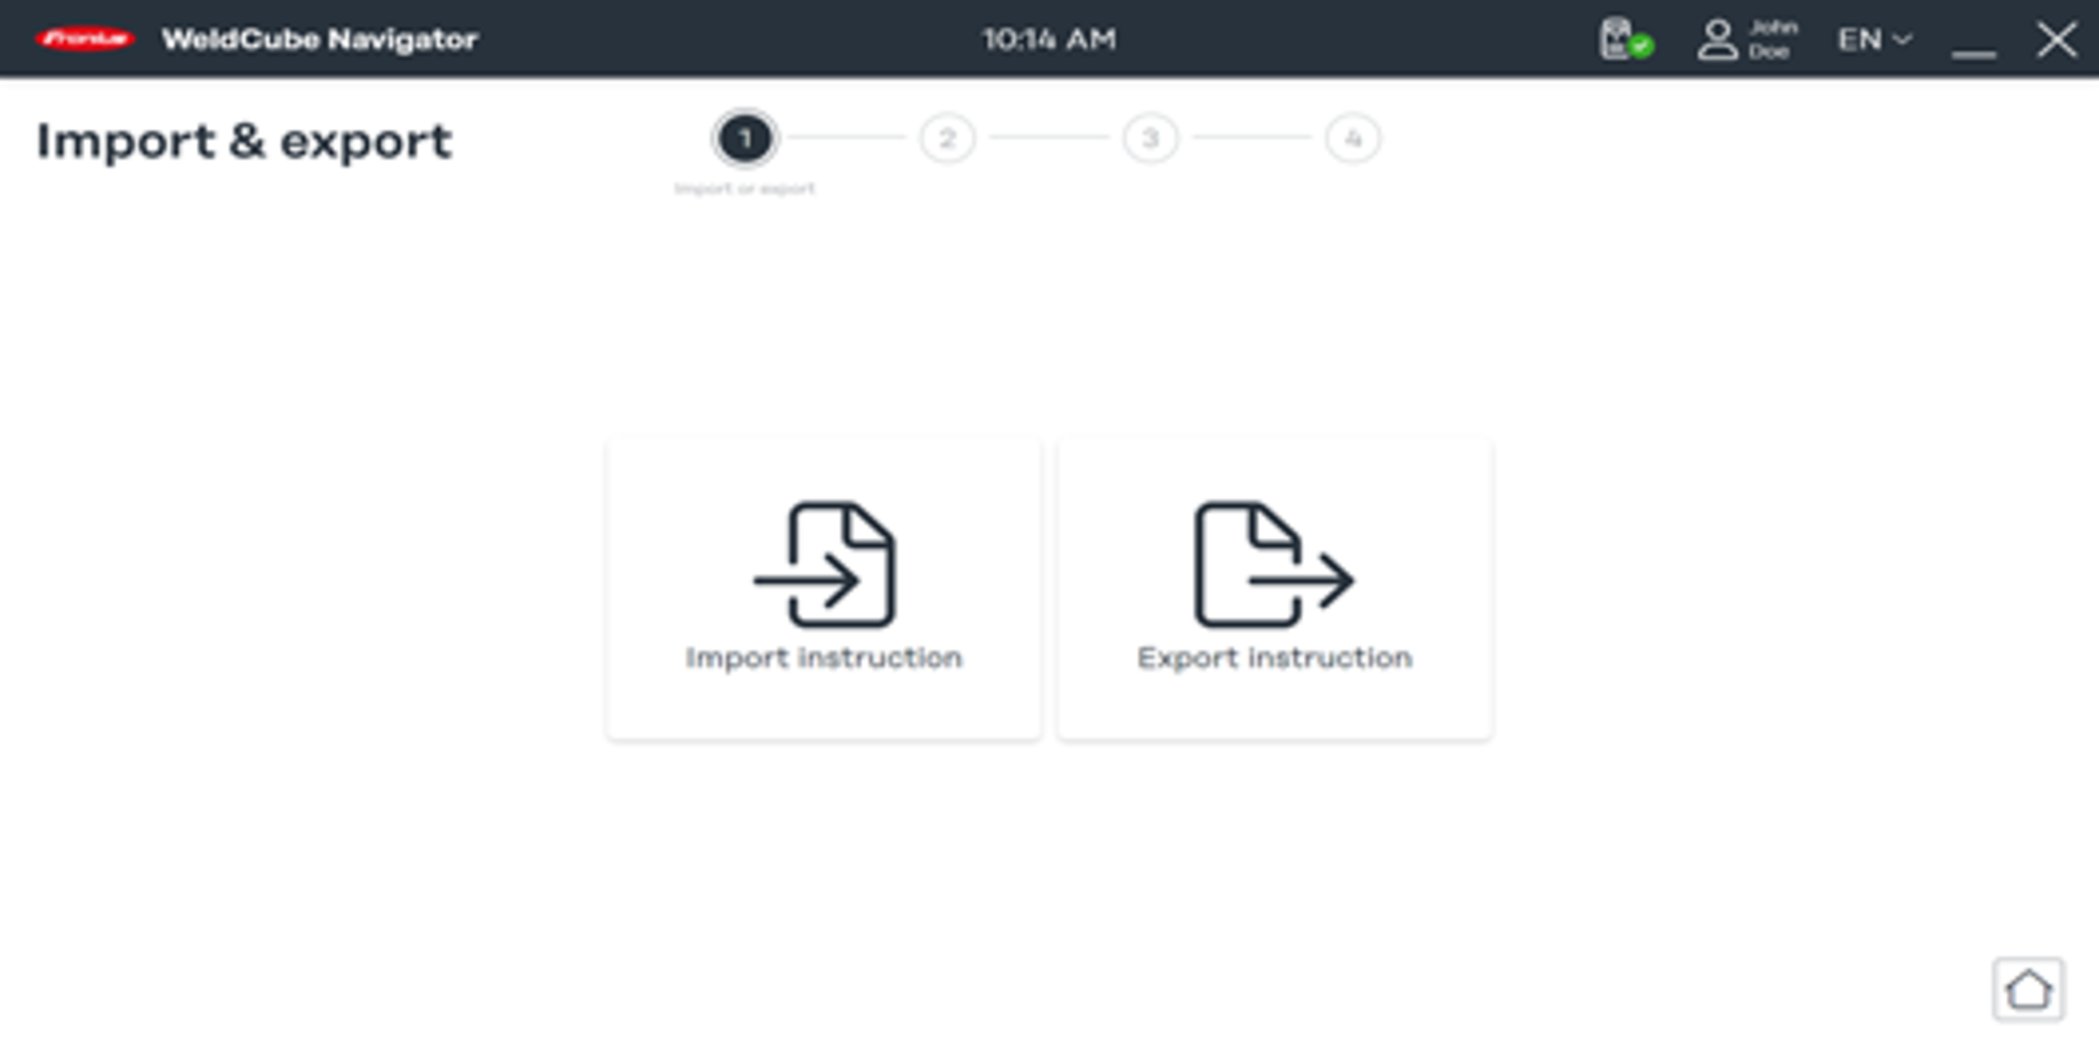
1Click Import instruction.
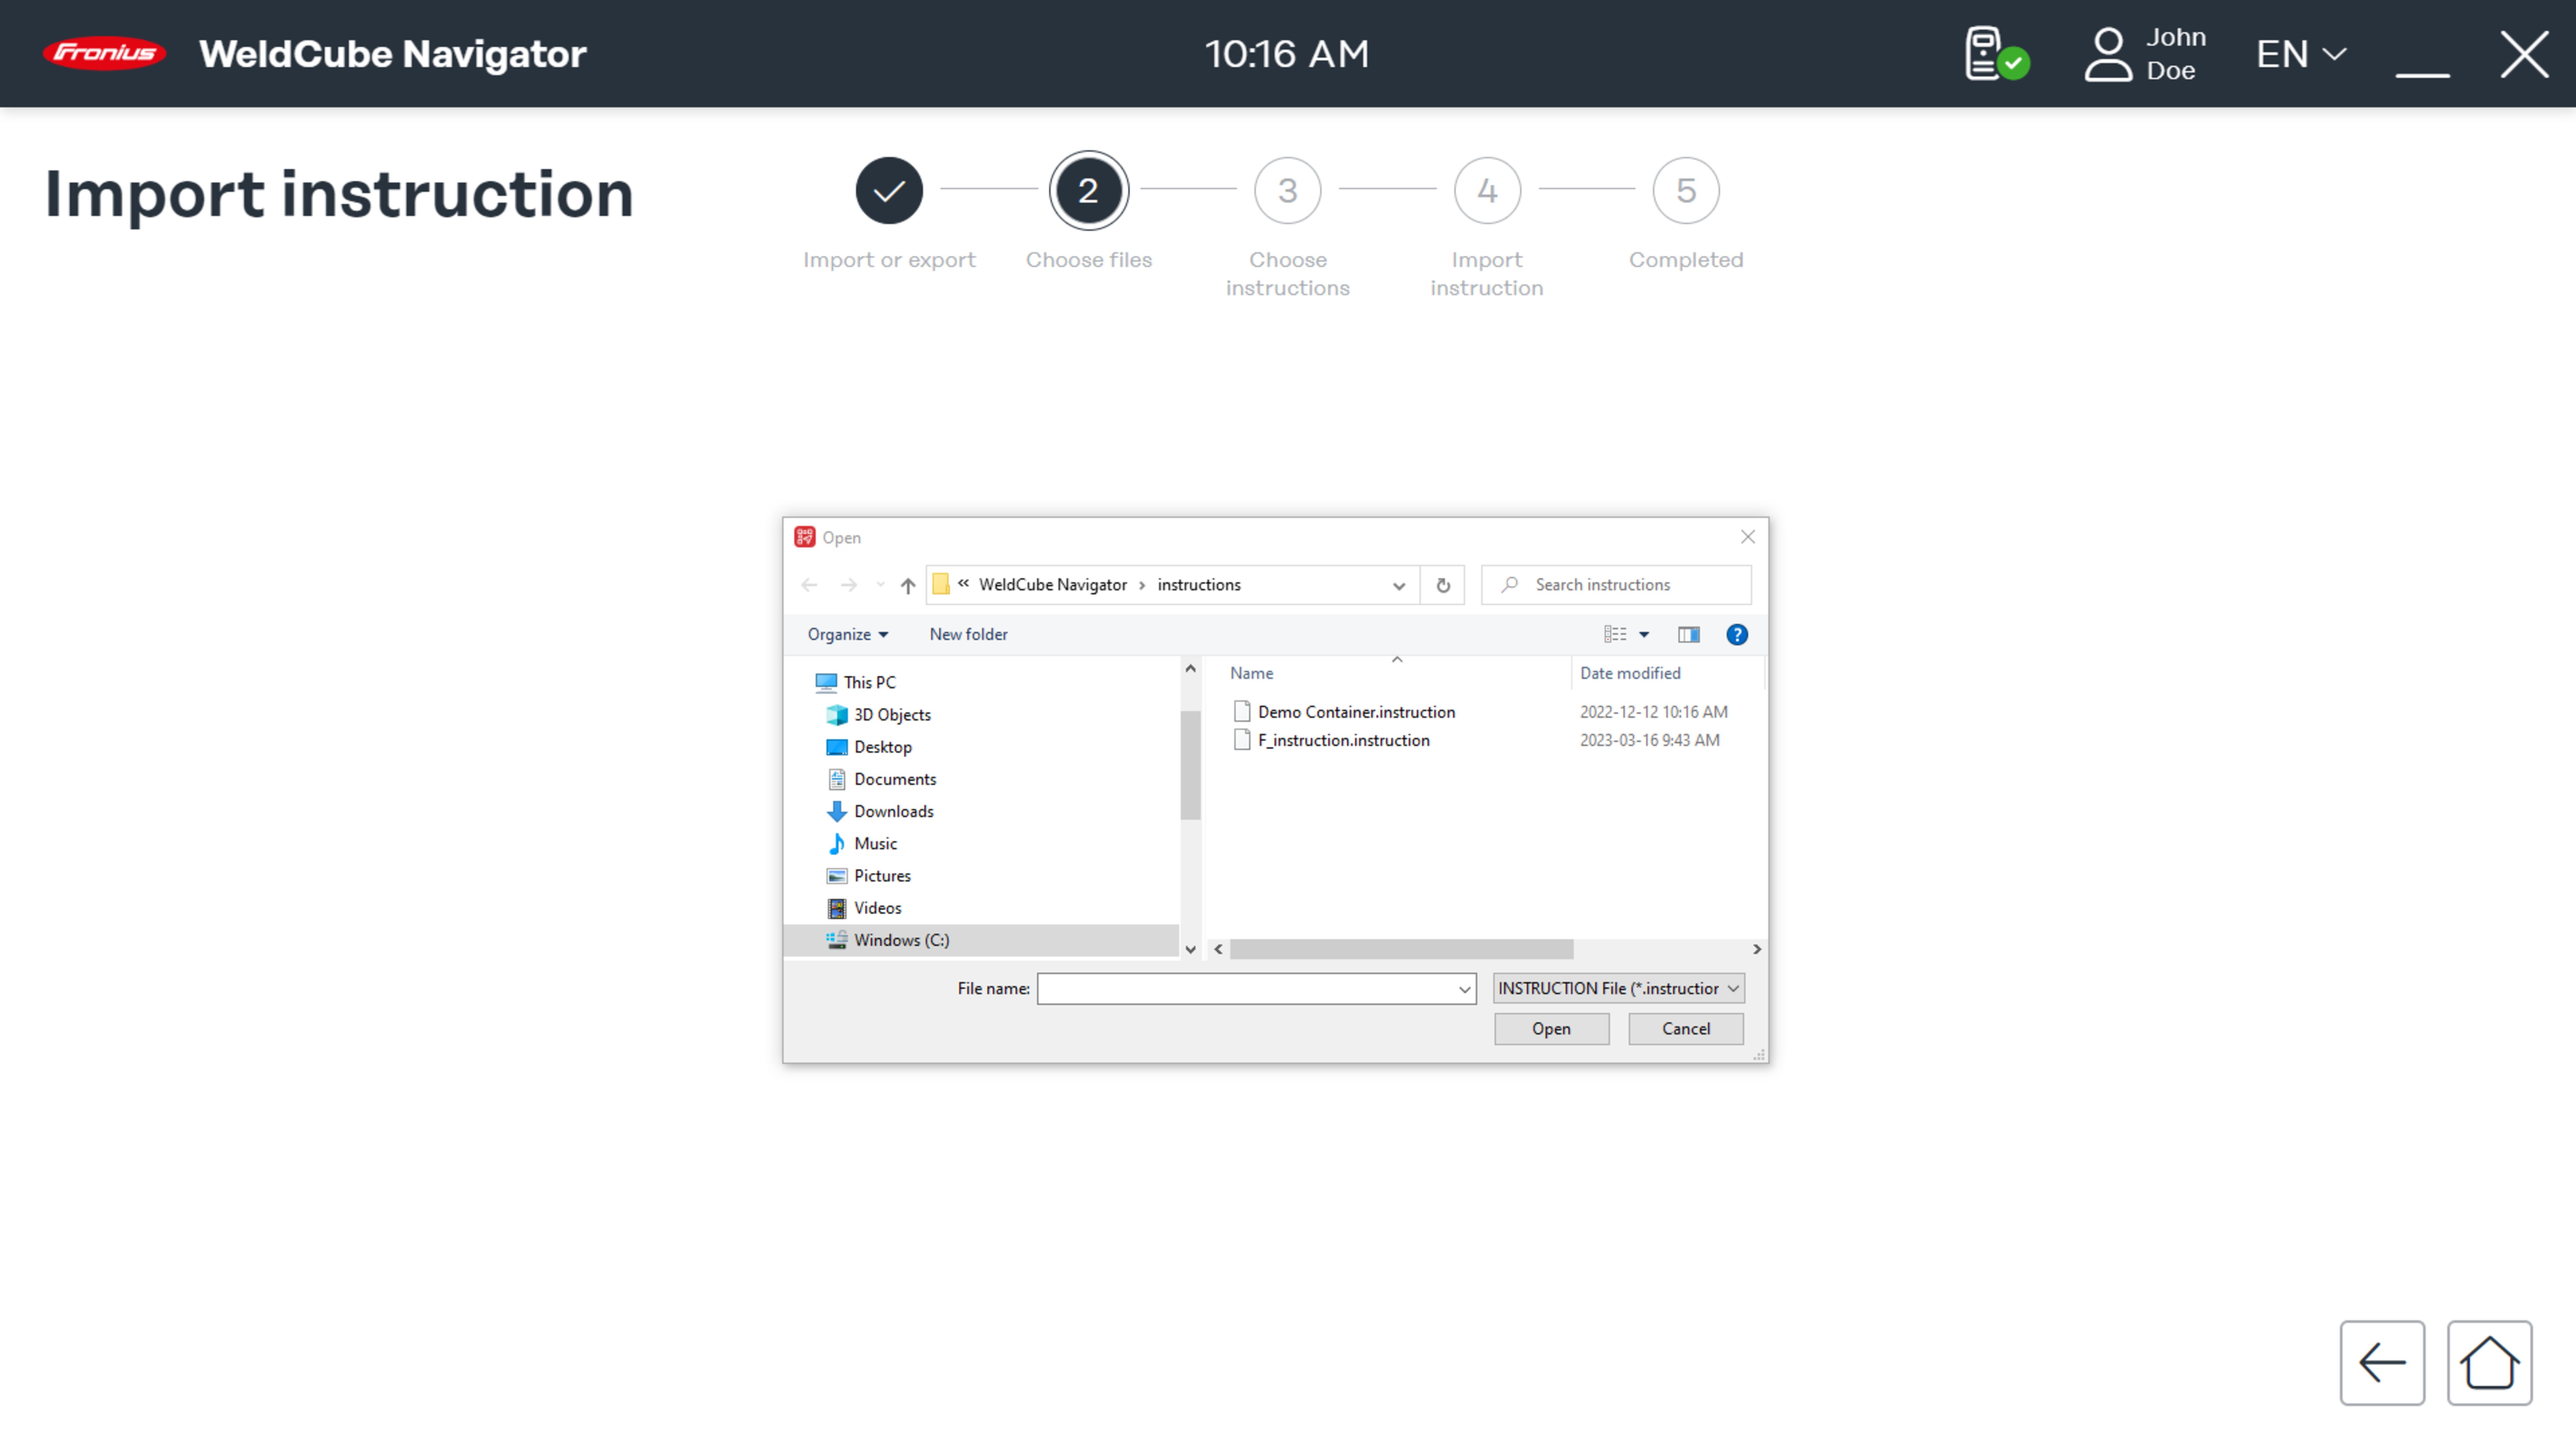
2Select an instruction from a location on the computer and click Open.
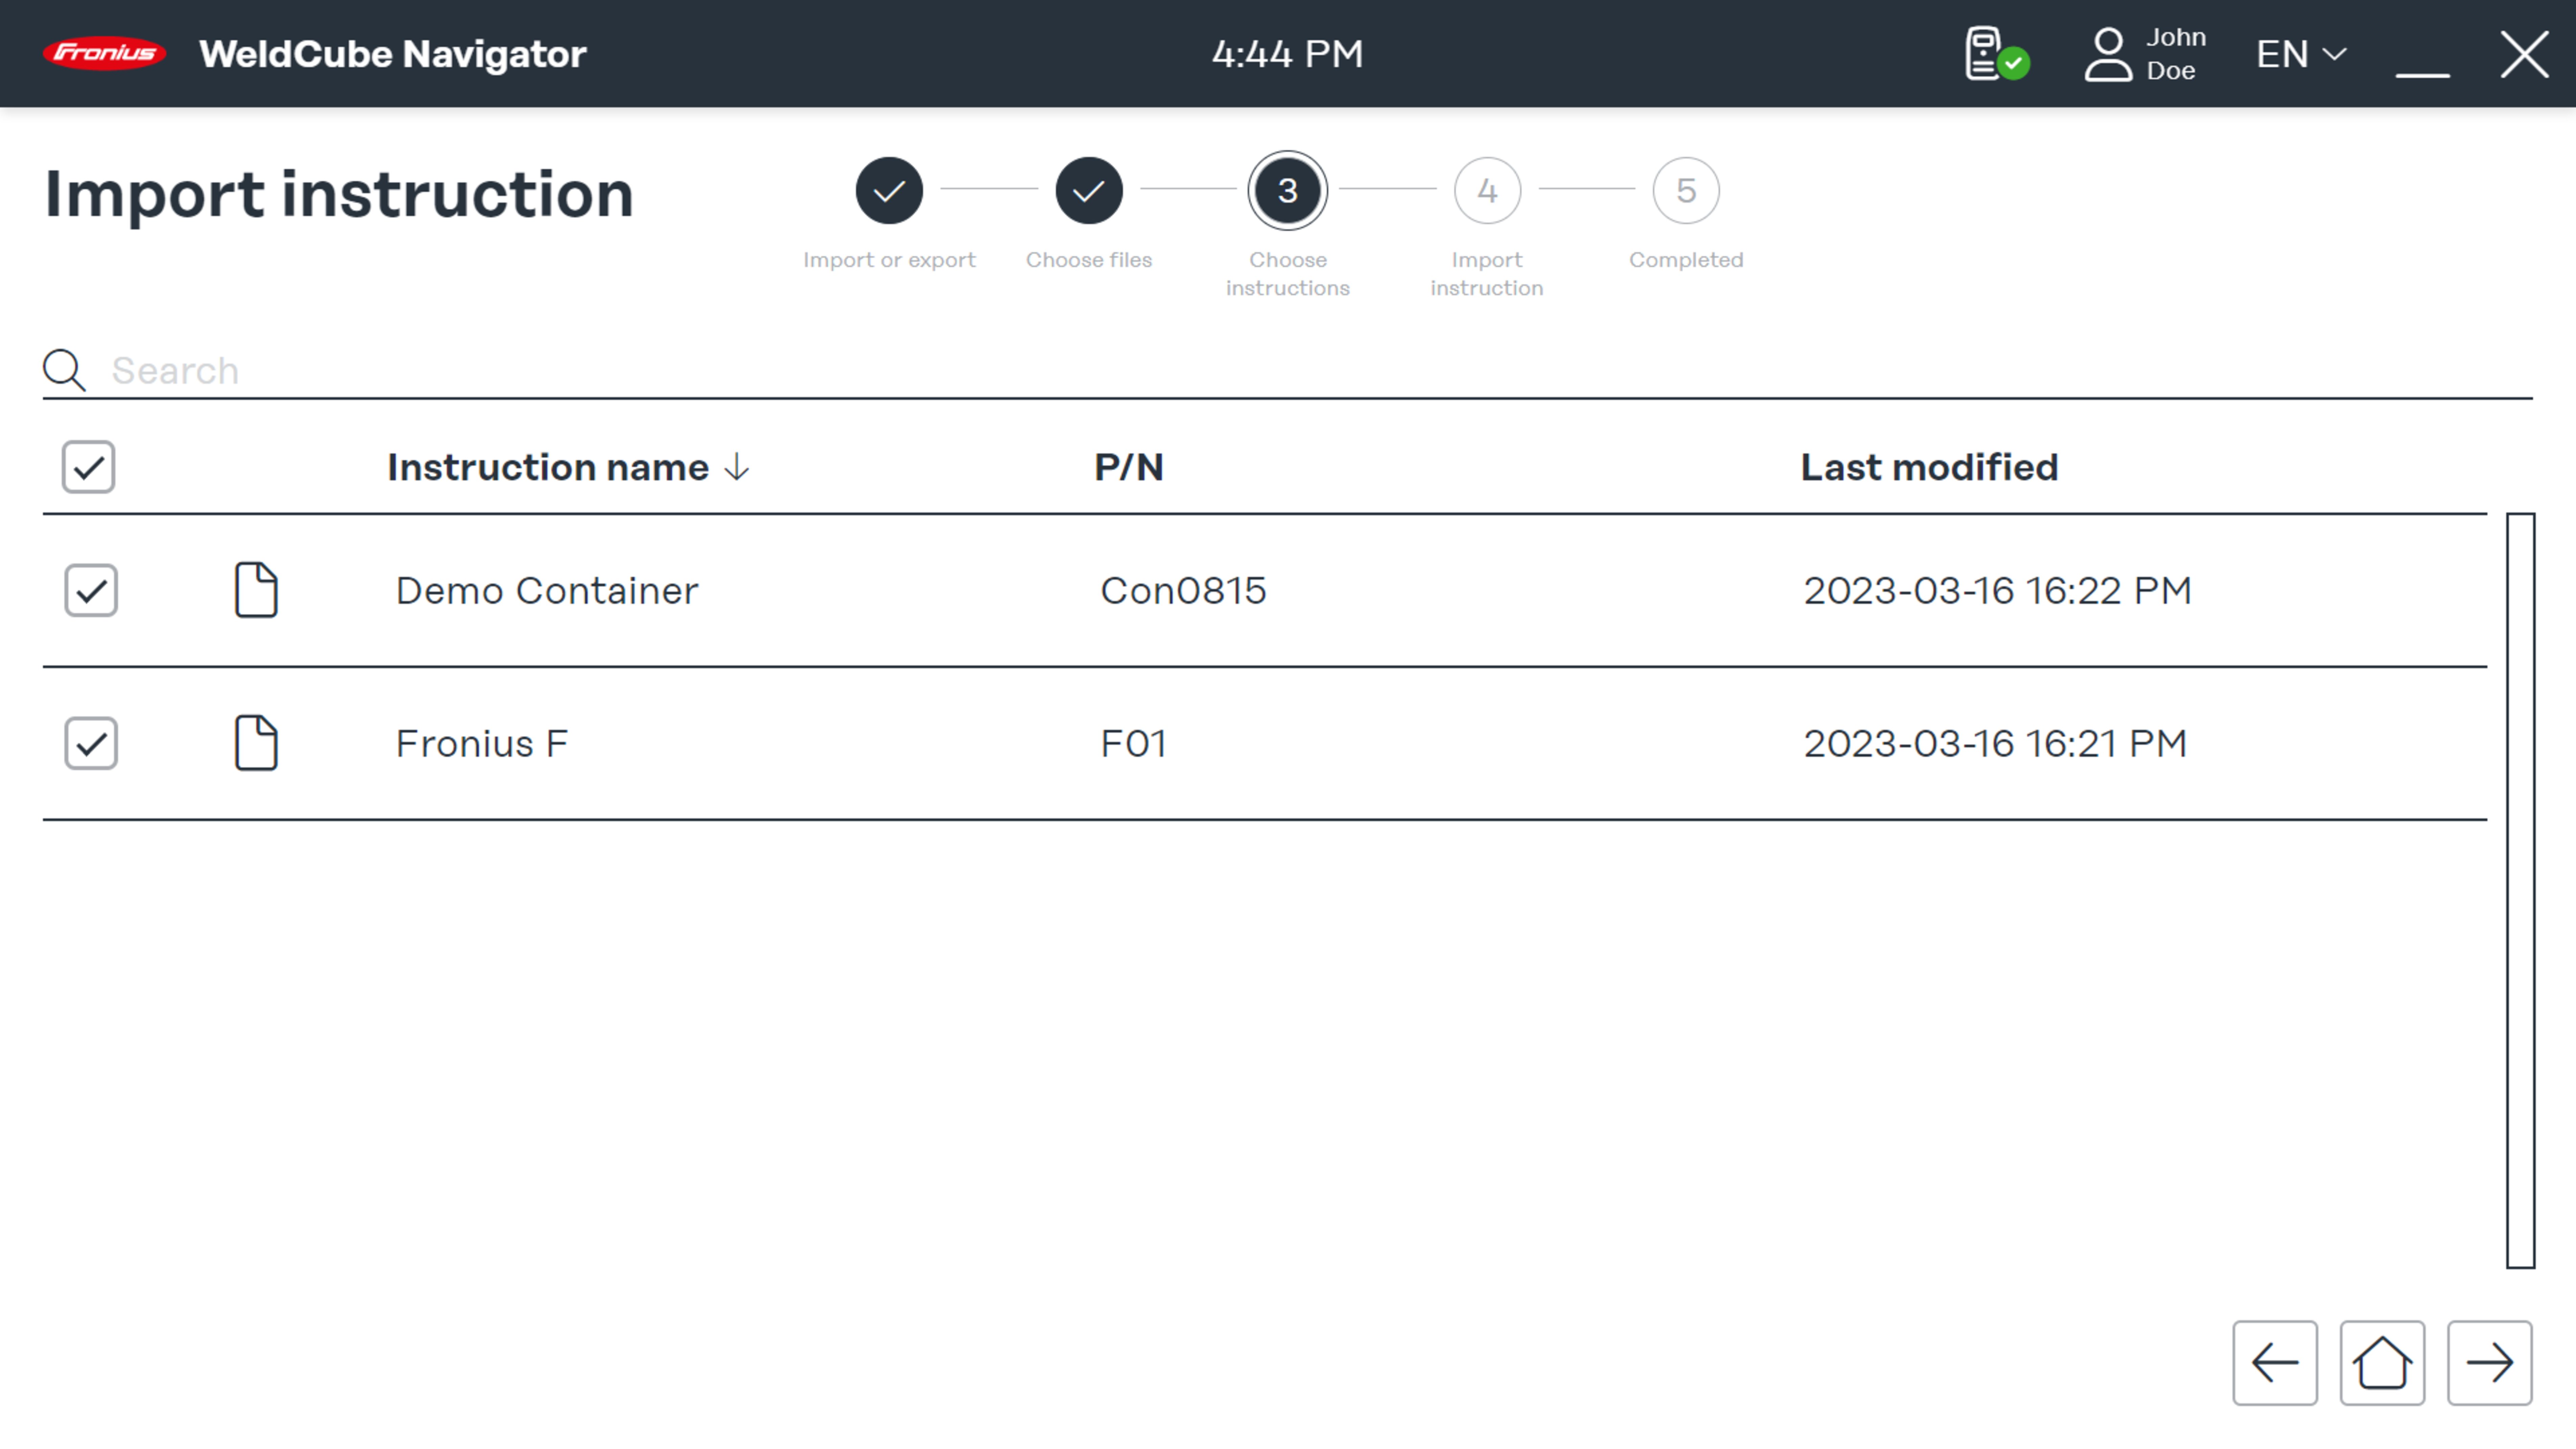
The instructions available in the file are displayed.
3Select one or more instructions and click the right arrow.
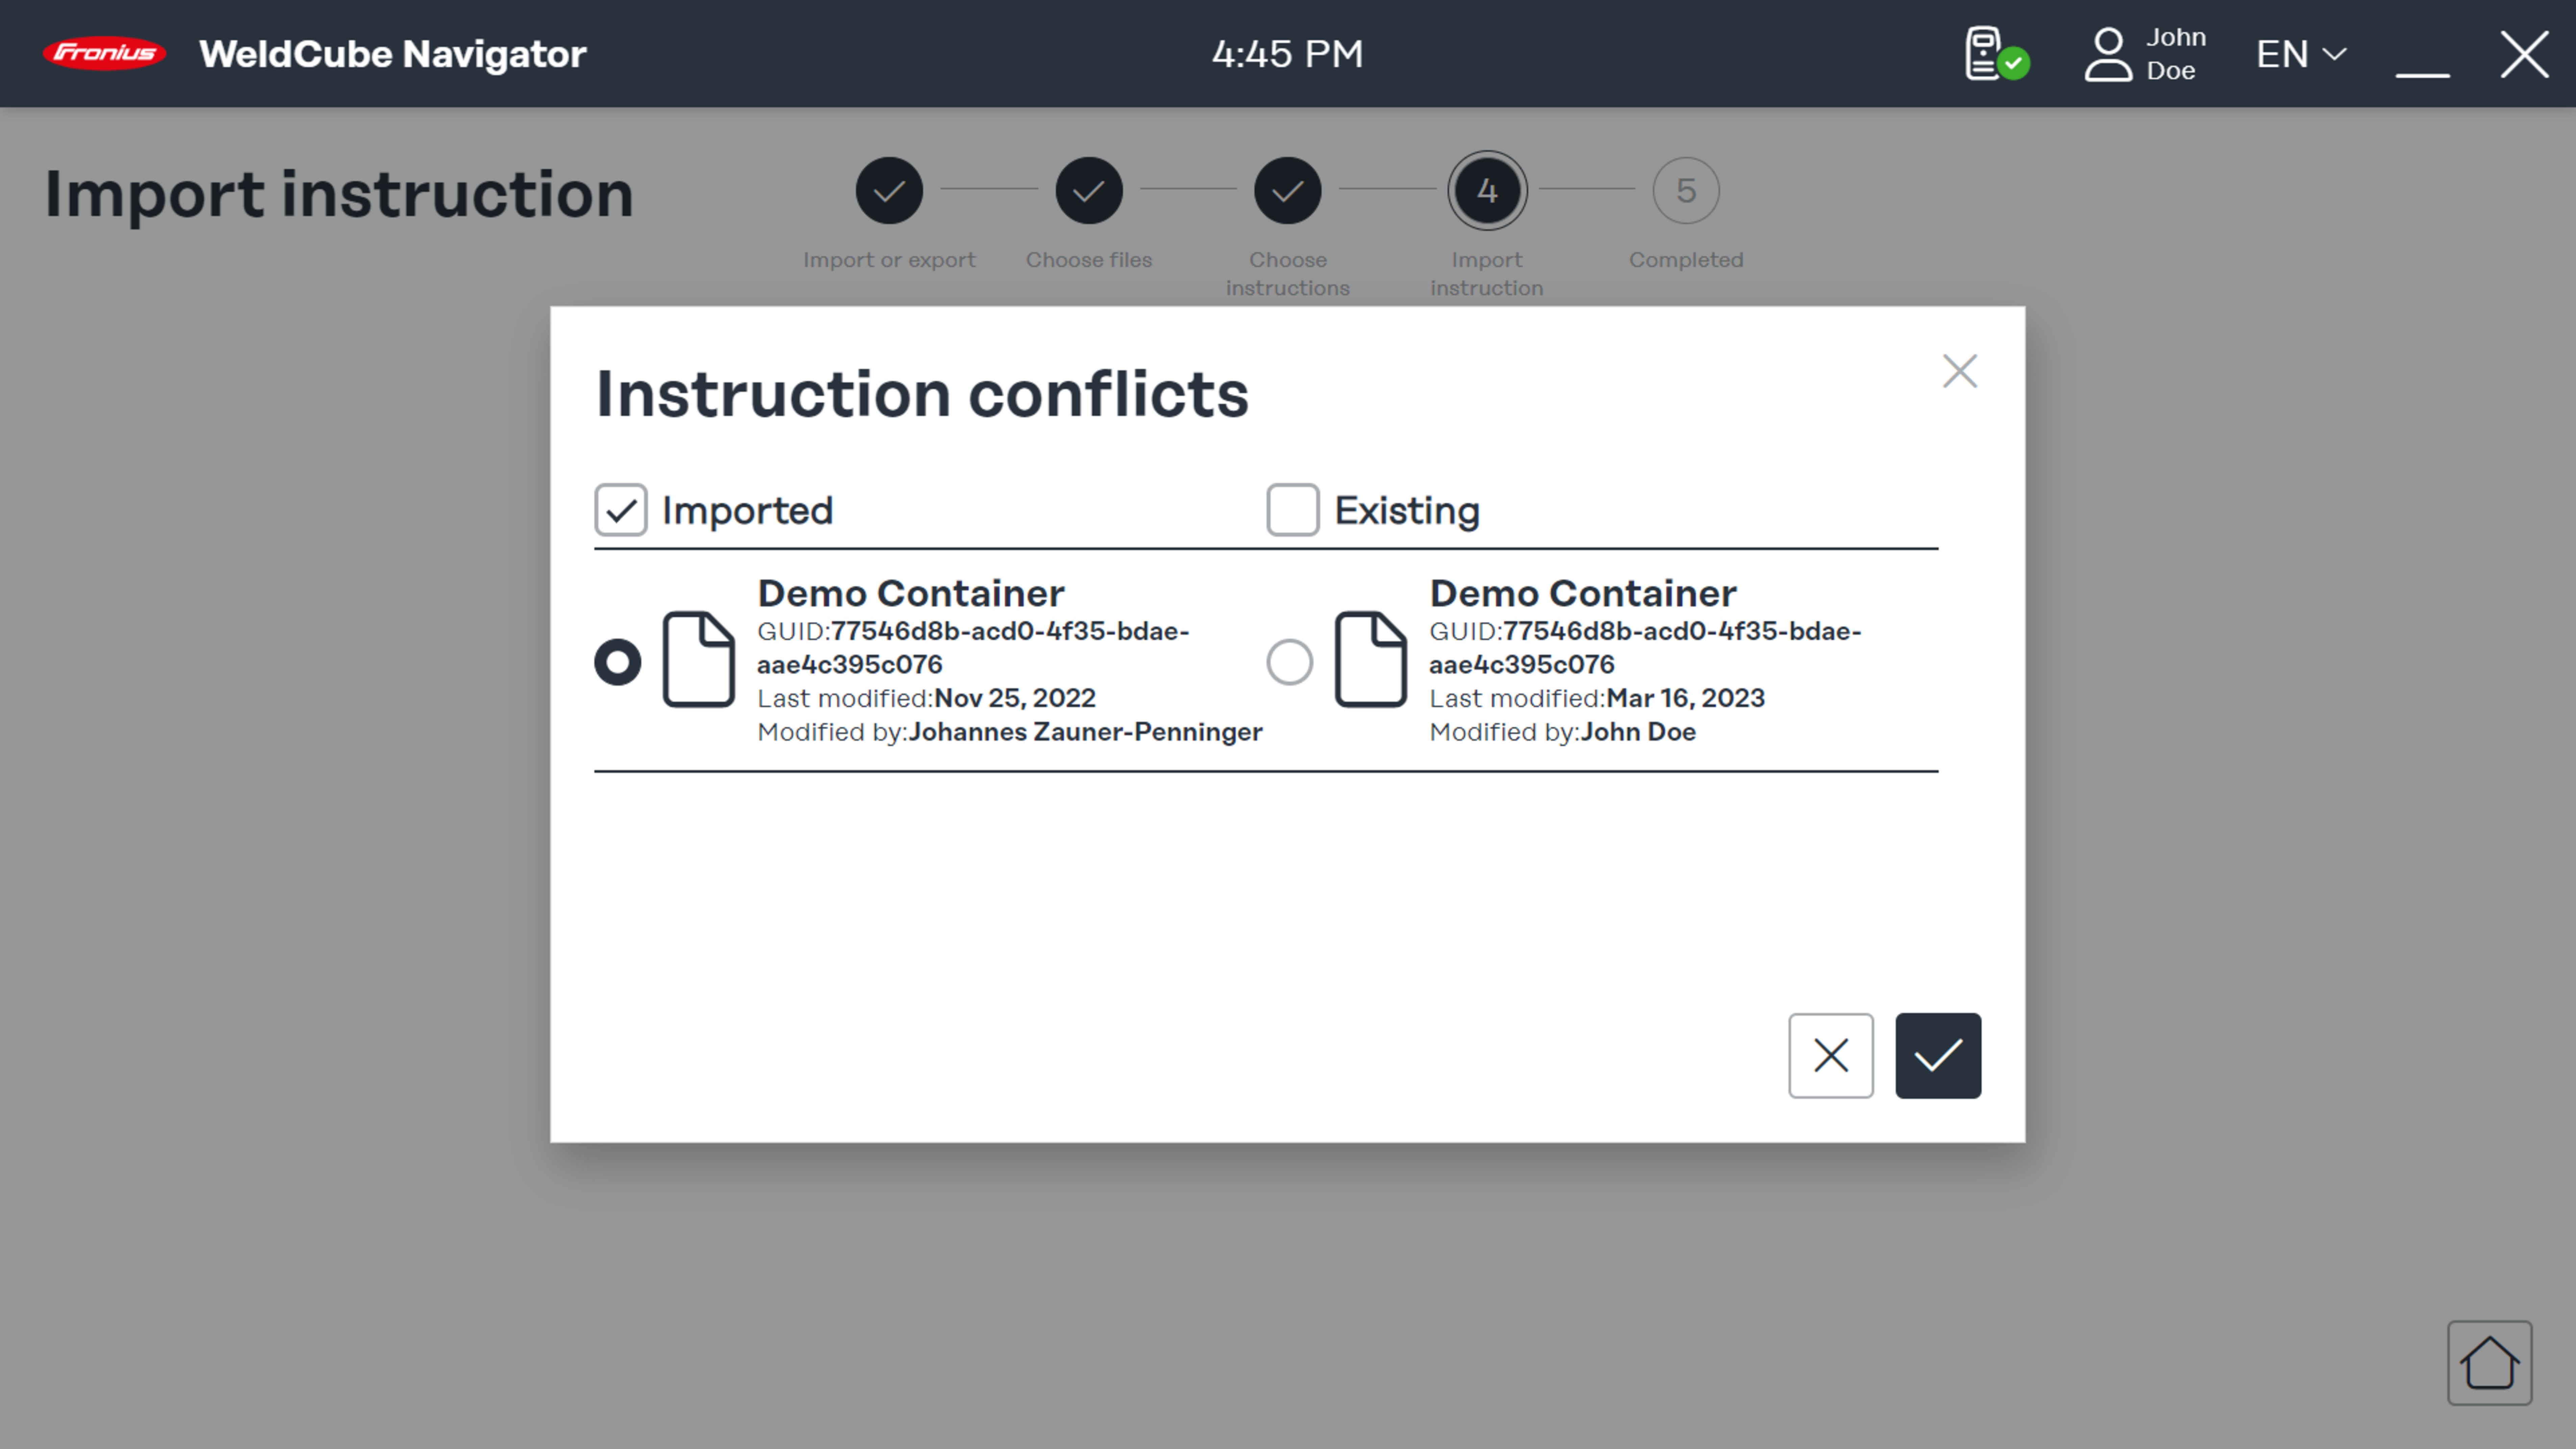
WeldCube Navigator detects when an instruction has already been previously uploaded.
4Select the instruction and choose whether to save the imported data record or the existing data record.
5Confirm selection with the check mark.
The import of the instruction(s) is started

Import status, symbolic representation
The progress of the import process is displayed.

The import process has been completed. The following status codes are displayed:
- Green check mark: Instruction was imported successfully.
- Red exclamation mark: Import could not be performed.
6Click on the house icon to go to the main menu.
Importing and exporting instructions
Importing instructions
In order to distribute instructions to different welding workstations and manufacturing sites, WeldCube Navigator offers the possibility to import and export instructions.
1Click Import instruction.
2Select an instruction from a location on the computer and click Open.
The instructions available in the file are displayed.
3Select one or more instructions and click the right arrow.
WeldCube Navigator detects when an instruction has already been previously uploaded.
4Select the instruction and choose whether to save the imported data record or the existing data record.
5Confirm selection with the check mark.
The import of the instruction(s) is started
Import status, symbolic representation
The progress of the import process is displayed.
The import process has been completed. The following status codes are displayed:
- Green check mark: Instruction was imported successfully.
- Red exclamation mark: Import could not be performed.
6Click on the house icon to go to the main menu.
Exporting instructions
1Click on Export instruction.
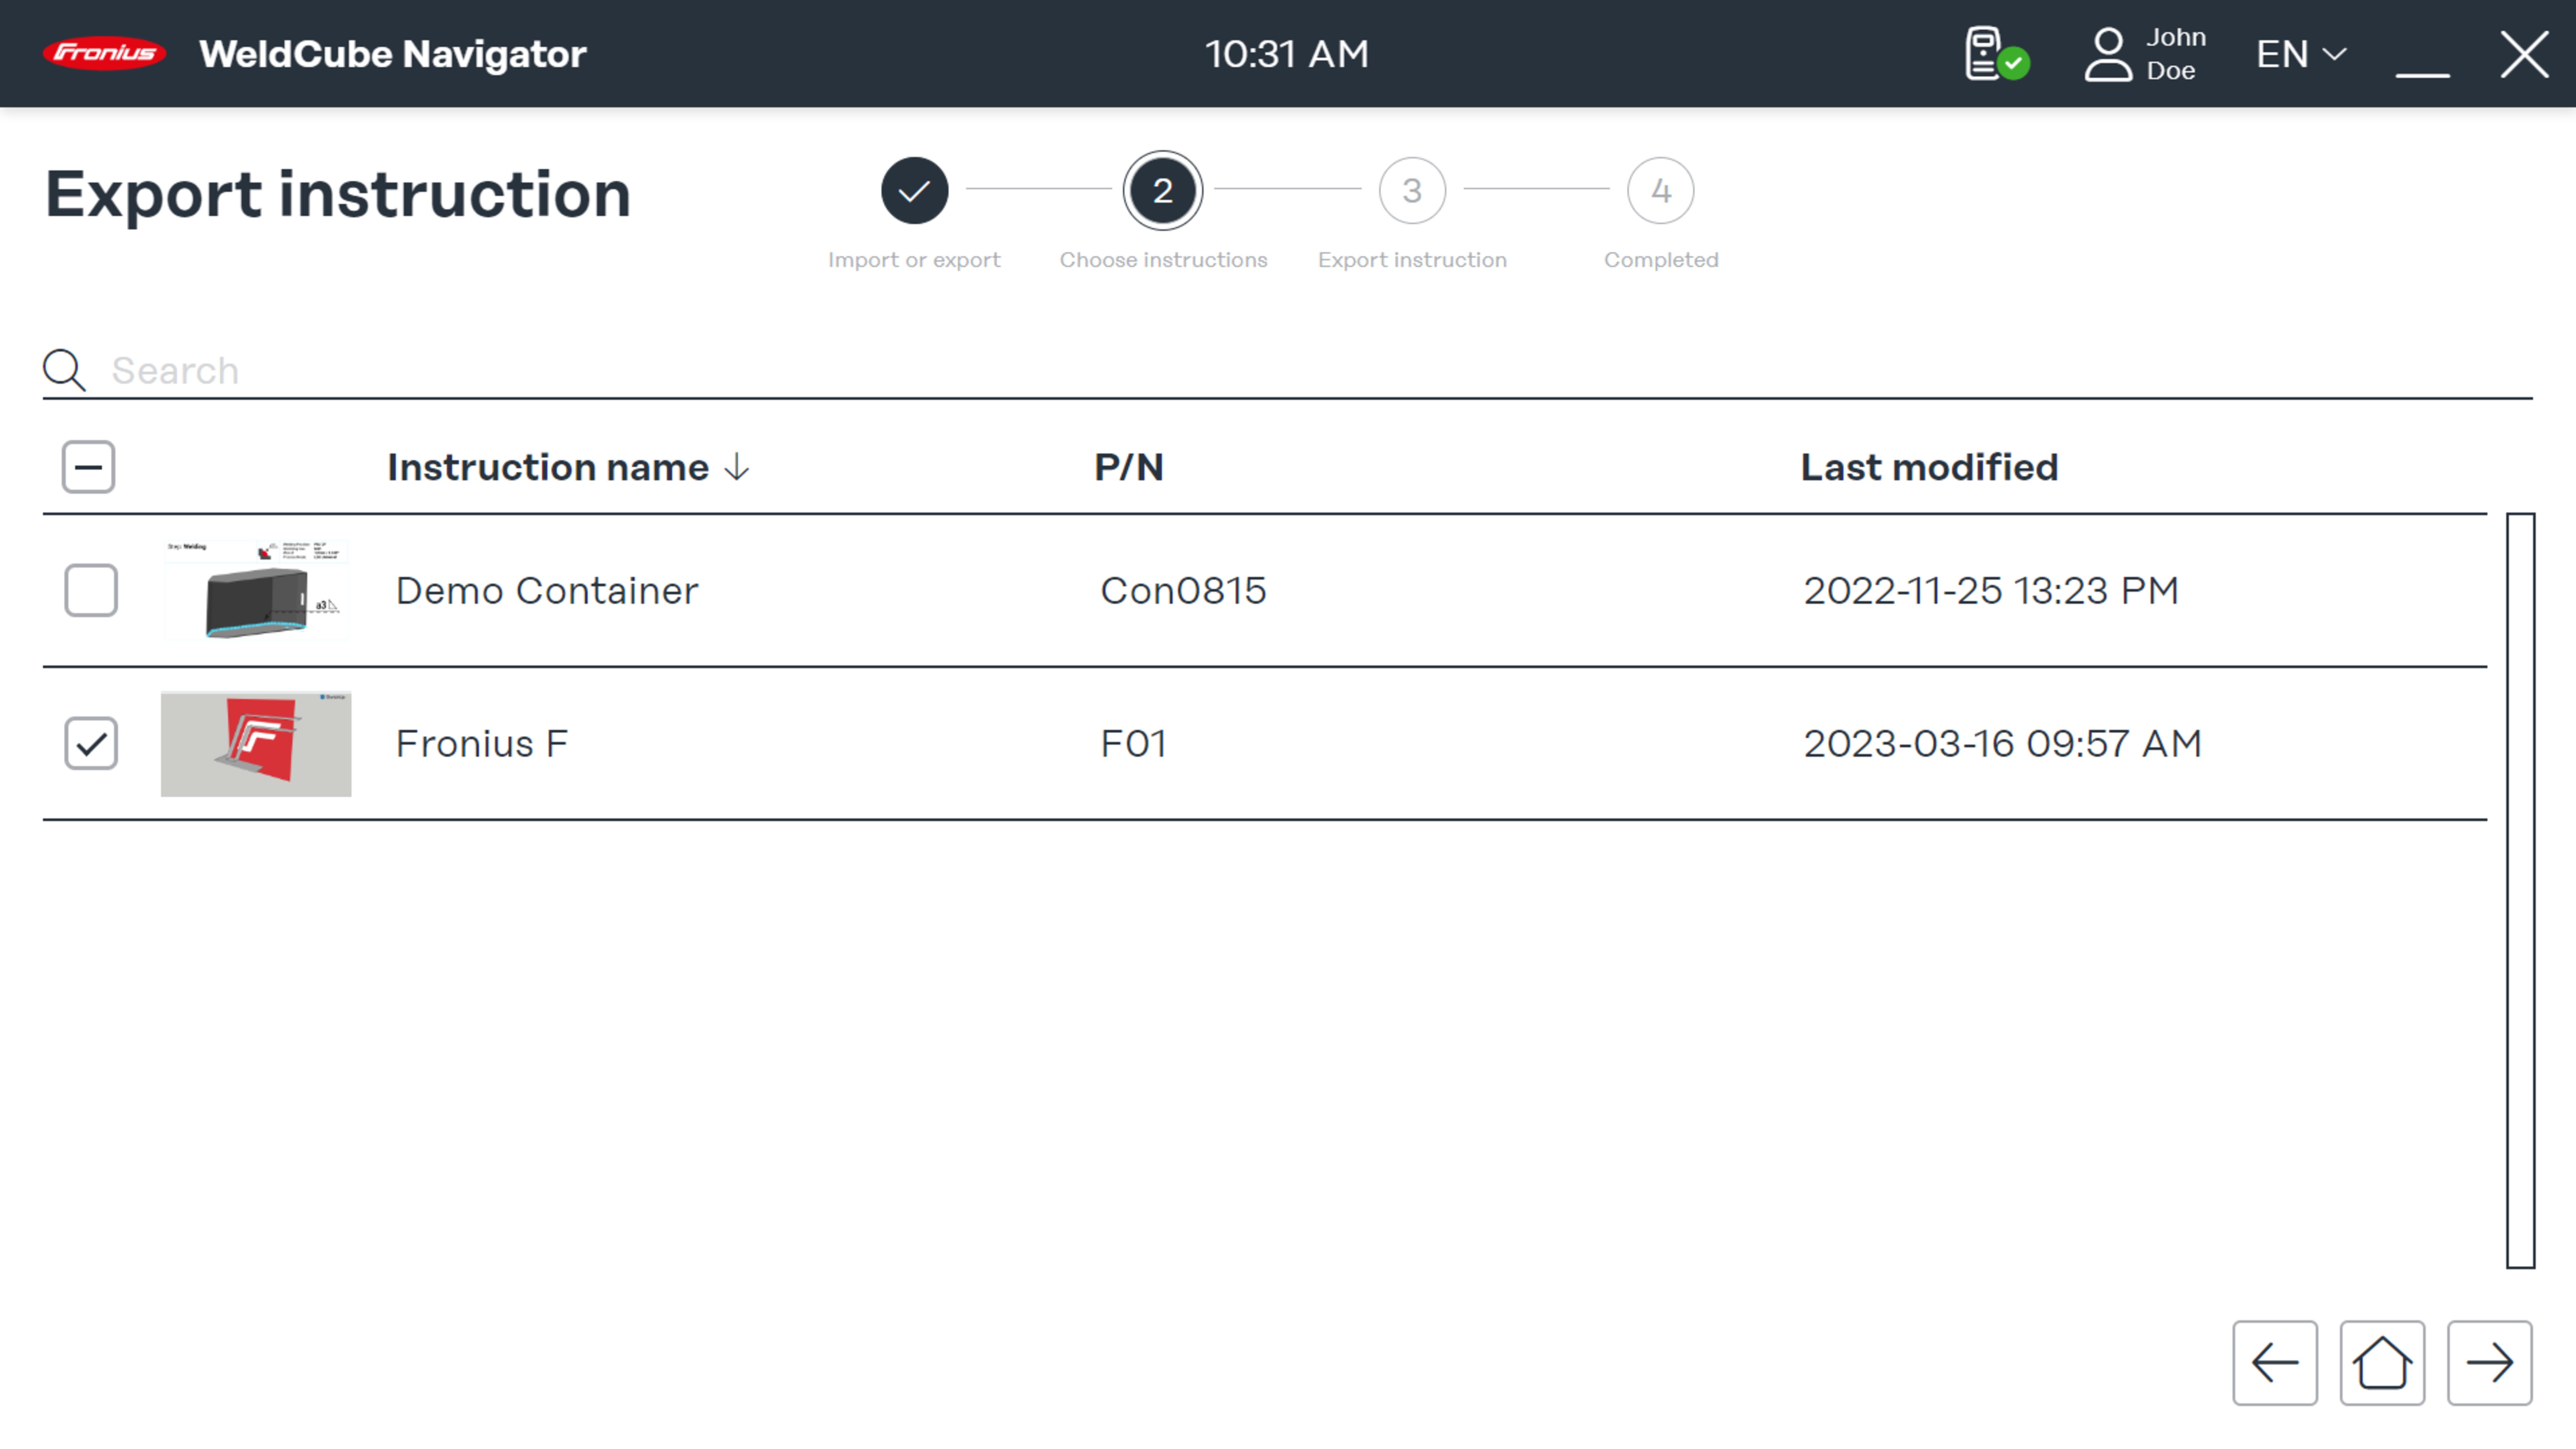
2Select one or more instructions from the overview.
3Click the right arrow.
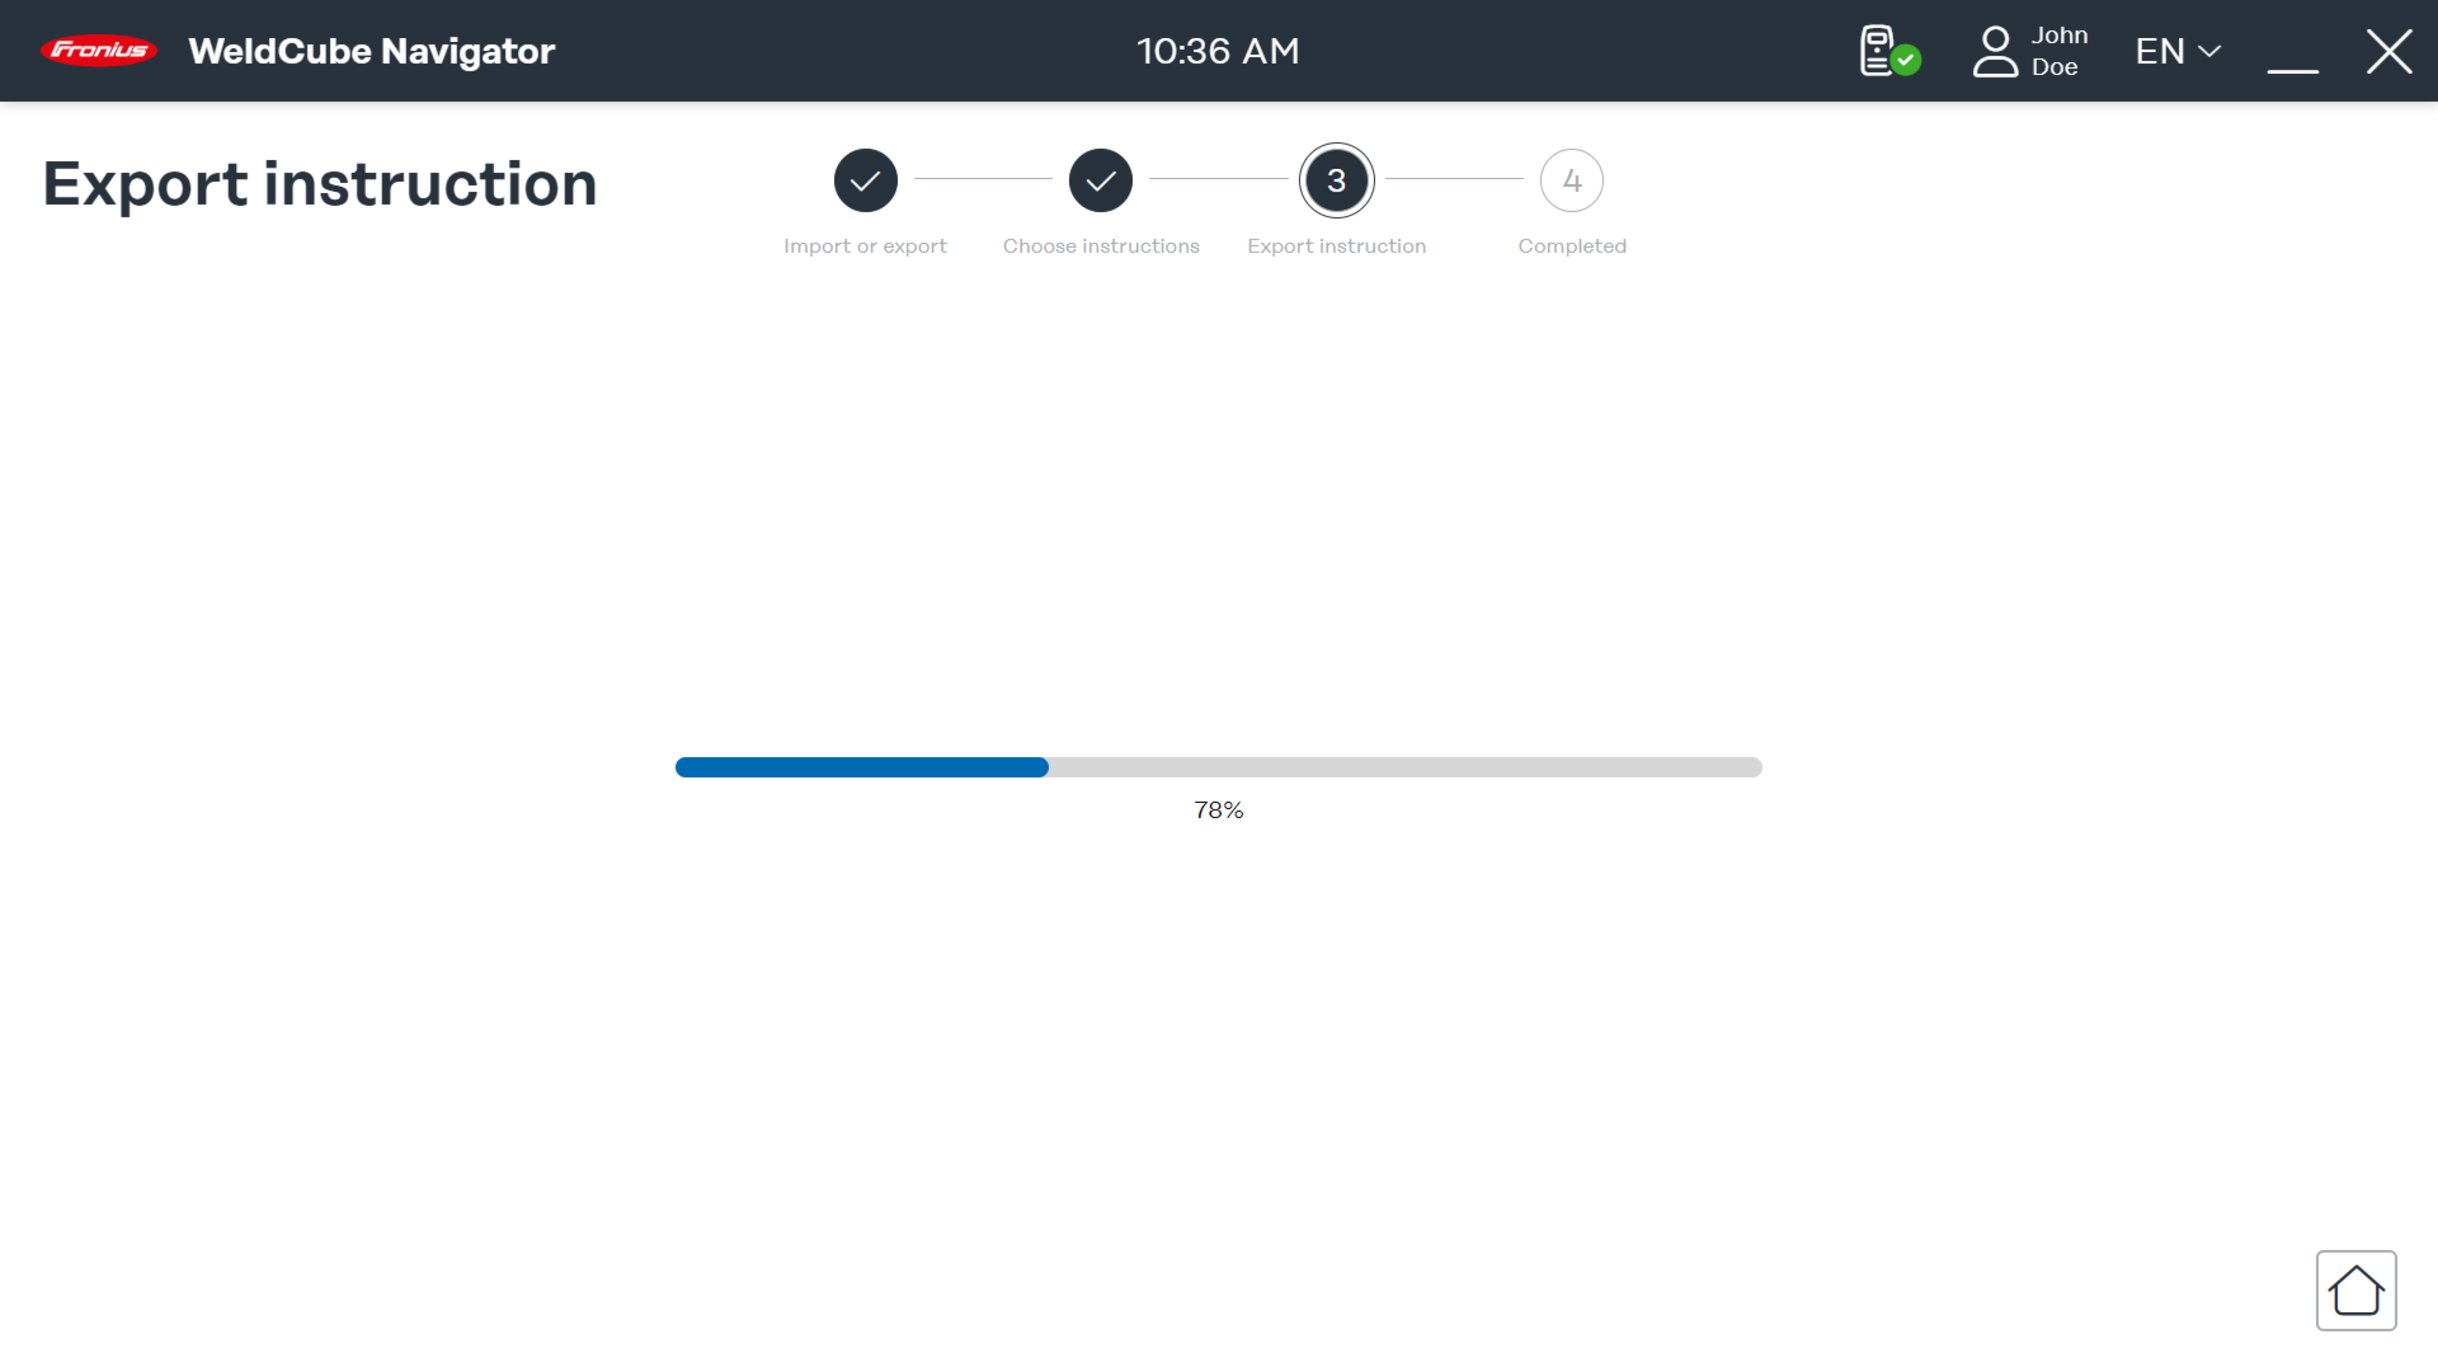
WeldCube Navigator now compiles the file for export. The progress of the process is displayed.
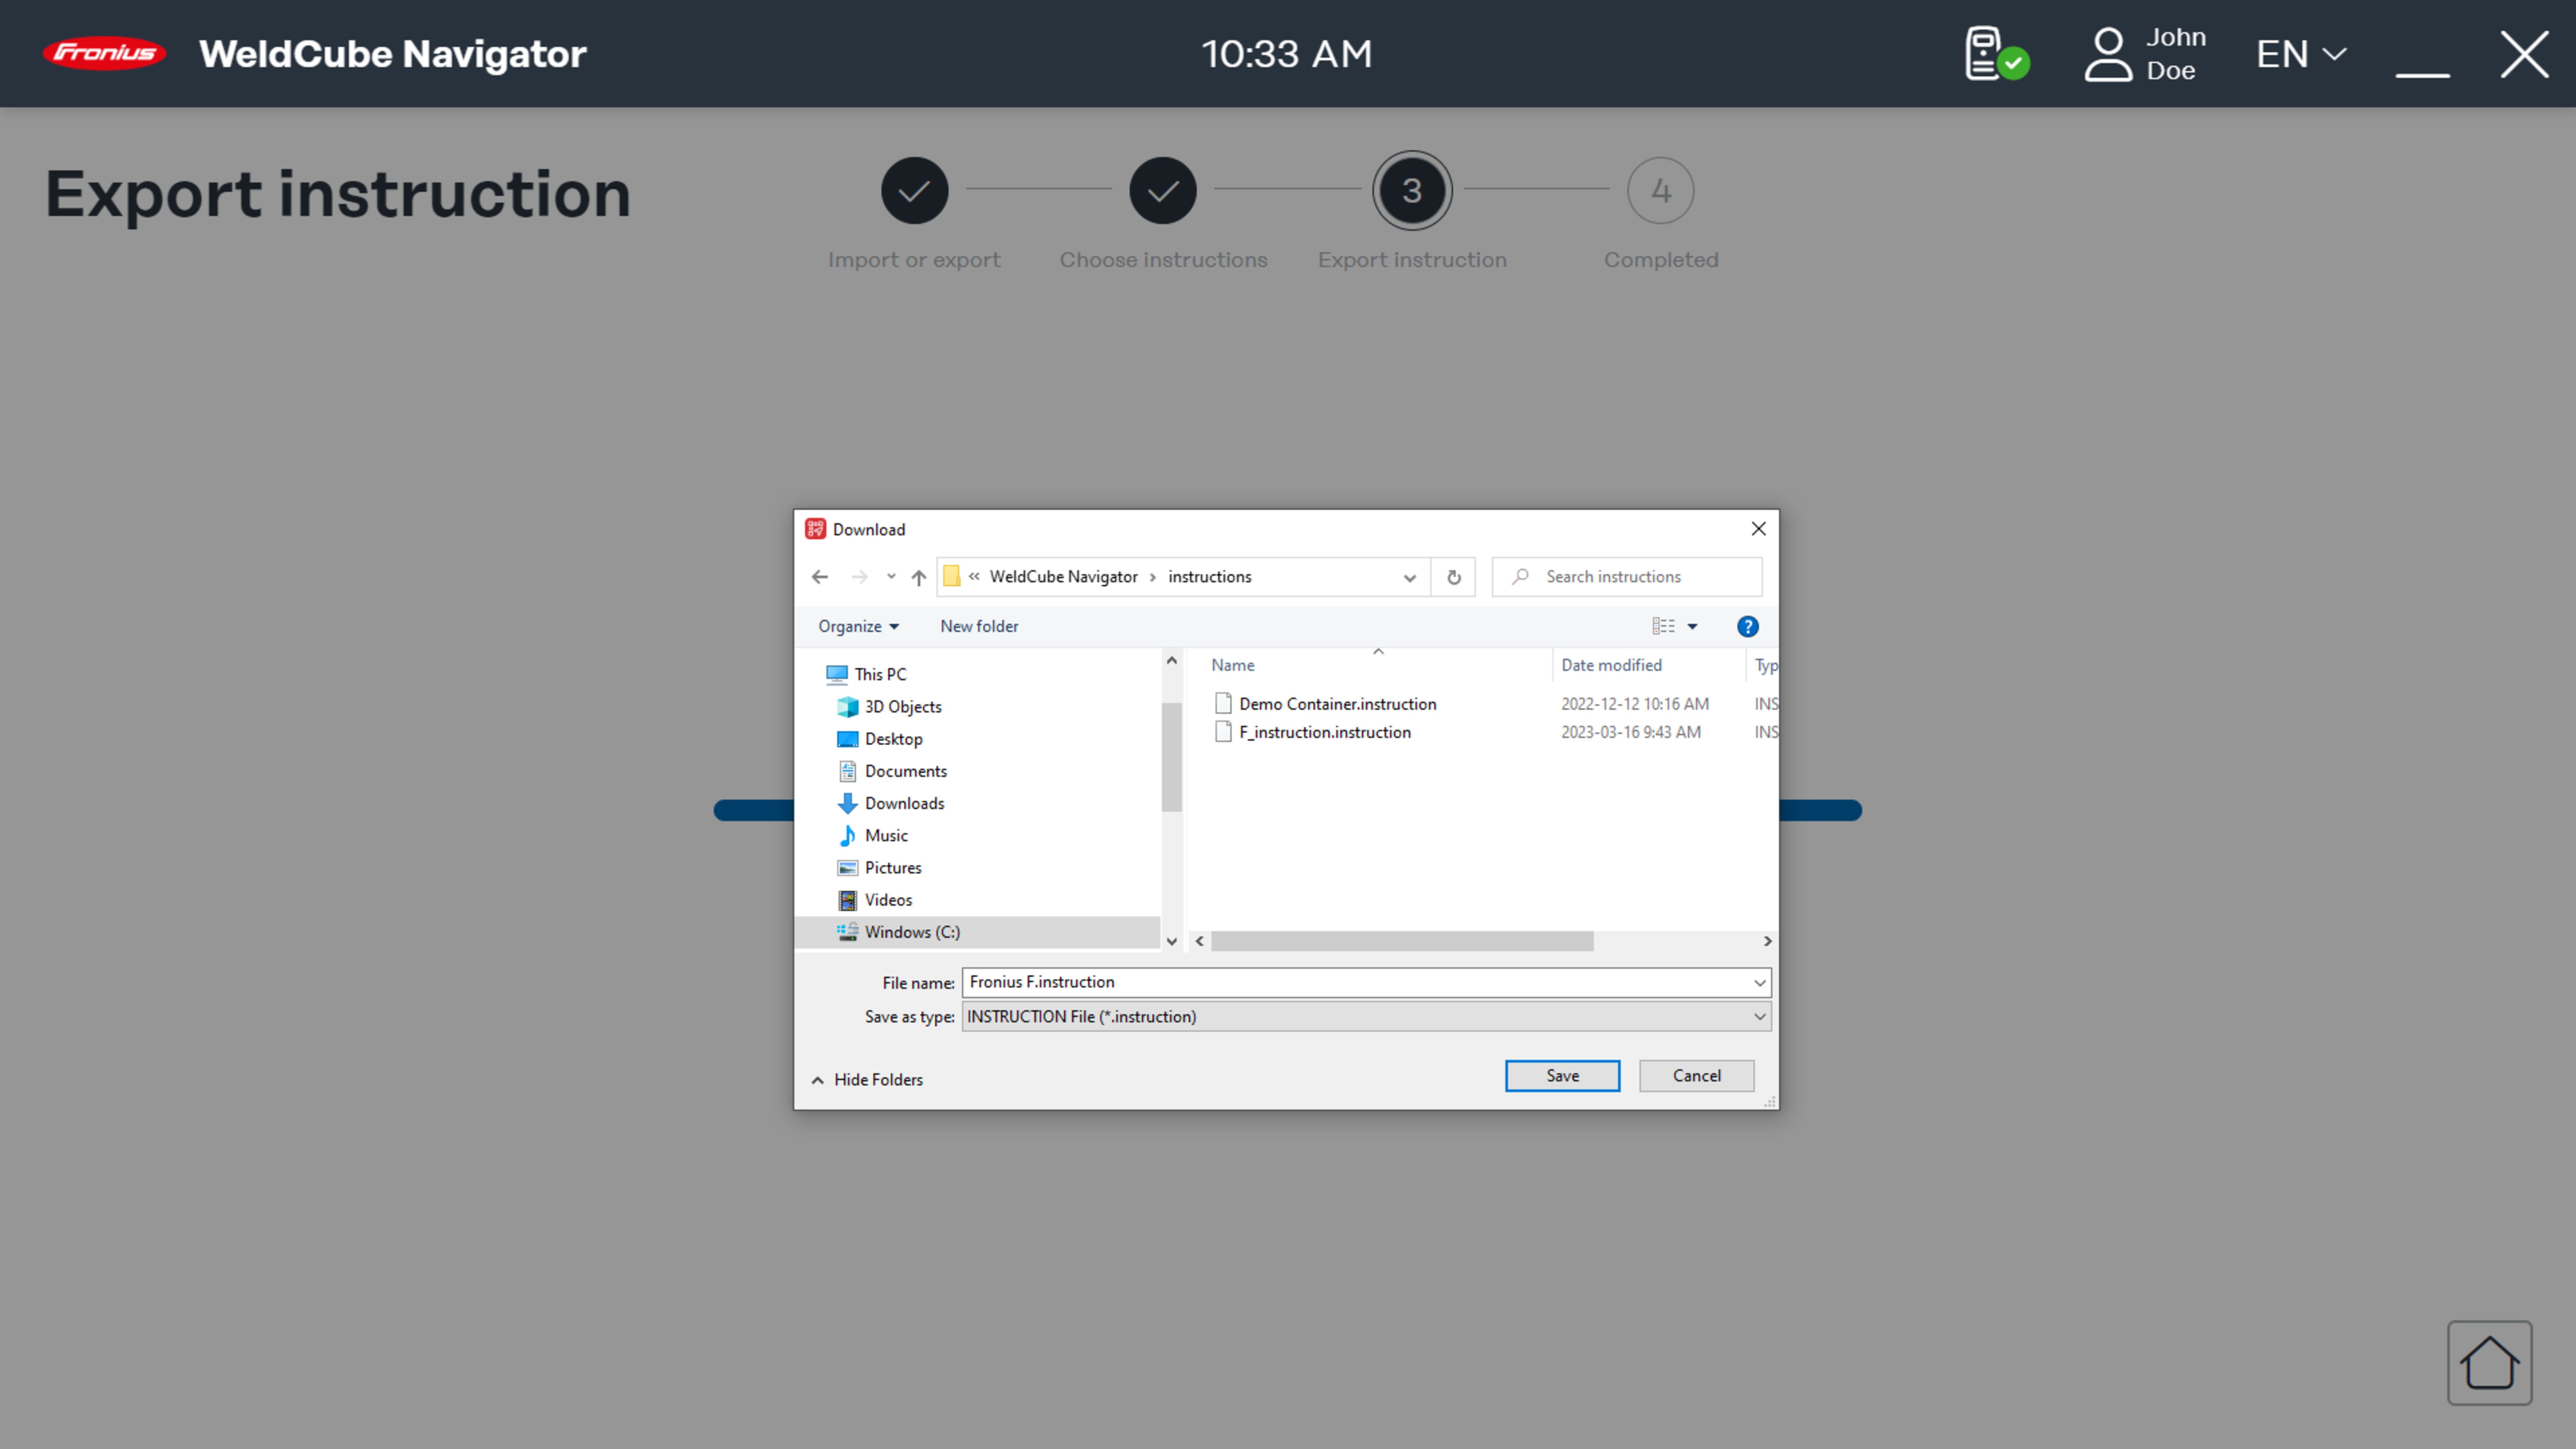
4Select a location for the file and click Save.
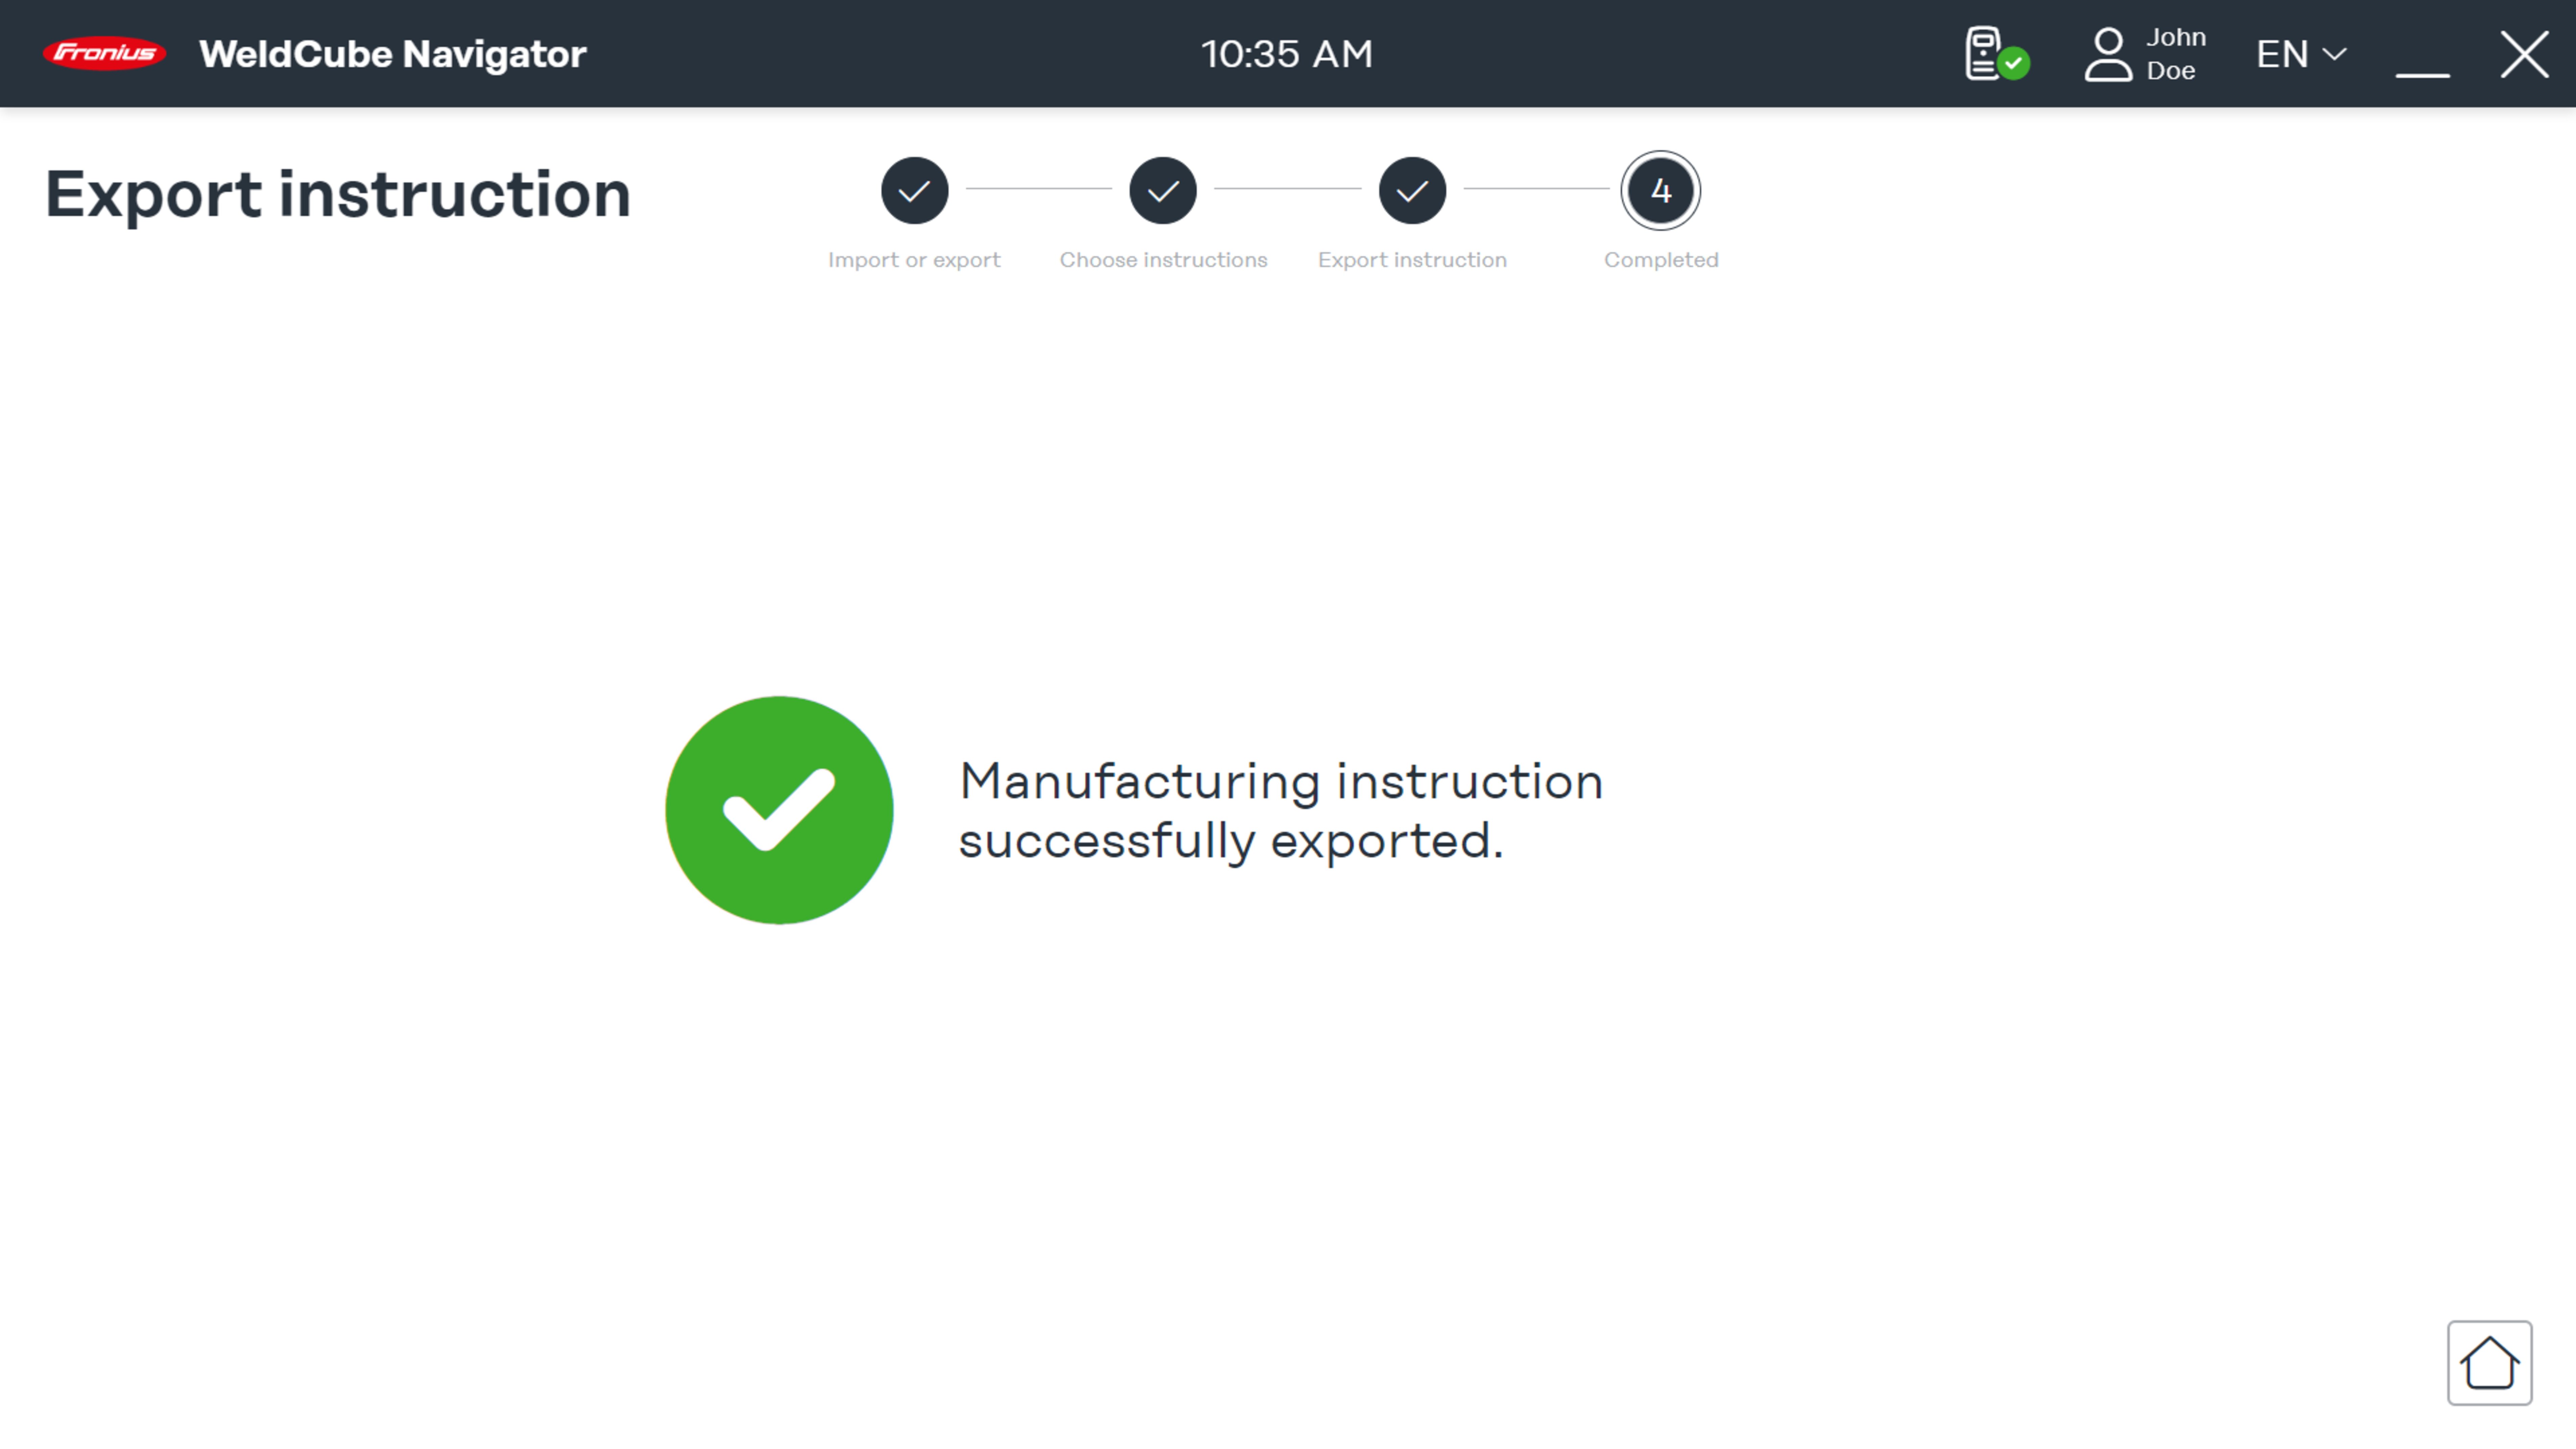
The export process has been completed. The following status codes are displayed:
- Green check mark: Instruction was exported successfully.
- Red exclamation mark: The exported instruction could not be saved.
5Click on the house icon to go to the main menu.
Welding settings
Selecting job per weld
- When working through the welding instructions, the welding parameters for each manufacturing step are automatically preset in WeldCube Navigator.
- The basis for this are the jobs that are created in the SmartManager for the welding machine.
- When creating an instruction in the editor, a job number is assigned to a manufacturing step.
- The selected job can be edited.
To do this, proceed as follows:
1Enable the option OPT/i Jobs (TPS/i, iWave) or OPT/i Jobs (Fortis) on the welding machine.
2Click on Edit job. The SmartManager for the welding machine opens.
3Make changes in the SmartManager and save them.
4Close SmartManager and return to WeldCube Navigator.
Alternatively, it is also possible to edit the job in the WeldCube Premium software:
1Connect to WeldCube Premium via the Settings menu.
2Click on Edit job. WeldCube Premium opens.
3Make changes and save them.
4Close WeldCube Premium and return to WeldCube Navigator.
Defining error behavior
The aim of active monitoring of the instructions that are processed in the sequencer is to detect errors and deviations and to react accordingly. With the Lock on error function, a lock in the event of an error can be set individually for each manufacturing step.
The following actions are triggered when the function is active:
- WeldCube Navigator blocks further processing in the sequencer if errors such as limit violations occur.
- The welding supervisor must acknowledge the error using an NFC card on an external NFC reader or alternatively via the API.
When all errors have been acknowledged, processing can be continued.
NOTE!
The OPT/i Limit Monitoring option is a prerequisite for evaluating limit value violations. It is not available for welding machines from the Fortis series;
on these systems, only welding machine errors and welding process errors are detected.
Software settings
Re-registration
Re-registration allows, for example, multiple users to edit a welding instruction. In doing so, note the following:
- If another user logs on to the system using the NFC card, the previously logged in user is logged out.
- This re-registration can be seen in the documentation for a welding instruction.
- The data of both users are recorded.
- The function is available for the user groups "User" and "Administrator".
- "Local Administrators" cannot be logged out of the software by re-registering other users.
Backing up and restoring data
It is recommended to back up the WeldCube Navigator application data stored on the computer at regular intervals. To perform a backup, the logged-in user must have administrator rights. Data backup is required for the following scenarios:
- New installation, for example after hardware or software changes to the control unit.
- If the database path is changed during a new installation, copy the Database.db file separately and save it in a safe location.
- Restore application data with the same system configurations, for example after a system crash.
- Restoration of application data can be performed only on the software version for which a backup is available.
- Therefore, when backing up, always back up the current installation file as well.
- If the software version has changed, run the backed up installation file and reinstall WeldCube Navigator.
Backing up data:
1Open the Services program in Windows.
2Select the WeldCube Navigator Service process from the list and terminate it.
3In the Explorer, call up the path C:\ProgramData\Fronius\WeldCube Navigator.
4Copy and paste the Service\CertificateStore and Service\database folders as well as the current installation file to a secure location.
5Select the WeldCube Navigator Service process in the Services program and click Start.
6Check the process status in the list. This must be set to Running.
Restoring data:
1Open the Windows program Services with administrator rights
2Select the WeldCube Navigator Service process from the list and terminate it.
3In the Explorer, call up the path C:\ProgramData\Fronius\WeldCube Navigator.
4Copy the Service\CertificateStore and Service\database folders from the secure location and paste them in the path.
5Select the WeldCube Navigator Service process in the Services program and click Start.
6Check the process status in the list. This must be set to Running.
NOTE!
Restoration of application data can be performed only on the software version for which a backup is available.
Run the saved installation file and reinstall WeldCube Navigator if the software version has changed.
Maintenance
Updating and troubleshooting
Updating WeldCube Navigator
Fronius releases regular updates for WeldCube Navigator to improve functionality and fix any errors that occur. These are available on the Fronius website in the DownloadCenter.
Updating and troubleshooting
Updating WeldCube Navigator
Fronius releases regular updates for WeldCube Navigator to improve functionality and fix any errors that occur. These are available on the Fronius website in the DownloadCenter.
Updating WeldCube Navigator
Fronius releases regular updates for WeldCube Navigator to improve functionality and fix any errors that occur. These are available on the Fronius website in the DownloadCenter.
Fronius Support team
For WeldCube Navigator, Fronius offers remote support to help customers install, commission, and configure the software. Remote support is the first point of contact for faults and errors that may occur in the software.
IMPORTANT!
To assist in resolving queries, please include the following information in any support requests to Fronius:
- Current log files for the software that are available for download via the System information menu (seeSystem information)
- Firmware versions of the connected welding system